While web development trends may come and go, one thing is certain: websites will always have a need for speed.
In this guide, we are going to share with you a treasure trove of WordPress speed secrets you can (and should) use to keep your visitors happily clicking around and interacting with your site.
We launched Rapyd Cloud for just this reason: speedy WordPress hosting specifically for dynamic WordPress sites where users frequently interact.
We won’t focus only on dynamic sites here, though, but rather all kinds of WordPress sites.
After all, speed isn’t a bonus for websites, it’s the entire point — letting people connect instantly over the internet.
Speed Up WordPress Site – Why is it a Necessity?
The ideal page load speed for any website is anything less than 3 seconds. Longer than that, and the visitor staring at your loading icon starts to get annoyed.
Imagine it yourself: Count 1… 2… 3… Gone, and never to return, right? It’s funny how that works, when before the internet people would happily wait a week or longer for a letter to arrive in the post.
But like it or not, that’s what we as web maestros are working with. If your site doesn’t load in a flash, you might as well pack it up or content yourself with a tiny fraction of your site’s potential.
This number isn’t just a hunch; it was studied by Google and presented in 2016. And ask yourself, with all the misery that exists in this world, do you really want to add to it by launching a clunky website that makes people frustrated or angry?
- User experience: Slow sites don’t just suck. They really ought to be considered “broken”, like a tap that merely drips. Poor load time is one of the top contributing factors to high bounce rates, second only to having a downright ugly website.
- SEO ranking: Google added site speed as a ranking factor back in 2010 and other search engines like Bing also use load time as a key ranking signal.
- Increased sales conversions: The quicker your site, the more likely people are to become customers of whatever products or services you might be selling.
- Higher traffic potential: A well-optimized site is able to handle higher workloads and, thus, serve more traffic.
- Accessibility: Mobile users and those in rural areas don’t always have fast internet, so a quick site ensures wide accessibility.
Now that you know the reason why you need a fast WordPress site, let’s take a detailed look at how to speed up WordPress site effortlessly.
WordPress speed secrets: revealed!
Optimizing for site speed has been a problem that many have worked on since the beginning of the web. With evolving HTTP versions such as HTTP/2 and HTTP/3 (HTTP over QUIC), this work continues at the upper echelons. However designing an internet protocol is outside many ordinary webmasters’ hands.
Regardless, there are many things that you are in control of. That’s what you’re here for, so let’s get started with speed up WordPress site, step by step.
1. Choose high-performance hosting
Most hosting companies are general-purpose providers. Not optimized for any one platform, but overall good enough for anything you can throw at them. That’s okay if you are running a simple blog or online store. But for anything more demanding there is massive potential for optimization.

Here are the crucial hardware specs to look for in a high-performing web host:
- CPU: Responsible for the processing of code such as PHP (and much more, as it is the brain of the entire operating system). Generally, the more CPU/vCPU cores, the faster your site will be able to process and show pages to users.
- RAM: The OS, web server software (e.g. LiteSpeed), related programs (e.g. MariaDB), and other data all need to fit inside RAM to run properly. The more traffic (esp. concurrent traffic) you get, the more RAM you need to keep the CPU fed with data for processing all those requests.
- Storage: A good web host will provide fast SSD drives to fit all your website files and media, with swap space to spare. When a server reaches peak traffic it always risks running out of RAM. That’s when a server really slows down and bad things happen, system-wise, if no swap space is available.
- Networking: The best hosting hardware is nothing without a fast network. Beyond offering high bandwidth rates, high-performance hosting often relies on CDN technology where servers are distributed worldwide to serve visitors with the lowest possible latency.
Did we mention that Rapyd Cloud’s cloud hosting plans tick all these boxes? That’s because we are bucking the trend of providing just-good-enough hosting services. Our new way? Putting speed first, no matter what.
2. Adopt a lightweight theme
Before going into all the major WordPress speed optimization techniques, the type of theme you start off with is very important. You might find a theme with a style that you love, but it comes with dozens of features that you will never need.
Consider all those features as bloat that may ruin your WordPress speed. After all, the appearance of any theme can be easily changed to your liking with custom CSS or third-party page builders like Elementor or Beaver Builder.

Check out these five of the fastest, most lightweight WordPress themes in 2024, according to WP Rocket:
The same advice goes for plugins. If you need a specific feature that a simple plugin offers, always choose the simple plugin over an all-in-one plugin that has what you need, but also lots that you don’t. Unless the simple plugin is badly coded, it won’t put as much load on the server as a complex one.
3. Leverage caching plugins
Caching means to save the results of some processing (e.g. the output of PHP code) on the hard disk or in RAM so that they can be called upon later without having to reprocess the same code or data over and over.
The cumulative benefits are enormous. Not only does caching greatly reduce the loading time of the web page being shown to a visitor, but it also reduces the workload of the CPU and frees up RAM (even when you are storing cached data in RAM itself).
With caching, sites that would ordinarily need a hefty server now only need a fraction of the hardware resources to handle the same amount of traffic.
Here we will explain the common types of caching for WordPress.
Page caching
When a visitor loads a web page, the server needs to look at all the PHP code for that page, interpret it, and execute it. Finally, it spits out the result to the browser as viewable HTML.
Instead of doing this every time for every visit, you can store the result (the processed web page) in a page cache.
Now, the web server only needs to pull in the cached page from RAM as a static (i.e. fixed and readily-available) resource instead of having to compute it again and again from disk for every visitor. Once the page cache has stored all your website pages (a process called building the cache), page load times are dramatically reduced and everyone is happy.
Object caching
Object caching is a method of caching that stores the results of database queries in RAM. These results can then be called from RAM the next time they are needed without having to continually query the database.
A caveat of object caching is that it can lead to excessive memory usage, so caution is advised when setting it up. On the other hand, it reduces CPU workload since the CPU doesn’t have to keep processing database queries; it already has the data ready in RAM.

One of the top ways to cut your WordPress speed in half all on its own, caching should generally be tackled last when setting up a new site. This is especially true for sites that are being modified and updated live (instead of on a separate staging site, which some amateur WordPress admins tend not to bother with).
Setting up caching is notorious for giving webmasters of even the simplest sites much pain and suffering. For one, you will have to keep flushing the cache each time you make new changes. Luckily, many caching solutions handle this automatically.
Further, a single caching misconfiguration can bring down the whole site. Other times, half your site content is stuck in some kind of limbo, while the rest is fine. Figuring out how to fix it isn’t a matter of just clicking around; you usually have to go and read the user manual at some point.
Caching is a complex topic, but true to form, WordPress caching plugins can help save you much time.
WordPress performance plugins with caching
Here are the top WordPress plugins that offer caching functionality (in no particular order):
- W3 Total Cache
- WP Super Cache
- Hummingbird
- WP Fastest Cache
- Comet Cache
- WP-Optimize
- Autoptimize
- WP Rocket
- LiteSpeed Cache
- Cache Enabler
- Speed Optimizer
- Perfmatters
- WPSpeed
- PageSpeed Ninja
Many of these caching plugins also let you do other neat things to increase your WordPress speed such as lazy loading images and minifying JS/CSS. We will cover these extra optimization features separately in this guide so you know how to get the most out of the plugins above.
But first, let’s cover the specific caching solutions that work best for our customers, especially those with lots of dynamic content that is often difficult to cache correctly and efficiently.
Opcode caching (OPcache)
Other than page caching and object caching, there is another important type of caching called opcode caching, which is performed by a PHP extension called OPcache.
Any time a PHP script is executed for the first time, the OPcache engine compiles the script as bytecode in RAM. When the same script is called in the future, the cached bytecode is loaded from RAM without the script needing to be read and interpreted from scratch from the hard disk.
Like page caching, OPcache increases the page load speed and reduces disk I/O, which can also prevent wear-and-tear on the server’s SSD.
OPcache vs. page caching
However, OPcache is not identical to page caching since page caching stores the actual output of a PHP script (like the final HTML of a page written in PHP) as a static file that can be instantly loaded from RAM, whereas OPcache only stores the script code itself in its cache in RAM, in a machine-friendly form (bytecode) that makes it quicker to execute as needed. In OPcache, only the script code itself is cached, not the final output.
For dynamic and highly interactive WordPress sites that change a lot in terms of the updating of small pieces of data (e.g. real-time notifications/messages/profile updates/page interactions such as ‘likes’ or ‘votes’, etc.), OPcache makes a lot more sense than page caching because page caching isn’t designed to handle these events. OPcache, on the other hand, doesn’t care about the actual content and simply speeds up the processing of scripts at the server level in general.
In the BuddyBoss podcast, “Wes Tatters on Rapyd Cloud: The Journey Towards an Optimized BuddyBoss Hosting”, Rapyd Cloud’s Managing Director, Wes Tatters, touches on how OPcache works, why it’s so crucial for performance, and why so many other providers have failed to get it right. Watch the episode here:
Meanwhile, WP Rocket have written a great guide on how OPcache works and how to configure it. Check it out.
LSCache
LSCache is a bespoke page caching system developed by LiteSpeed, the web server that Rapyd Cloud uses for its excellent ability to handle high-concurrency traffic. Enabling server support for LSCache for our customers is just one of the ways we take the pain out of caching for you.
Redis Cache (via Relay) and Object Cache Pro
Another superior caching system that we provide for our dynamic website hosting is Relay, a special type of Redis client.
The reason why Relay is so good for dynamic sites is a feature called active invalidation. Active cache invalidation ensures that any time a piece of information changes on an interactive site, the old cached version of that data is invalidated and the new version is then immediately re-cached. And that is exactly what dynamic sites need: the “active” elimination of stale cache content, so users always see timely, accurate updates.
What’s more, we also provide free usage of Object Cache Pro, which is the premium version of Redis Object Cache. Object Cache Pro helps reduce a server’s workload by storing database queries as objects that can be cached and quickly executed from RAM. It’s highly recommended to help speed up your site by lowering the workload on your database, and thus, the CPU.
4. Optimizing images for speed
According to The HTTP Archive, as of 2022 the average page weight (size of a page in bytes) for most web pages in the world is 2,315 KB on desktop and 2,020 KB on mobile.
In other words, that’s an average page size of ~2 MB for all web pages on Earth.
From the same study, out of that 2 MB page size, images are the largest content type with 1,026 KB taken up by images on desktop and 811 KB on mobile.
Simplified again, that means roughly half of the total file size of every web page, on average, is taken up by images. Now that’s a fact we can work with, confirming that image optimization should never be just an afterthought.
Image optimization for WordPress is all about keeping image file sizes as small as possible. There are a few ways you can do this, explained below.

Choose the appropriate format
Though not widely adopted as yet, WebP is touted as the new image format standard for the web. It is more efficient at compressing images down to web-friendly file sizes than both PNG and JPEG, and that’s about all you need to know, at least according to Google.
If you prefer to keep using JPEG/PNG for technical (or other) reasons for the moment, then here’s what you need to know about these older file types.
PNG retains the best image quality for drawn or computer-generated images (illustrations, art, etc.) while JPEG is best for real-life photographic images because you can better compress JPEG photos without as much image degradation compared to PNG.
In summary, choose WebP format by default for all images unless you have a good reason not to. For photographic images, use JPEG, otherwise go for PNG.
Resize and compress images
There’s no point providing large, super high-resolution images if they are only for screen display purposes (as opposed to print publishing).
Either downscale and compress your images in a tool such as Photoshop or GIMP, or let an image optimization plugin like Smush help you do all this automatically.
Tip: TinyPNG is a free online image compression tool that does an amazing job of compressing images while retaining quality. It is useful if you don’t want to add an extra plugin for this and aren’t familiar with image editing software.

Enforce image upload limits
For user-generated content sites like social networks and forums, ensure that image uploads are restricted to a certain max file size and/or resolution.
Note that an appropriate limit depends on the type of site; a photography forum might have much larger limits than other sites.
Tip: You can enforce upload file size limits at a server-wide level by editing the upload_max_filesize option in your “php.ini” config file.
Set all images to 72 DPI
The optimal DPI (Dots Per Inch) for images displayed on any device screen is 72. 300 DPI, the standard for print publishing, results in a much larger image file size than 72 DPI for no noticeable difference in quality.
There is never a good reason to provide 300 DPI images unless your site handles images for print publishing (e.g. book covers, print magazines, advertising billboards, T-shirts). Think of print-on-demand sites like Etsy or Zazzle.
Use “srcset” for responsive images
In HTML, the srcset attribute lets you specify different sizes of images to be served to visitors depending on the device they are using or the actual viewport. This lets you provide just the right image size for the right device.
You can also do other sensible things with srcset such as type-switching. Type-switching is where you can specify whether images should be served as the new WebP format, falling back to PNG or JPEG if the browser doesn’t support WebP.
5. Reducing HTTP requests
When a visitor loads a page, all the different files that make up your website (*.html, *.css, *.js, *.webp, etc.) need to be fetched individually from the web server.
This is usually fine and dandy for files that are hosted locally on the server, but web pages often also need to fetch external resources such as JavaScript libraries and other scripts.
The key concept here in terms of website speed is Round-Trip Time (RTT). For every external HTTP request that a browser makes while loading your website, the browser has to wait for that other server to: 1) receive the request, and for the server to, 2) acknowledge the request and send a response.
Naturally, too many HTTP requests can introduce a lot of unnecessary latency and impact your overall WordPress speed score.
A word on HTTP requests from ad networks
One of the worst offenders for adding lots (and lots) of HTTP requests is advertising networks. Not only do these HTTP requests all add up, but you also have no control over the latency of each source, which may have their own ungainly Round-Trip Times.
As a rule, if you are monetizing your website with display/text ads on an ad network such as Google AdSense or Mediavine, your page speeds are going to suffer.
There’s not much to be done about ad network overhead in terms of HTTP requests, which is why it’s so important to keep the ads you show to a minimum. But even so, ad networks often add a dozen third-party trackers to a page despite only showing one or two ads.
If this is a deal-breaker, consider alternative monetization methods such as affiliate marketing, where you are more in control over how ad slots are displayed and tracked. Another idea is to use an ad manager plugin such as AdRotate, but this may not totally solve the problem.
Suggestions for reducing HTTP requests:
Here are some suggestions on how to minimize your total HTTP requests:
- Combine multiple CSS and/or JS files into one file for each file type. For instance, all your different CSS style files can be lumped into a single large styles.css file.
- Host as many resources (images, fonts, CSS, JS) as possible locally on your hosting server itself. Note that popular libraries such as JQuery are now provided within WordPress core so you don’t need to request them from a third-party.
- Minimize the amount of plugins your site uses, or swap out a plugin that makes unnecessarily many HTTP requests for one that doesn’t.
Ultimately, every time the browser has to wait for an HTTP request to be received, it can potentially block the loading of the rest of the page. To avoid this without reducing any HTTP requests, you should learn about how to eliminate render-blocking resources such as by deferring scripts and optimizing the loading of CSS.
6. Database optimization
Not many WordPress webmasters tend to treat their MySQL/MariaDB database as an area for optimization. This isn’t surprising, since messing with the database is always risky. It’s where all your website data is stored, after all, and one mistake can be very costly.
As such, we recommend you back up your database at least two times over, preferably with two different plugins or methods, before doing anything at all with it.
Optimizing a database mainly involves cleaning up old data that doesn’t need to be there anymore. This data may include:
- Inactive users: admins, editors, authors, subscribers, and so on.
- Post revisions, which have a habit of piling up over time.
- Spam and other possibly useless comments such as pingbacks and trackbacks.
- Trashed items (posts, comments, etc.).
Some reliable plugins that can help you with your database maintenance are:
7. Using a Content Delivery Network (CDN)
A Content Delivery Network is what it sounds like, a network of servers that helps to deliver content to users.

These servers are distributed around the world for one main reason: to improve the latency from the server to the visitor. The closer a server is to a visitor, geographically, the faster the data can be received. This helps reduce Round-Trip Time in many scenarios, especially relevant when your website makes a lot of HTTP requests.
A CDN consists of multiple Points of Presence (POP), which is a fancy way of saying they have servers in different locations. CDNs typically use techniques like load-balancing and anycast to ensure that visitors get served by the closest server that also has enough resources to handle the traffic without breaking a sweat.
At Rapyd Cloud, we focus on doing everything possible to get your website data to your users in no time at all, no matter where they are. As part of this mission we offer a free WordPress CDN for all our WordPress hosting plans, so your content can be distributed not just from one international server, but locally from servers all over the world.
8. Ensure mobile responsiveness
Mobile responsiveness has been a best practice in web design for quite some time. Not only does it make good design sense, but it also lets your website provide smaller, faster-loading images on the mobile version as compared to the desktop version.

Thankfully, almost all modern WordPress themes are built with mobile responsiveness in mind, so this is more of a reminder than anything else. You are welcome. Oh, and don’t forget to do the dishes.
9. Minify JS, CSS, and HTML files
Minification is a very common speed-boosting technique, and easy to implement on any site.
It is simply the process of removing all non-essential characters from the source code of your JS, CSS, or HTML files. This includes white space and newline characters as well as code comments. While these characters are helpful to humans reading the source code, computers don’t care about them at all.
Stripping them out of your source code with a WordPress performance plugin or other method can reduce their file size by a good amount. There are 35 white space characters in this paragraph of text alone.
10. Lazy loading media
Lazy loading is a super simple concept to increase your WordPress speed: images and other bulky media are not all loaded immediately when the page loads. Instead, the images are held back until the visitor scrolls down to where the image would be shown. At this point, the browser loads the image from the server and it pops into view.
Lazy loading comes as a feature you can enable in several WordPress performance plugins such as W3 Total Cache. There are also standalone lazy load plugins such as a3 Lazy Load and the aptly named Lazy Load Plugin.
Also Read: WordPress White Screen of Death
Going further
Beyond all the above, there are many other optimizations that webmasters aren’t currently using to their benefit, since they require deep knowledge of Linux computing and how to properly configure operating systems and web server software (e.g. Apache/ nginx/LiteSpeed, MySQL/MariaDB, load-balancers, reverse-proxies, PHP workers, etc.).
From an engineering standpoint, that’s simply another reason why we encourage WordPress website owners of all kinds to take advantage of managed dynamic WordPress hosting like us.
We’re biased, we know, but we also know your passion is your website and your community; not the toil and slog of system administration. Check out our high-performance managed WordPress and managed WooCommerce hosting plans to find out how we can help host you.
How to measure your WordPress speed?
Now if you did all those stuffs to speed up WordPress, how do you know that your website speed is now improved?
WordPress speed testing tools
The easiest way to figure out what the above metrics mean in practice is to hop onto a website speed test website that tracks them for you.
These excellent performance testing tools help you see what’s going on with each metric as they pertain to your site in action:
- PageSpeed Insights (Free)
- WebPageTest (Free)
- Pingdom Website Speed Test (Free)
- GTmetrix (Free/Paid)
- DebugBear (Free/Paid)
- Request Metrics (Free/Paid)
- PageVitals (Trial/Paid)
A neat benefit of using a tool as above, rather than running tests from your own PC, is that they can test your site speed from multiple different countries. If your server is located in the U.S. but also serves a European audience, you can find out what kind of latency is involved for those far-flung reaches of the world.
Some of these website performance tools can also simulate your site with different browsers and device models, helping you ensure top speed no matter how your site is accessed.
Also, don’t forget about Google Search Console, which can tell you much about your website performance according to real users on its Core Web Vitals page.
Inspect with developer tools
You can also gain a lot of info about your website’s performance and networking by using the developer tools that are built into all web browsers. To access these tools, simply right-click anywhere on your website and select “Inspect”.
Next, head to the “Network” tab and refresh the page. Now you will see a list of all the network requests that your browser makes and exactly how long it takes to receive them individually.
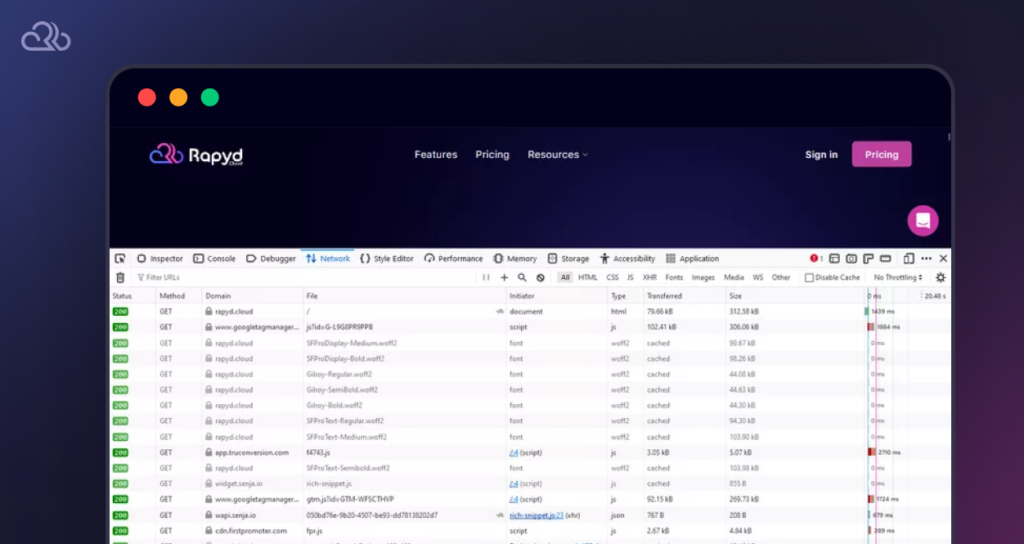
If you are a new developer, designer, or webmaster, you will learn to love these developer tools as they are mostly intuitive and make web development and debugging processes a breeze.
Simply, no site speed issue can remain a mystery for long with the power of “Inspect”!
Load testing tools
One of the final tasks you should do is load testing. With performance monitoring tools, you know your website loads instantly for any given visitor, but what about when thousands or more reach the site at the same time? Can your site actually handle all those concurrent users?
Here are some great load testing tools you can use to test your site’s resilience to high traffic:
Warning: Some load testing tools are capable of sending enormous amounts of traffic to your website all at once. This may incur unwanted bandwidth costs, so be careful.
Query Monitoring
Just as important as server and site monitoring, however, is keeping your finger on the pulse of how your community is experiencing your site. You can’t fix or improve what you don’t know about, so listening to your actual users and asking for feedback will be your best defense against the pitfalls of complacency.
Oh, and, one last hearty recommendation: install the Query Monitor plugin. It sits in your admin dashboard and gives you a ton of useful information about how your site is performing on any page you have open in the browser.
What should be your target speed?
The problem is, how do you know what level of website speed is expected, at a minimum, by most website visitors? Other than the 3-second rule, of course.
With well-studied industry metrics and benchmarks, of course. And the benchmark that is now the standard in the industry is combined on Google’s Core Web Vitals.
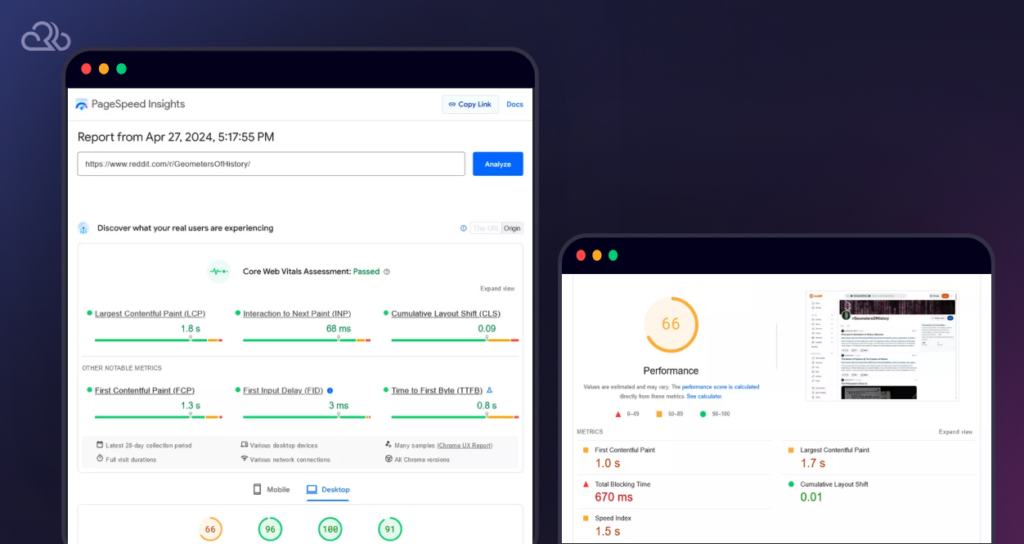
Here are the metrics for measuring the speed of a WordPress website, or any site at all:
- Latency: How long it takes for a website to respond when a visitor sends a request. Latency is mostly dependent on location: the closer the hosting server is to the visitor, the lower the latency.
- TTFB (Time To First Byte): Similar to latency, this is how long it takes for the server to respond to any request, measured by the time it takes a browser to receive the first byte of data.
- FCP (First Contentful Paint): How long it takes for a website to show something (anything!) while loading. This is a measure of perceived load speed, in that a fast FCP time can quickly tell the user whether the site is actually loading or has become stuck on a blank page.
- LCP (Largest Contentful Paint): Another measure of perceived load speed, this is how long it takes for the visitor to see that the main content of a page has been loaded. It is defined as the point at which, during page load, the largest text or image block becomes visible to the visitor.
- CLS (Cumulative Layout Shift): Web pages might delay the loading of certain visual elements (such as popups, menu panels, etc.), gradually shifting around the layout of the content. The sooner your webpage settles on a final layout while loading, the better.
- INP (Interaction to Next Paint): How long it takes for the website to visually respond after a visitor takes some action (e.g. clicking a link or button). When you snap your fingers, the site must dance!
These metrics may have awkward acronyms but they are quite self-descriptive. You can check on Google PageSpeed insights to track each of these metrics.
Wrapping up
Phew, you made it to the end? On behalf of all your future visitors and web users everywhere, thank you for recognizing the need to speed up WordPress website as fast as possible!
We know it’s not always easy, but by following the advice provided in this comprehensive WordPress speed guide, you are helping make the web a better, more joyful technology for everyone. Nothing could be more commendable.
In summary, here’s a recap of the main points we have covered:
- Why WordPress speed matters.
- How to measure the speed of a WordPress website.
- The top 10 WordPress speed secrets, including choosing a high-performance, fully managed WordPress hosting, leveraging caching, optimizing your images, reducing HTTP requests, minifying files, and more.
- Potential pitfalls of optimizing for speed in various ways, how to monitor website performance over time, and how to load test your website to check your optimizations at scale.
Do you know of any other tips or tricks to improve the performance of WordPress?
Please let us know — once you’ve shared this guide on social media, of course!
Frequently Asked Questions
Why is my WordPress so slow?
WordPress can be slow due to too many plugins, unoptimized images, poor-quality hosting, no caching, or using a heavy theme.
How do I increase my WordPress speed?
Install good caching plugin, optimize images, limit plugins, update everything, use lightweight themes and use reliable hosting.
How to speed up WordPress search?
Use a hosting like Rapyd Cloud that offers ElasticSearch by default to speed up WordPress site search functionality.
How do I clear the cache in WordPress?
In the settings of your caching plugin (W3 Total Cache, WP Rocket), click Clear Cache/Purge All Caches. Alternatively you can do that from your hosting backend, if they have that feature.
How do I make WordPress load faster?
Couple that with caching, image optimization, a fast theme, CDN integration, and fewer plugins for low load time and high performance.


