If you build or manage a WordPress site, you’ll need to upload files at some point.
They can be large images, videos, PDFs, or even plugin or theme files.
Now imagine when you go into the WordPress dashboard and try to upload, you get this annoying error message:
“File exceeds the maximum upload size for this site.”
This frustrating error message is a very common issue for WordPress users.
But the good news is that WordPress is really flexible, and there are several ways to perform a WordPress increase upload size action.
In this article, I’ll help you check your current WordPress maximum upload size and walk you through the process of how to increase the maximum upload size limit in WordPress effectively.
Let’s begin!
How to Check Your Current WordPress Maximum Upload Size
Knowing its current limit is important before you increase your site’s upload size limit. Below are the most common and fastest ways to check the maximum upload size limit.
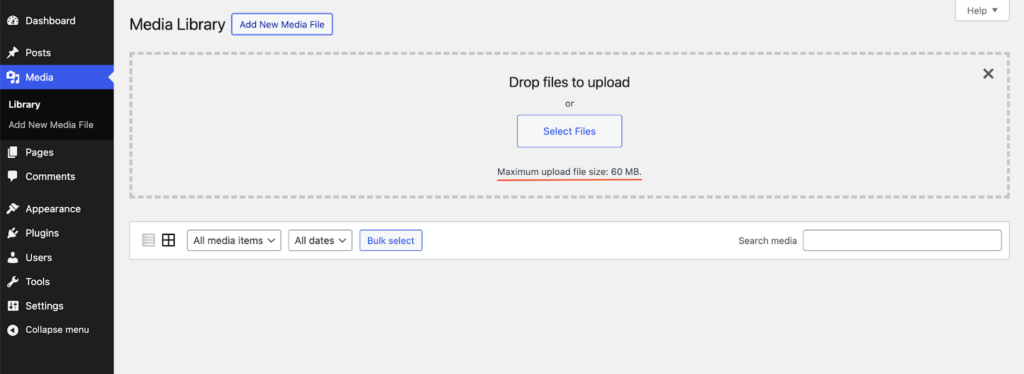
1. Check in the WordPress Media Library
A simple method is to:
- Log in to your WordPress Admin Dashboard.
- Navigate to Media > Library.
- Click on Add New, and it will bring up the uploader option.
Under the file selection option, you should see a message like:
“Maximum upload file size: 60 MB.”

The value may be “2 MB,” “64 MB,” “128 MB,” or more, depending on your host defaults and any modifications you may have made already.
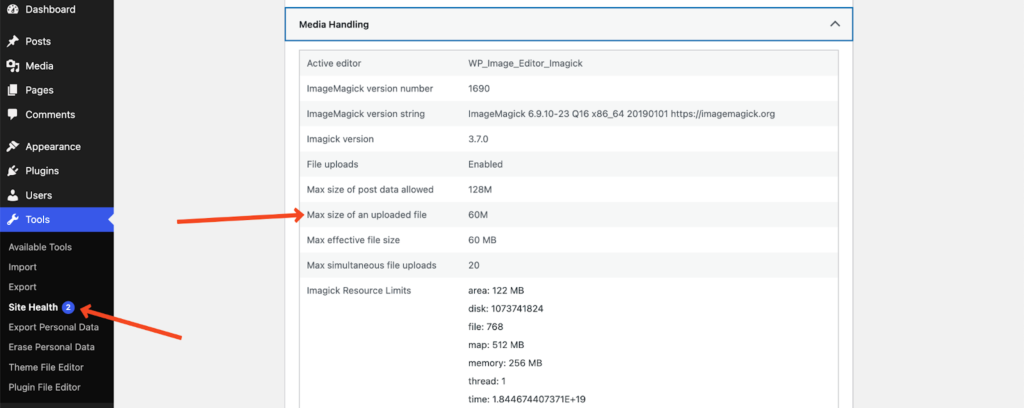
2. Use the Site Health Info Screen
From WordPress 5.2, Site Health also gives you information about your site’s environment. This also includes your file upload limit.
To view it:
- From your WordPress admin dashboard, click Tools > Site Health.
- Click on Info.
- Select Media Handling. See the size of an uploaded file to see the current WordPress limit.

How to Increase Maximum Upload File Size in WordPress
Now let’s share several ways to perform a WordPress increase upload size update. You only need one method to work, so feel free to skip around if your hosting environment doesn’t allow a particular approach.
1. Update Your .htaccess File
In case your web server is running Apache (common on many shared hosting environments) you are typically able to increase the upload limit by editing the .html file. This file is generally found in your WordPress website’s root directory (the same folder containing wp-config.php and wp-admin, wp-content, wp-includes folders). This is a direct way to increase upload size in WordPress through server configuration.
Here’s the process:
- Access the .htaccess file by way of FTP (or the File Manager in your hosting control panel).
- Backup this file prior to editing it. This is important because .htaccess can be extremely sensitive and errors can happen because of incorrect modification. In that case, you might need the backup file.
- Change.htaccess as described below in a text editor or even a code editor:
php_value upload_max_filesize 32M

php_value post_max_size 64M

php_value memory_limit 128M

php_value max_execution_time 300

php_value max_input_time 300- Save the changes and close the file.
Your brand-new upload limit should now be in place if your server is reading .htaccess correctly. In case you get a 500 Internal Server Error, your hosting might be using PHP in CGI mode, so .htaccess cannot override those settings.
If that happens, delete those lines and try another way below to restore your site.
2. Modify the php.ini File
Many hosts set default PHP values, such as upload size limits in a php.ini file.
The php.ini file:
- Maybe in your site’s root folder, inside a folder like /etc/php/7.4/fpm/, or in a different directory,
- May have a name slightly different from php.ini or user.ini depending on the host configuration.
Once you find the php.ini file, follow the steps below:
- Open the php.ini file with FTP or your hosting control panel’s file manager.
- Search for directives like upload_max_filesize, post_max_size, and possibly memory_limit. If they are missing, then create such files.
Set their values, for example:
upload_max_filesize = 32M

post_max_size = 64M

memory_limit = 128M

max_execution_time = 300

max_input_time = 300- Save the file and exit.
The changes could cause your server to restart PHP-FPM or Apache. Look in your hosting control panel for a Restart Services option (usually under Restart PHP or Restart Apache). If not, changes might just roll back after a brief delay. You can also ask your hosting provider to restart the services.
3. Modify the .user.ini File
In your WordPress root directory, you may find a file called user.ini on some hosting platforms, especially those that prefer user-level overrides instead of global PHP.ini changes. If it is missing, you can create it. To perform a WordPress increase upload size action:
The process is almost identical to editing php.ini:
- Locate or create a .user.ini file in your site’s root directory.
Add or modify the same directives:
upload_max_filesize = 32M

post_max_size = 64M

memory_limit = 128M

max_execution_time = 300

max_input_time = 300- Save the file.
See if those changes took place by visiting Media > Add New in your WordPress dashboard. Still no updated limit? Check with your host that .user.ini overrides are allowed on your plan
4. Modify PHP Options via cPanel
If your host supports cPanel You may be able to increase the WordPress max upload file size via a graphical interface, no editing code or config files required. While designs may differ by cPanel version, typical steps are:
- Log in to your cPanel dashboard.
- Find the Software section and click on Select PHP Version (or a similar option).
- In the new screen, look for Options or PHP Options.
Within that interface, you should see a list of PHP directives, including:
- upload_max_filesize
- post_max_size
- memory_limit
- max_execution_time
- max_input_time
Adjust these values to the new limits you want. Check that the post-max size is larger or equal to the upload-max size. Also, make sure your memory limit is high enough to handle new file sizes. Click the save button if your cPanel has one. Otherwise, changes might be saved automatically.
Note: cPanel might place upper thresholds that match your hosting plan. In that case, to set a higher limit, you’ll need to upgrade or contact support for a custom solution.
5. Increase the Max Upload File Size in Nginx
If your hosting environment uses Nginx instead of Apache, you must do the process a bit differently to increase file size limits. You have to modify both the php.ini and the Nginx configuration file (nginx.conf) as Nginx enforces its own limit via the client_max_body_size directive.
Step 1: Update php.ini
Locate your php.ini file, often found in /etc/php/7.4/fpm/php.ini (the exact path may vary).
Set your desired values:
upload_max_filesize = 64M
post_max_size = 128M
Save the file.
Restart PHP-FPM by using this command:
sudo service php7.4-fpm restart
(Adjust the command for your PHP version as needed.)
Step 2: Update nginx.conf
Find nginx.conf, typically in /etc/nginx/nginx.conf.
Inside the http {} block, the server {} block, or a specific location {} block, add or modify:
client_max_body_size 128M;Save the file.
Restart Nginx with the following command.
sudo service nginx reloadYou need to contact your hosting provider to have your website’s client_max_body_size value changed, if you’re hosted on a fully managed wordpress hosting platform.
6. Use the WordPress upload_size_limit Filter
WordPress itself has a built-in filter, upload_size_limit. You can use this to also define or override the maximum upload file size limit. This is the limit that is usually shown on the Media Library when you try to upload media.
Here’s the code snippet to customize that.
function filter_site_upload_size_limit( $size ) {

    // 10 MB.

    return 1024 * 10000;

}

add_filter( 'upload_size_limit', 'filter_site_upload_size_limit', 20 );
To use this code snippet:
- Copy and paste the code snippet to your theme’s functions.php file or use a code editor plugin.
- Adjust the numeric value that we shared to match your desired file size limit.
Note: If your server-side limit is lower than the one you set, you will get the highest limit your server is offering. So you have to consult your hosting provider again to increase your server limit.
7. Upload Files via FTP/SFTP
Almost all of these methods consist of some level of code tweaking. And I understand that you might feel a bit scared to customize the codebase and unintentionally break your site. You can actually avoid the code tweaking, by directly uploading from FTP/SFTP.
Here’s how to do that:
- Set up an FTP/SFTP connection with a tool like FileZilla. You’ll need your FTP credentials (host, username, password, and possibly a port number).
- Connect to your web server.
- Navigate to your WordPress wp-content/uploads folder (or whichever folder you’d like to store your files in).
- Drag and drop the large file from your local computer to the folder on your server.
This places the file on your server but it won’t appear in the WordPress Media Library by default. Install a plugin like Add From Server that will recognize your large file as a file that WordPress can insert into posts and pages. This plugin searches your server for files and imports them into the Media Library. Or you can use WP-CLI commands (media import).
Changing file size limits is often the easiest workaround for many users with FTP/SFTP. Especially useful if you rarely upload large files and don’t want to fuss with server configurations.
8. Increase the Max Upload File Size for WordPress Multisite
WordPress Multisite environments add another level of configuration. You can set a global maximum upload limit for all subsites if you run a network of sites under one WordPress installation, or override it for specific subsites.
- Access Network Admin:
- Go to My Site > Network Admin > Dashboard in the WordPress toolbar if you’re logged in as a Network administrator.
- Go to Settings:
- Go to Network Settings from the Network Admin dashboard.
- Find “Upload Settings”:
- Look for the upload file size. The default is often around 1500 KB (1.25 MB), but You can change it to 131072 KB (128 MB).
- Save Changes.
Remember that server-level limits override any Network Settings you set. If your server is capped at 32 MB and you set 128 MB in the Network Settings, uploads will still fail above 32 MB. You’ll need to ensure your server’s settings (in php.ini, .htaccess, or .user.ini) match or exceed the value you put in your Network Settings.
9. Increase the Upload Size with a WordPress Plugin
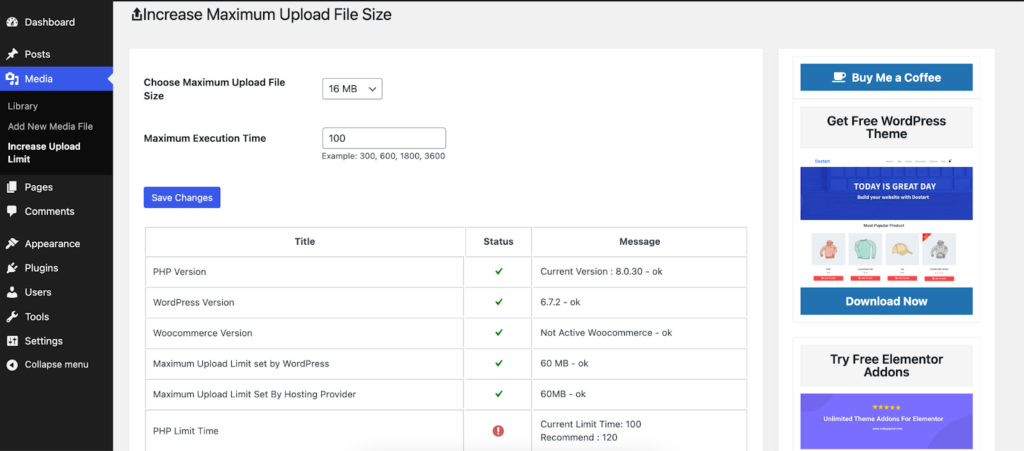
Does modifying config files, or some coding here and there seem intimidating for you? Luckily, there are plugins that will increase the upload file size for WordPress if your host allows it. One of the most popular plugin that we recommend is the MaxUploader plugin.
- In your WordPress Admin, go to Plugins > Add New.
- Search for MaxUploader.
- Install and Activate the plugin.
- Go to its Media > Increase Upload Limit.
Inside the plugin’s interface, you’ll see the option called “Choose Maximum Upload File Size”, change it as needed.

Please note that: You can only change the upload file size limit here if your hosting provider allows you to change it. In the event that your hosting providers cap the hosting environment with a lesser value, the plugin can not override this.
For many site owners, particularly those on flexible hosting, this plugin approach is the easiest.
10. Contact Your Hosting Provider Support
If you adjust .htaccess, php.ini, user.ini, or other options but still can’t increase the maximum upload limit, your hosting provider probably has a cap imposed by default. Shared hosting providers usually do this to protect their servers from resource abuse.
Or maybe you just want to get into any technical hassle.
In any of these cases, contact your hosting support to perform a WordPress increase upload size adjustment on your account. Many hosts will adjust limits quickly for you if your plan allows that. Some hosts will want you to upgrade your plan for large file handling.
Wrapping Up
The “exceeds the maximum upload size” error is annoying if you have no idea why this is happening and how to solve it.
But as you saw from this article, thankfully there are easy ways to safely increase WordPress upload size.
Applying any one or all of these will allow your site to handle larger files, like uploading a plugin, a huge image gallery, a new video background, or any other asset you need.
But before you do these, do not forget to back up your critical configuration files at all times. So that you can always restore your site if something goes wrong.
You should be able to easily upload large files once you get your server and WordPress setup right. If you are still facing any problems or have any questions, don’t hesitate to ask us in the comments section below.
Frequently Asked Questions

How to increase max file upload size in WordPress?
Customize your htaccess, user.ini, and php.ini. file from your hosting control panel to increase the maximum file upload size for WordPress.
You can also simply upload from your FTP/SFTP, or you can use plugins like MaxUploader.
How do I upload a large file to WordPress?
For a quick fix, uploading the file from FTP/SFTP directly to your wp-content/uploads folder is the fastest way.
Or you can change the.htaccess, .user.ini, and php.ini in your hosting control panel to increase the upload limit.
How to increase upload_max_filesize in php.ini?
To increase the upload_max_filesize directive in php.ini:
Locate your php.ini file (possibly found in /etc/php/7.4/fpm/ or /public_html/).
Open it in a text editor and search for upload_max_filesize. If not present, add it manually.
Set it to the desired value, for example: upload_max_filesize = 64M.
Make sure post_max_size is equal to or larger than that same value (post_max_size = 64M or more).
Save the file and restart your PHP or web server if needed.
What is the maximum file size for WordPress media library?
There is no certain limit for maximum file size, it depends on your hosting provider and the hosting plan you have.


