Creating online courses has never been more popular. But with the rise of e-learning—educators, and businesses need tools that can simplify their course creation and management. That’s where LifterLMS comes in; honestly, it feels like a lifesaver!
Imagine this: you have a WordPress Plugin that transforms your website into a complete Learning Management System (LMS). This tool helps you create, sell, and manage courses without hassle, whether you teach, coach, or own a business. And the best part about this? You need zero coding knowledge and work seamlessly with WordPress. This makes it an excellent option for beginners and intermediates alike.
So is it the right tool for you? In this LifterLMS review, we will take a closer look at everything this plugin offers. As with so many WordPress LMS plugins—you might find it pretty tough to choose the right one. Let us do this work for you! Our review will help you decide if LifterLMS is perfect for your online course journey.
Is Lifter LMS PluginA Good Choice?
The global e-learning market is expanding like never before! It was worth USD 305.97 billion in 2023, and by 2033, it is set to hit a fantastic USD 1515.97 billion. This presents an incredible opportunity for aspiring course creators. But you need the right tools and support to succeed in this industry.
Enter LifterLMS. Chris Badgett started LifterLMS in 2014. And it has continued to expand since then. WordPress expert Chris Lema also endorses it to help people share knowledge with ease. The mission was simple: “To lift up others through education.” Setting up LifterLMS is a breeze just like any other WordPress plugin. It lets you shape courses exactly how you want to.
The statistics also show that LifterLMS has earned the trust of many,
- 8.3+ million courses enrolled in courses through LifterLMS
- More than 12.5 million lessons and courses completed successfully.
- 310,000+ certificates awarded to recognise students’ achievements.
- Trusted by 10,000+ active websites worldwide.
- Rated highly with 308 five-star reviews from satisfied users.

We believe LifterLMS is the best choice for courses using WordPress. So here are the key reasons why you should try it once,
Features we love:
This WordPress LMS plugin comes with tools that simplify course creation and make managing students so much easier. Here is what you should know about this plugin:
- Drag and Drop Builder: It has a drag-and-drop builder that helps you create courses. You don’t need any coding skills to create the course. Just drag and drop lessons, quizzes or sections into place. It feels intuitive even for beginners.
- Quizzes and assignments: You can create engaging tests to keep students interested. Setting up quizzes is simple, and the variety of question types adds a fun twist.
- Student dashboards: These dashboards are clean and professional. They help students track their progress, see achievements and stay motivated.
- Integration: LifterLMS works beautifully with tools like Stipe, PayPal, and email marketing platforms like Mailchimp. This flexibility makes it easy to manage payments and communications in one place.
- Easy memberships & payments: You can offer courses and site access through memberships with LifterLMS. It lets you set up automatic enrollments, special membership pricing, and more. Payments are flexible too! Students can pay with credit cards and set up recurring payments. They can even choose custom pricing plans. It is simple and adaptable to everyone.
Benefits you get using LifterLMS
Here are the reasons we believe LifterLMS will work best for you:
- It fits any budget: The core plugin is totally free of cost. You can start small and later add premium features when needed. You can give it a try even before committing to it. Explore the full features on a demo site for just $1. It gives you 30 days to test it out risk-free.
- It is scalable: LifterLMs simply grows with you whether you are just starting with a single course or managing a full academy. Adding courses or upgrading features is seamless.
- Deep WordPress Integration: This plugin is specially built for WordPress. The main goal here is to let you customize your site to look and function exactly how you want. We simply loved how much control it gives its customers over the design and functionality.
- Content protection: Protecting your content is vital—especially when you offer it exclusively to paying students. LifterLMS makes it easy with strong content restriction features. You have complete control over who can access your lessons. This ensures only the right people can see your work. The protection is reliable and gives you peace of mind that your valuable material stays secure.
- Student engagement: Keeping students engaged is key to helping them enjoy learning and succeed in their courses. LifterLMS makes it easy with features like achievement badges, social learning tools, or private coaching. These options keep learning interactive and encourage students to perform their best.
- Supportive community: Chris and his team genuinely care about helping creators succeed. Their tutorials and support sources are incredibly helpful when you are stuck. We also appreciate their active online community for advice and tips.
Challenges You Should Know
Not every tool is perfect, and LifterLMS is no exception to that. Here is what we have noticed about this WordPress LMS plugin:
- Add-on Costs: The free version is simply great. But to unlock other features like LifterLMS Advanced coupons, custom fields or private areas, you need to pay for add-ons. This can get a bit pricy if you get multiple ones.
- Learning curve: The number of options makes you feel overwhelmed at first if you are a beginner. But things can get easier for you with some practice. And their helpful guidance is simply great when you go for an online course creation with WordPress using this plugin.
Who Should You Use LifterLMS?
From our experience, LifterLMS is best suited for:
- Course creators and educators: This tool will give you everything you need to build professional courses if you teach online.
- Businesses: Companies can use it to create employee training programs or onboarding materials.
- Schools and institutions: It is perfect for organizations looking to expand into e-learning.
- WordPress users: LifterLMS feels like a natural fit if you are already comfortable with WordPress.
How to Start An Online Course with LifterLMS: A Step-by-step Guide
Creating an online course takes time and effort. Especially with so many details to manage. You need to think about your curriculum, study materials, quizzes and even how everything looks and flows.
LifterLMS simplifies this whole process with its drag-and-drop course builder. This tool lets you easily map out the overall structure of your course. And once it’s done—you can add specific details and fine-tune the section. It is basically designed to save your time and make the course creation more straightforward.
1. Install and Set the LifterLMS on a WordPress Site
LifterLMS is available for free in the WordPress.org plugin repository. You can install it directly from your WordPress dashboard. And you would not require any license or upgrades for that.
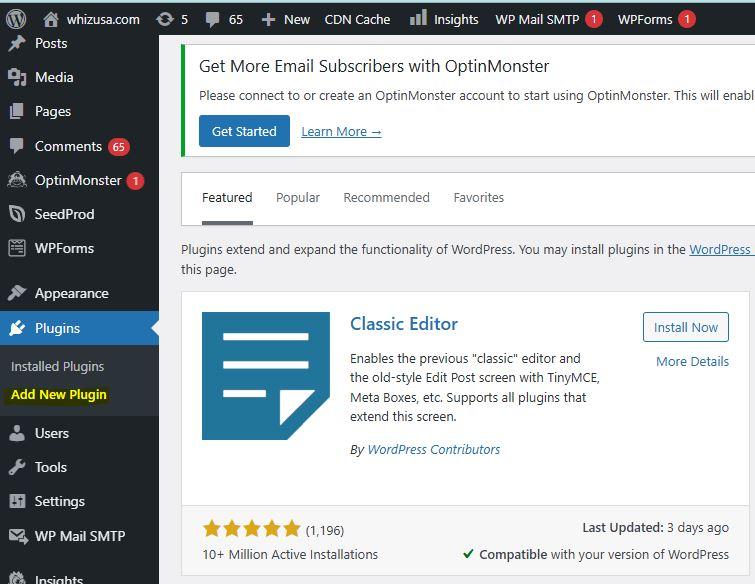
Step 1: First, you can simply log in to your WordPress site and go to the Plugins section. Then click on the Add New to start.
Step 2: You will find the Search plugins at the top of the screen.
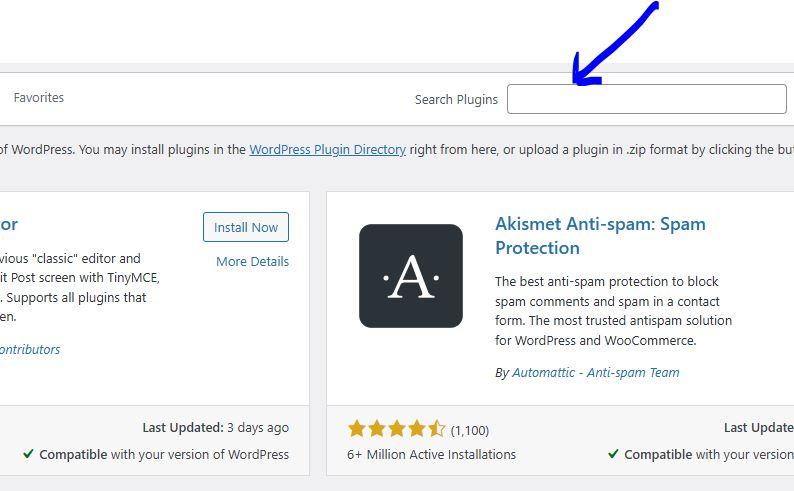
Step 3: Now Type “LifterLMS” into the search bar.
Step 4: Locate LifterLMS and click on Install Now when the search results appear.
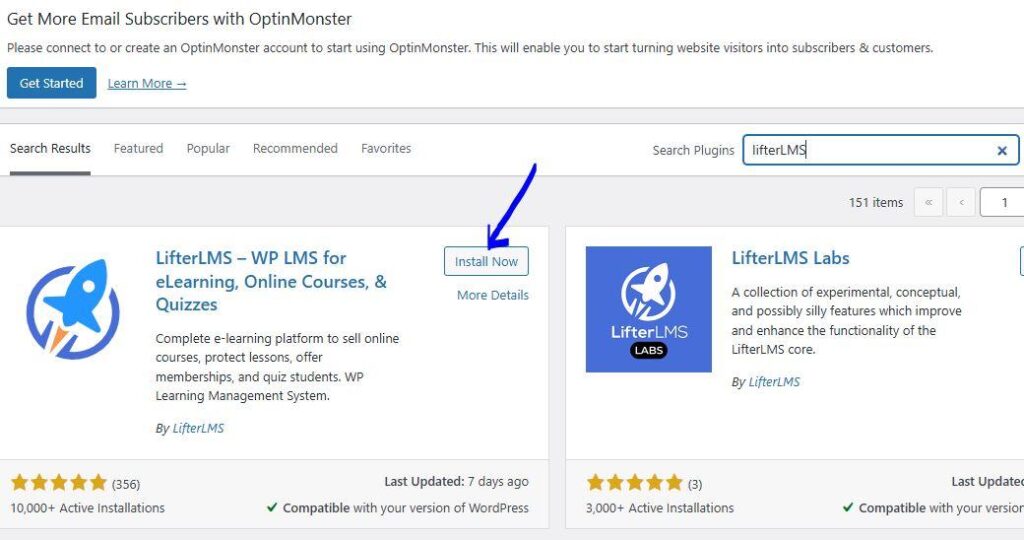
Step 5: Click on the Activate button. It will enable the plugin after the installation finishes.
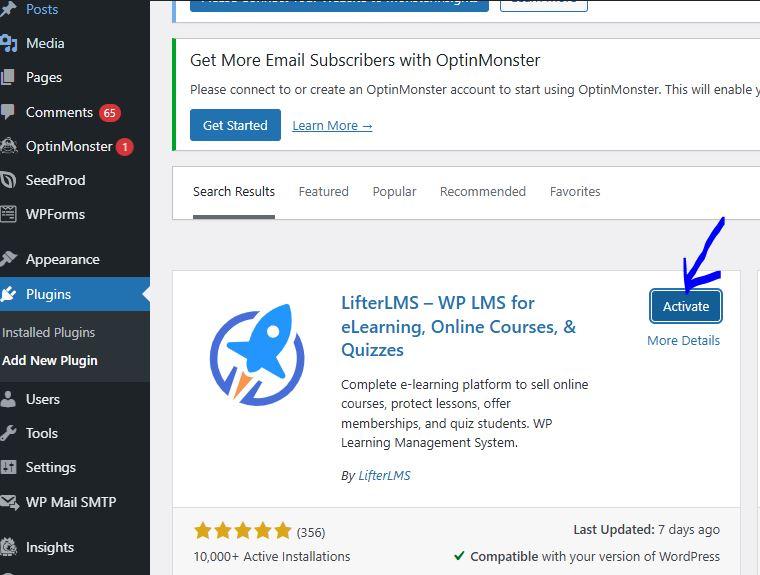
Step 6: The activation step will automatically take you to the Setup Wizard. If this is your first time using the LifterLMS, you can follow the steps in the wizard to configure your LMS.
And don’t worry if the Setup Wizard doesn’t appear. You can still manually access it by following the instructions in the official documentation.
Step 7: You will be directed to the Welcome Page of the Setup Wizard after activation. This is your first time installing the LifterLMS. Now simply click on the Get Started button to begin.
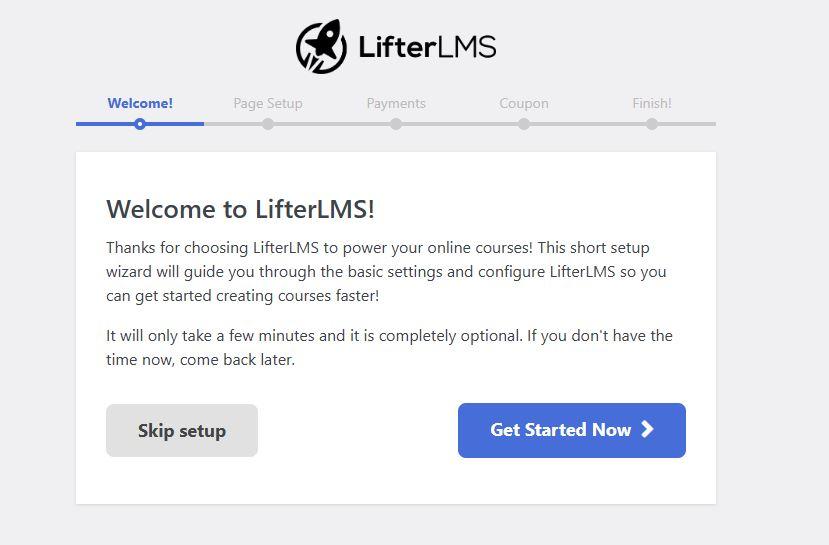
Step 8: The setup wizard will guide you through the initial configuration of LifterLMS. Completing this is essential to set up your LMS. At the very least, you need to finish the Page Setup step.
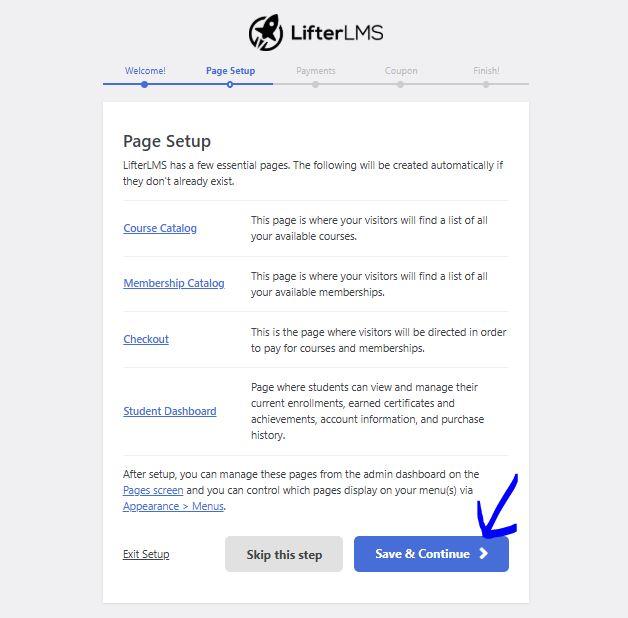
This step automatically creates all the essential LifterLMS pages your platform needs, including:
- Course Catalog
- Membership Catalog
- Checkout page
- Student dashboard
They will not be recreated if any of these pages are already on your site. Click on Save & Continue to move forward once you have reviewed everything.
2. Configure payment gateway options & membership options
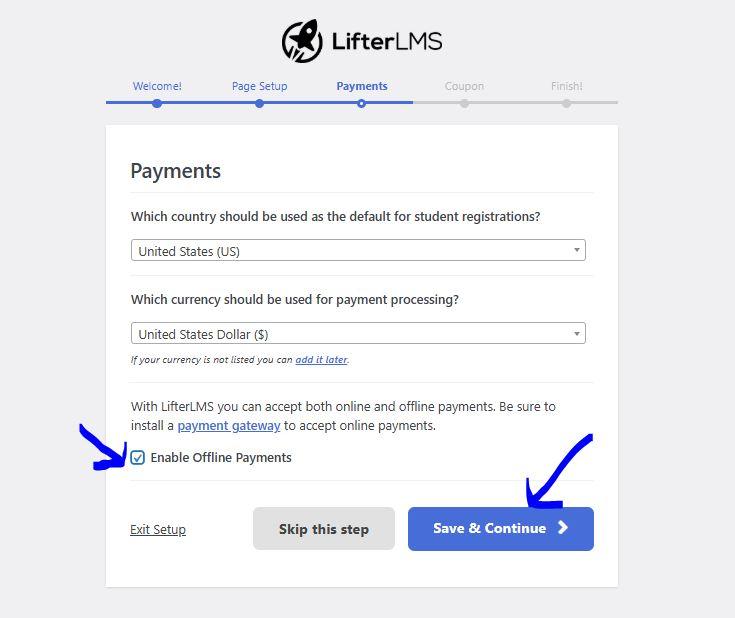
Step 1: You can configure your default settings on the payments screen:
- Select your site’s default country and currency.
- Now optionally activate the built-in manual payment gateway for basic payment handling.
Settings are not final. You can adjust them anytime by navigating to LifterLMS > Settings > Checkout.
You need to install one of the LifterLMS E-commerce add-ons when processing payments, such as Credit Cards, Stripe or PayPal. These add-ons expand your payment options. And make it easier to manage transactions directly through your site.
Step 2: Membership access
LifterLMS adds a Membership Access feature that appears as a meta box on your WordPress posts and images. This handy tool lets you restrict access to certain posts. So that only students with specific membership can view them. You can create exclusive content for your members with this feature and easily manage who gets access to what.
3. Creating your first course
Step 1: Start building your course
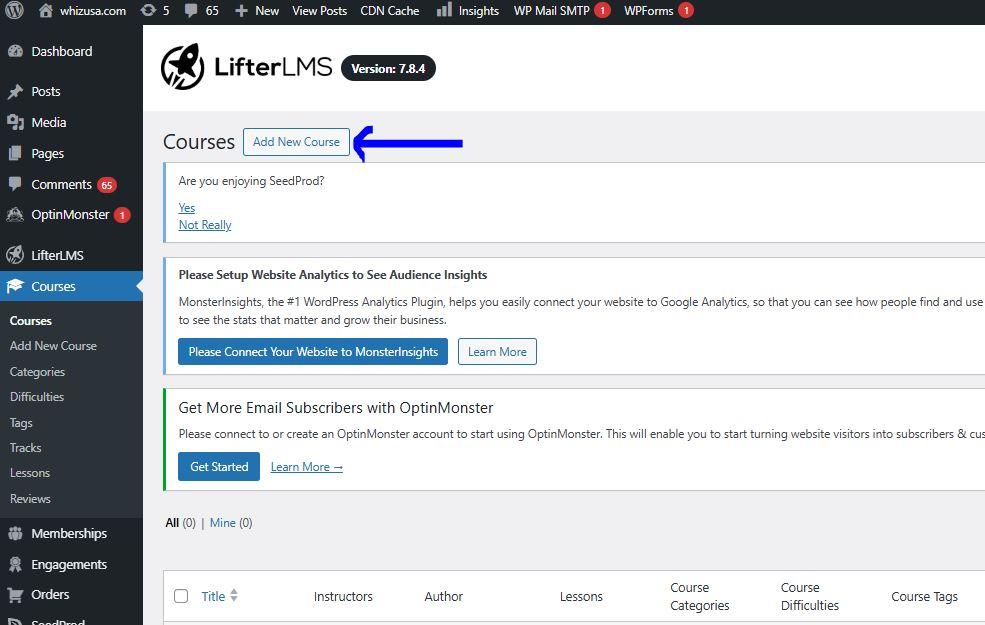
It is time to create your first course once LifterLMS is installed. Go to your WordPress dashboard (wp-admin) and navigate the courses. And click on the Add New to get started with it.
Step 2: Customize your course settings
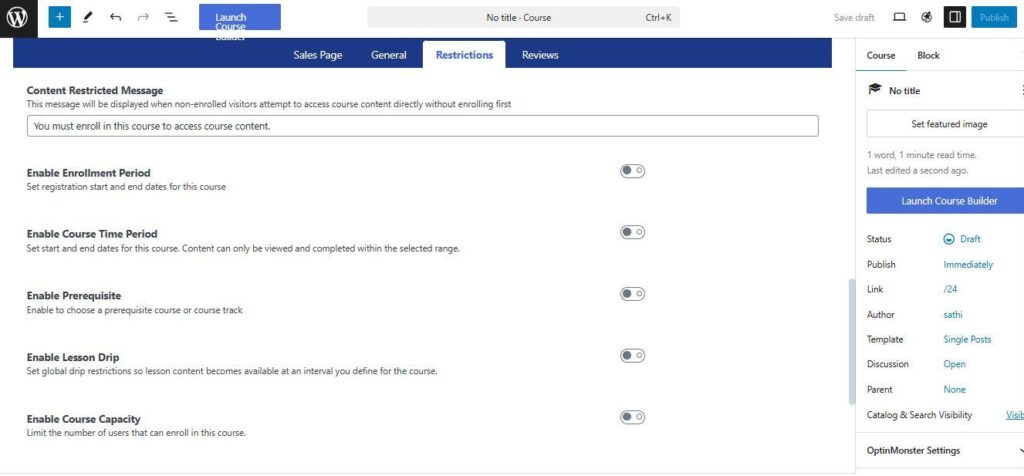
Every course comes with essential settings that you need to configure:
- Course Title: Name your course so it is clear and engaging.
- Course information: Provide details about what the course offers.
- Access plans: Set up the pricing or enrollment options.
You can also refer to the LifterLMS QuickStart guide for advanced options like content restrictions. But these settings will get you up and running.
Step 3: Add lessons to your course
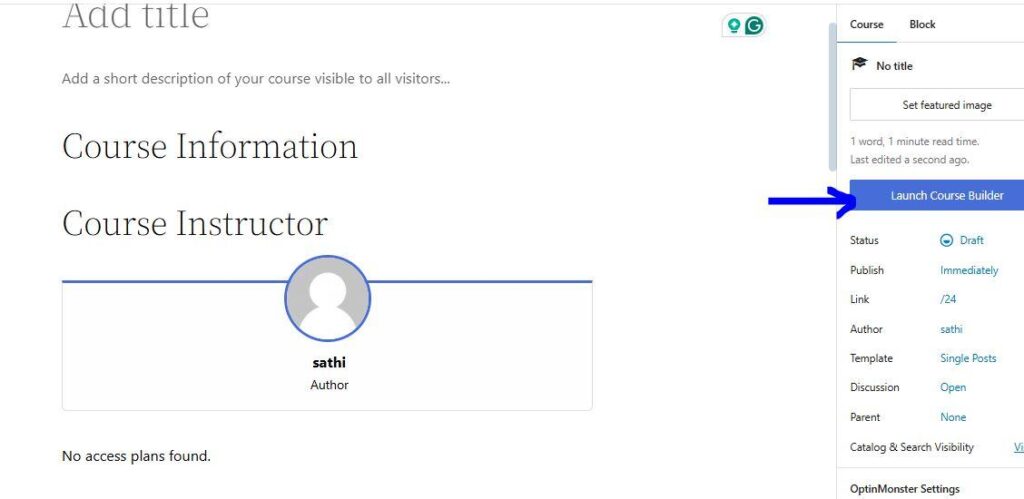
To build your course structure—activate the LifterLMS Course Builder from the right-hand sidebar on the course editing page. You can also add sections and lessons to organize your content in the builder.
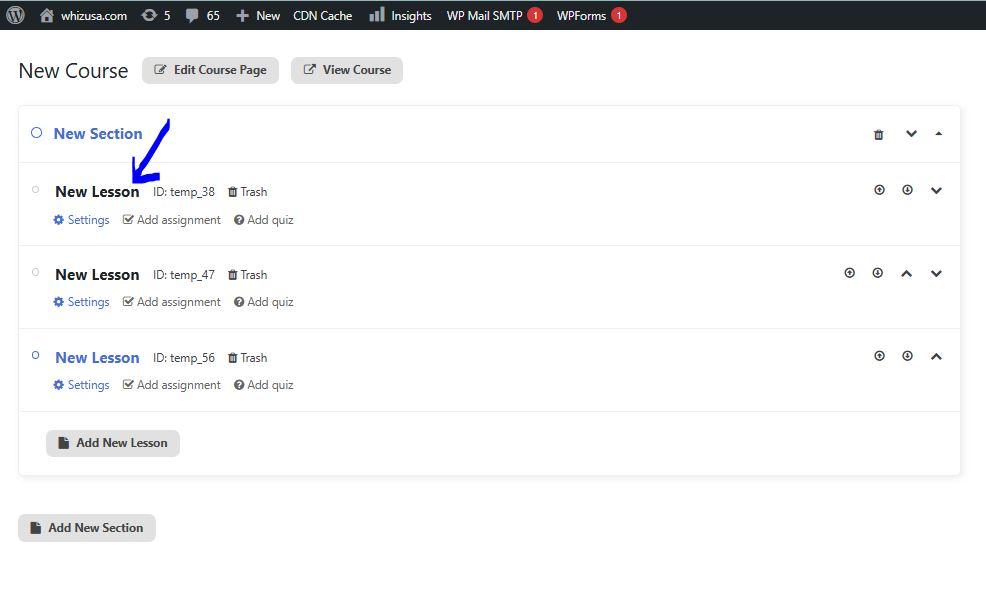
Click on the WordPress icon next to the lesson title to edit a specific lesson. This will take you directly to the lesson editor.
Step 4: Course quizzes
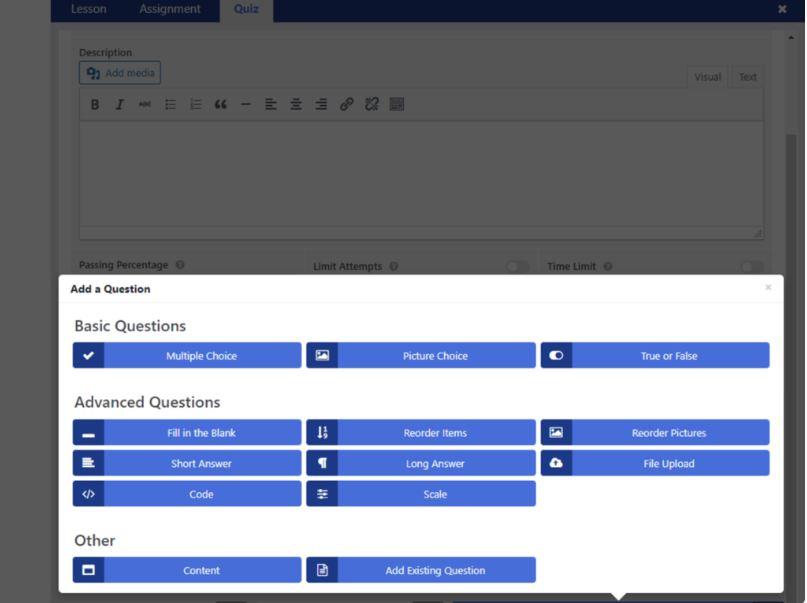
You can also add quizzes to your course lessons using the LifterLMS Quiz Builder. The core plugin includes basic question types to make testing students’ knowledge simple. You can even explore the LifterLMS Advanced Quizzes add-ons for additional question types or deeper customisation. This option expands your quiz-building capabilities. It provides a more robust assessment experience for your learners as well.
4. Customize your student experience and enable analytics
LifterLMS goes beyond just hosting courses—it lets you tailor the student experience. You can even track progress through detailed analytics. Their built-in analytics provide you insights into students’ performance. That ultimately helps you refine your content and improve engagement.
1. You can create a certificate
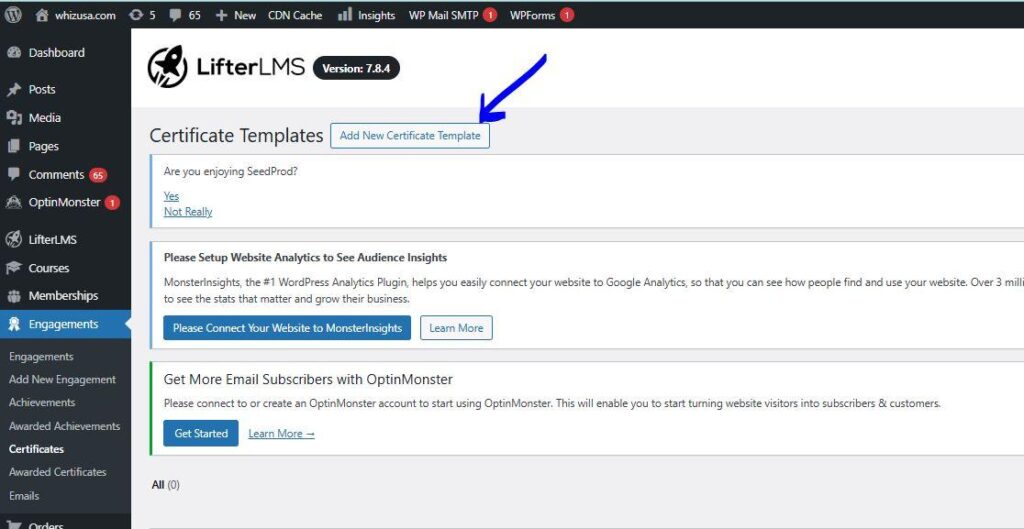
LifterLMS lets you create certificates to reward students for completing courses. You can design certificates using the WordPress block editor. Simply go to the wp-admin > Engagements > Certificates. Now build your certificate and click publish when finished.
2. You can create an engagement
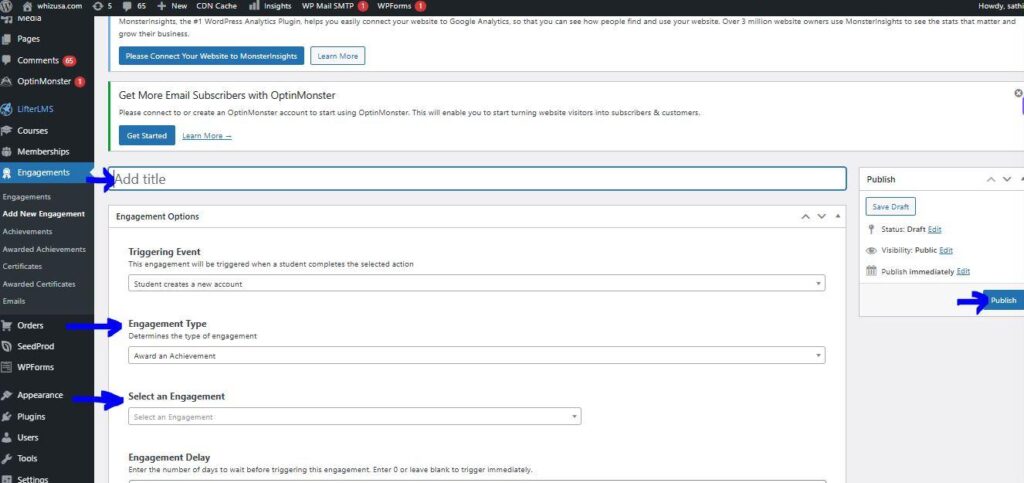
You can trigger engagement to create awards, certificates, or emails automatically. Go to wp-admin > Engagements > Add New. Don’t forget to click on the Publish button to save your certificates.
3: Downloading students’ reports to track progress
- Go to the LifterLMS > Reporting.
- Click the export button under the Students tab.
- The CSV files will be downloaded to your computer.
This makes it easy to analyse your data and track students’ progress seamlessly!
5. Review, publish & promote your course
Preview your course to see how it looks to students once you have added the lessons. Publish it if everything looks great! Do not forget to add the course page to your website menu so learners can easily find it.
You can offer free course enrollments or use the manual payments option with LifterLMS. You can even activate a payment gateway add-on to streamline transactions and grow your revenue—when you look to sell courses and memberships efficiently.
Keep Your LifterLMS Site Fast & Reliable with Rapyd Cloud
You know how important it is for your site to perform well if you are using LifterLMS. A slow site and unexpected downtime do not just frustrate you—they can also hurt your business. This is where Rapyd Cloud shines! This hosting solution is built to keep your e-learning site running smoothly—no matter what.
Fast and reliable even during high-traffic
Rapyd Cloud ensures your site remains lightning-fast—even during busy times. It is built to handle the heavy demands of dynamic platforms like LifterLMS. Whether it is streaming video, taking quizzes or earning certificates—all these demand top-notch backend performance.
Now, with Rapyd, you don’t have to wait for lessons to load or pages to open— even when you teach hundreds of students online at once. This platform uses advanced caching and optimized server configuration. It also offers proactive monitoring to guarantee smooth and responsive interactions. Don’t believe it? You can check out this case study!
Why Fast Loading Times Are Crucial
Picture this: A student logs in and is excited to learn. But their course takes forever to load. Annoying right? A slow site is not just a bad experience—it leads to low engagement and fewer returning learners.
Rapyd Cloud’s fast-loading speed helps:
- Keep learners engaged by eliminating delays.
- Enhanced your credibility by offering a professional experience.
- Boost interaction because students stay focused on the content—not on waiting for it long.
Reliable uptime every time
No students want to see a “site unavailable” message when they are ready to study. Rapyd Cloud guarantees near-perfect uptime with the advanced infrastructure they have.
This reliability means:
- Learners can access their courses anytime, hassle-free.
- You can avoid interruptions that could damage your reputation.
- Your focus will stay on business—not troubleshooting downtime.
Customised for LifterLMS
What sets Rapyd Cloud apart is its compatibility with LifterLMS. It is optimised to meet the unique demands of e-learning sites.
- Content protection: Your course material stays secure with multi-layer security protocols.
- Scalable performance: Whether you are managing 50 students or 1000 students, Rapyd adjusts to your needs effortlessly.
- Third-party integration: Rapyd supports seamless connections with payment gateways, analytics tools and many more.
Proactive support, so you don’t worry
Running an LMS is complex. But you are never alone with Rapyd Cloud. Their 24/7 expert support team acts as an extension of your own—ready to solve issues quickly. They also handle routine backups, updates and monitoring. So you can focus on creating content while they hold the technical side.
Why Rapyd Cloud is a Game-changer
Rapyd Cloud is not just hosting—it is a performance booster for your LMS. It is fast, reliable and secure. Rapyd helps you deliver an exceptional learning experience to your students while scaling your business stress-free.
Are you ready to see the difference? You can try Rapyd Cloud today and give your students the experience they deserve!
Conclusion
LifterLMS simplifies online course creation with powerful tools like a course builder, quizzes and student engagement features. It will help you manage progress and deliver a professional learning experience. And the best part about this?
You can simply pair LifterLMS with Rapyd Cloud hosting to take your online courses to the next level. Rapyd Cloud ensures your platform runs smoothly with fast load times, reliable uptime, and robust security. Together, they provide an excellent and seamless solution for creating and delivering courses. So what are you waiting for? Start building your dream e-learning site today with this winning combination.


