In 2023, the e-learning market hit a staggering $307.5 billion, and it’s projected to exceed $1.50 trillion by 2033. For aspiring course creators like you, this translates into immense earning potential. But to succeed, you need the right guidance and tools.
This guide will show you how to create an efficient and scalable Learning Management System (LMS) with Tutor LMS in WordPress. Tutor LMS, one of the best LMS plugins for WordPress, empowers you to design and monetize an interactive learning experience, similar to Coursera and Udemy. And if you are also ready to convert your skills and passion into profit, then creating and selling online courses on WordPress using Tutor LMS is the way to go.
With zero coding knowledge and a low upfront investment, you can build your own digital asset within days.
Key Takeaways:
- Create a fully-functional LMS website on WordPress using Tutor LMS.
- Set up your online course website using Rapyd Cloud hosting.
- Highly cost-efficient method of starting your own e-learning platform.
- Installing and setting up Tutor LMS on your WordPress website
Ready to create your own LMS? Let’s get started.
What is a Learning Management System?
A learning management system, short for LMS, is a web app that allows you to publish courses with all the bells and whistles that you’d expect from an actual classroom. These include quizzes, assignments, video lessons, student progress reports, grade sheets, full-length practice tests, live classes, etc.
In short, it’s a robust solution for anyone who wants to create an online learning platform.
What Do You Need to Build a Great LMS?
To build a robust LMS website, there are three essentials that you need:
- A responsive and fast WordPress theme
- A powerful cloud hosting solution
- An industry-leading LMS
Let’s understand them one by one.
1. Why Tutor LMS?
Built by Themeum, a premium WordPress design agency, Tutor LMS is an all-in-one powerhouse that converts your simple WordPress website into a dynamic online learning resource. It checks all the essentials and more:
☑️ Create, manage, and sell online courses from your WordPress website.
☑️ Develop engaging quizzes, practice tests, and assignments to engage students.
☑️ Have multi-instructor support with numerous teachers publishing their own courses.
☑️ Host multimedia content, including audio, video, and documents.
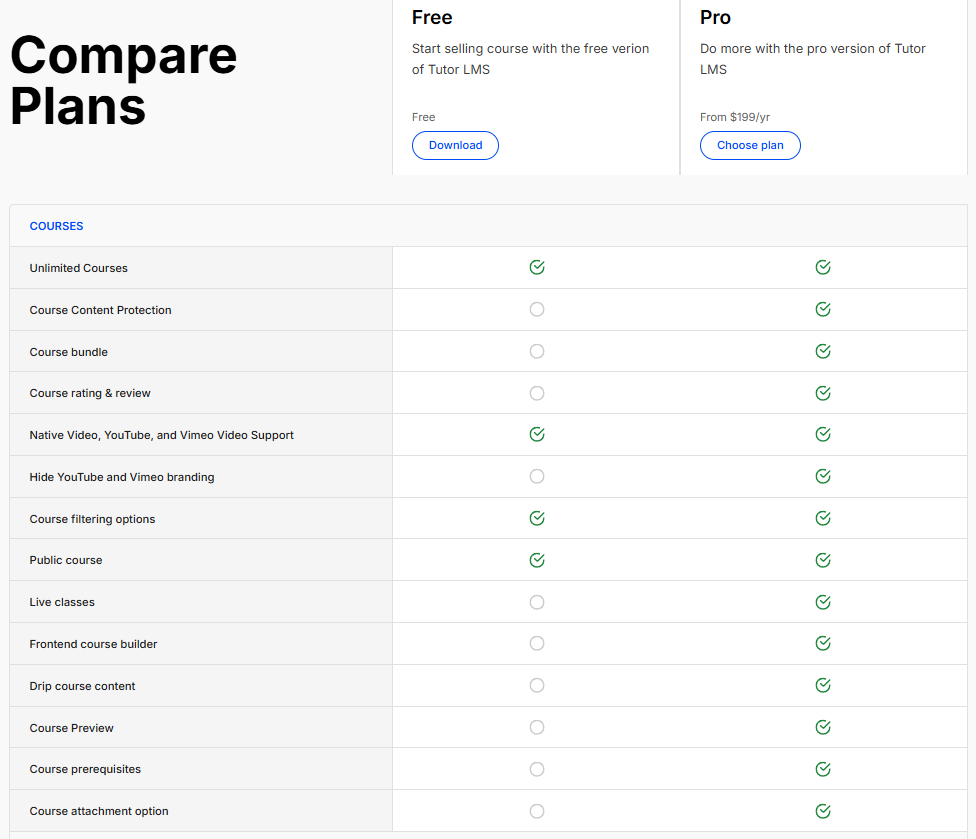
Tutor LMS Pro is the premium version of the course builder and is top-rated on Trustpilot. It only costs $199 a year to create unlimited courses and comes with advanced features such as import/export quizzes, course content protection, drip course content, and more. The UI/UX is also super easy to build your own LMS.
But that’s not even the best part. We have our clients using Tutor LMS for selling all sorts of courses and learning materials across multiple niches like language teaching (IELTS, TOEFL, PTE, any other language), health and fitness coaching, digital marketing training, and productivity tutorials, to name a few.
Whatever you can think of, you can indeed sell online using Tutor LMS.
2. Why WordPress?
You can’t be wrong going with an open-source platform that hosts nearly 42% of the websites. With a truly global community, you will join a massive community with support at every step of the way.
Here are some reasons why WordPress is the ideal choice for LMS creation:
- Economical solution that doesn’t take a toll on your budget
- Complete control over your LMS
- Multiple customization options
- Scale your business as your traffic grows by adding new courses and upgrading to a more premium hosting services.
3. Why Rapyd Cloud for your Online Course Website?
Rapyd Cloud and Tutor LMS is a match made in heaven. Why?
Because Rapyd Cloud is custom-built for dynamic websites and delivers performance that blows every other LMS hosting service out of the water. You can read the benchmarks linked above, but choosing Rapyd Cloud gives you hyperspeed hosting that doesn’t just perform incredibly well when you have high traffic and concurrent users, but scales seamlessly when your server capacity is full.
But here’s an overview of why Rapyd Cloud is the best choice for anyone building a Tutor LMS website:
Truly fast performance: Most hosting providers claim they are fast. But when it really comes down to it, most hosts fail when there’s high traffic and concurrent users. But Rapyd is built to handle dynamic websites with high traffic. Read this case study to find out more.
Seamless Scalability: Rapyd Cloud boasts vertically dynamic servers, meaning that when traffic spikes hit, your server simply scales to handle the load seamlessly, and your website keeps performing as smoothly as ever.
Top-Tier Security: Rapyd Cloud has a proactive multi-layered defense strategy, complete with firewall protection, proactive vulnerability detection, and many more security measures to ensure your online business and customers are completely safe from attacks.
Simple Platform: No one likes complexity, which is why the Rapyd Cloud Platform was built with simplicity in mind. You can accomplish all tasks in a few clicks, enabling you to focus on growing your business instead of managing your servers.
24/7 Expert Support: While we hope for a seamless hosting experience for you, in case you are stuck and need a helping hand, our 24/7 expert support is available round the clock to ensure you’re in good hands.
While there’s a lot more to talk about Rapyd Cloud and why it should be the number one choice for anyone building a Tutor LMS website, we need to bring our focus back to creating a Tutor LMS website.
Let’s get on with it.
Step-by-Step Guide to Installing Tutor LMS on WordPress
Step 1: Choose a Hosting Solution
To host your online content, you need a reliable hosting provider that not only handles all the bandwidth you need to stream audio and video content but also scales as you grow. With Rapyd.cloud, you don’t have to worry about powerful hosting features, website security, and speed. Its cloud infrastructure supports quick content loading and handles high traffic levels, useful for streaming multimedia content.
- Sign up for a plan on Rapyd Cloud based on your expected traffic and storage needs.
- Install WordPress: All Rapyd cloud hosting for LMS plans comes with WordPress pre-installed.
Step 2: Install and Configure Tutor LMS Plugin
To get started with Tutor LMS, you’ll need to install the plugin on your WordPress site. Tutor LMS offers a free version, but upgrading to Tutor LMS Pro unlocks additional features that are particularly useful for course creators.
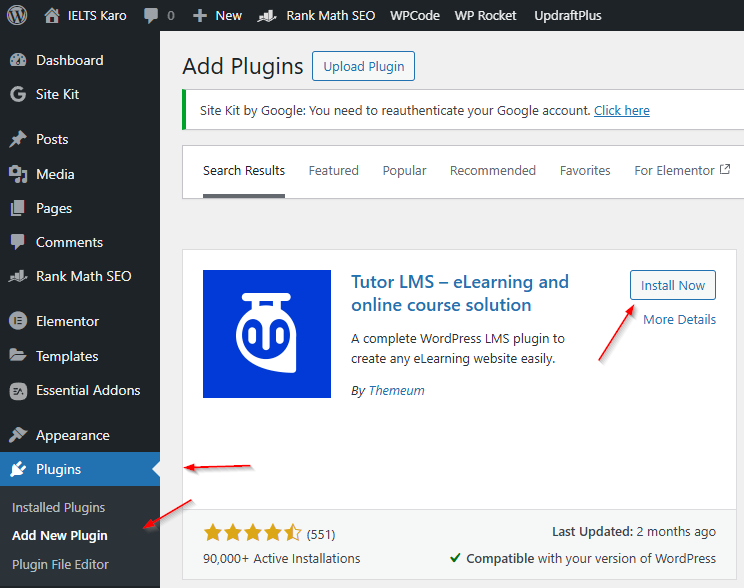
- Install Tutor LMS: Go to your WordPress dashboard, navigate to Plugins > Add New, and search for Tutor LMS. Click on Install Now.
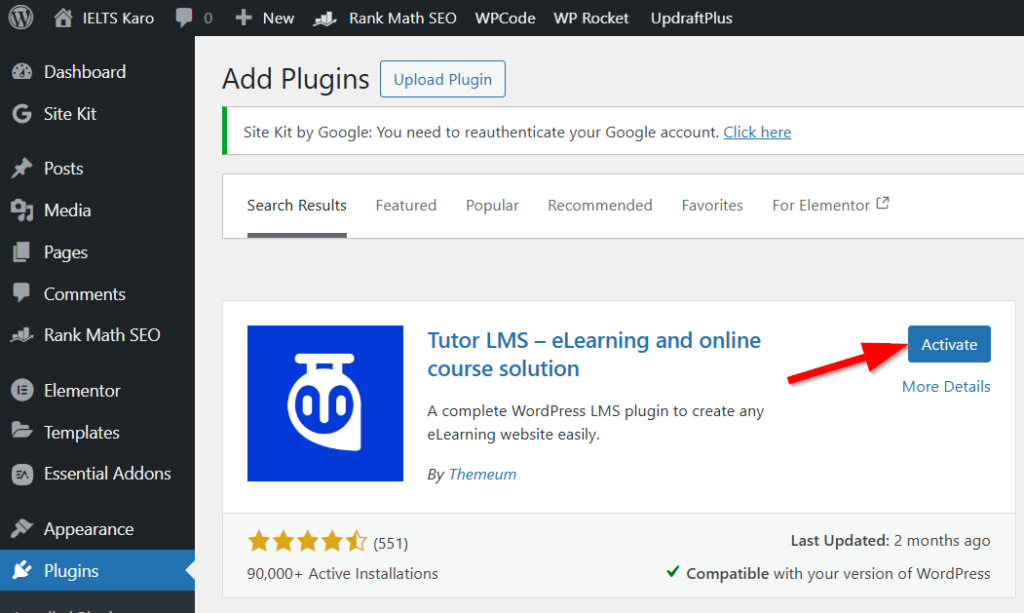
- Activate Tutor LMS: Click on the Activate button to activate, follow the on-screen instructions, and set up the LMS plugin
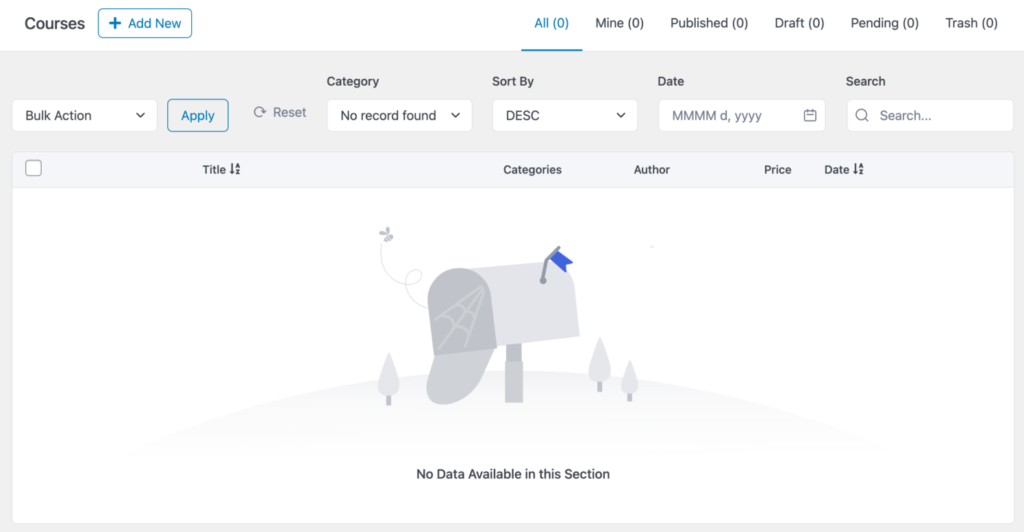
- Basic configuration: After activation, you will be taken through the initial setup process. Once the plugin is set up, you can see it in the left menu of your WP dashboard. Once you click on courses, you will be taken to the following screen.
Step 3: Create and Organize Your Courses, Add Topics, Lessons, and Quizzes
Now that you are all set up, you need to click on Add New at the top left or simply head over to Tutor LMS > Courses > Add New Course:
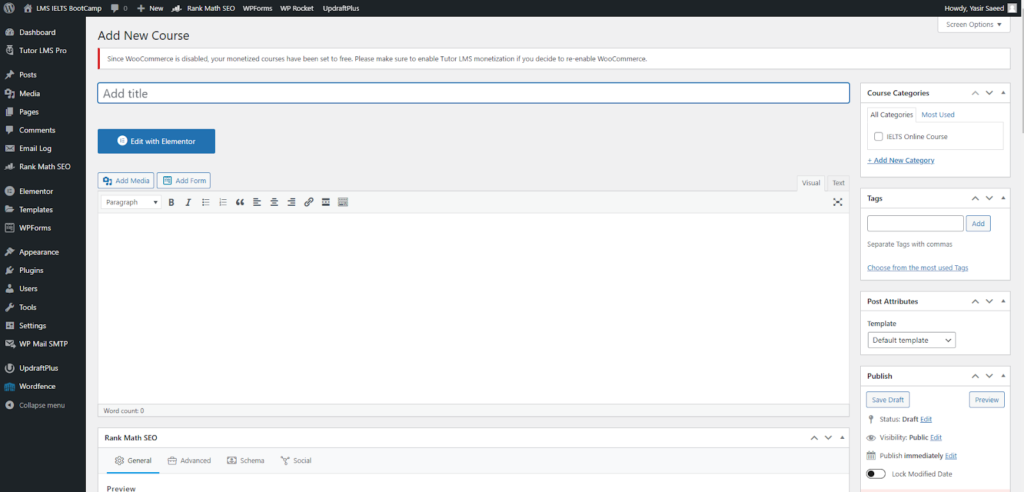
Enter the course title, description, and thumbnail image just like you would write and publish a blog post. The interface and publishing format of the Tutor LMS course is no different than that of a blog, which makes it super easy for anyone to create and launch their online courses.
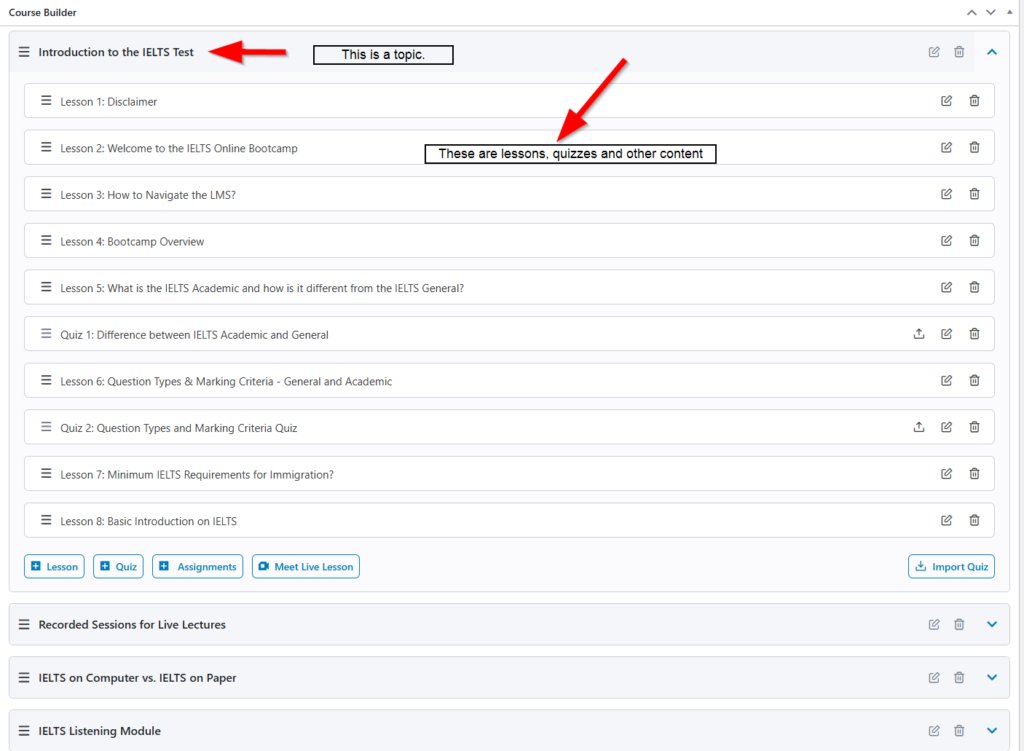
- Add lessons and quizzes: Add video lessons, PDF files, assignments, quizzes, and full-length mock tests for each course. To do this, scroll down, and you will see the option to add a new topic.
- Click the Add new topic, and in a new pop-up window, write the Topic Name and Summary for the new lesson. Once done writing, click on Add Topic.
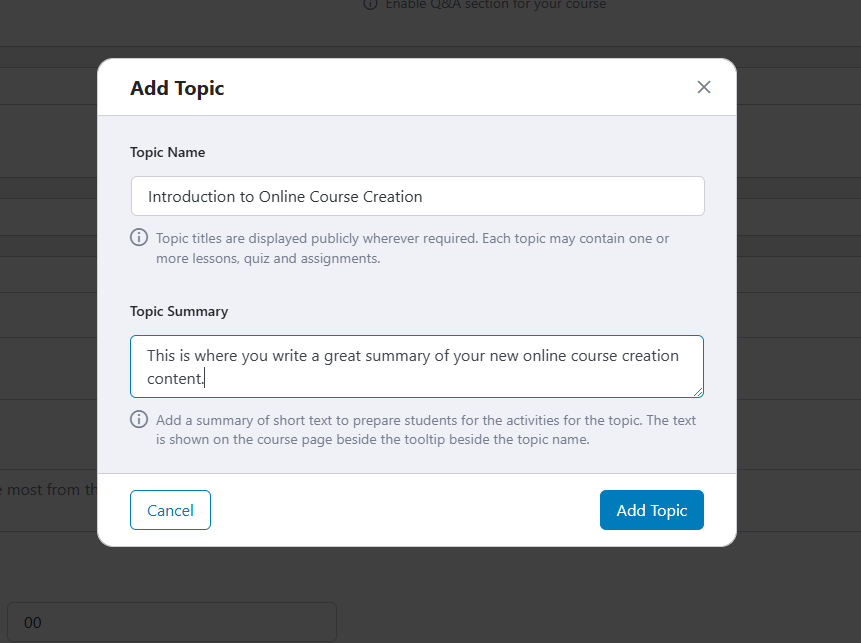
- You can now see the new topic added to the course curriculum. Once you have added a topic, you can unlock additional options such as Lesson, Quiz, and Assignments. To integrate Meet Live Lesson, you need to integrate the Google OAuth API and connect your Gmail account. However, in most cases, that is not required.

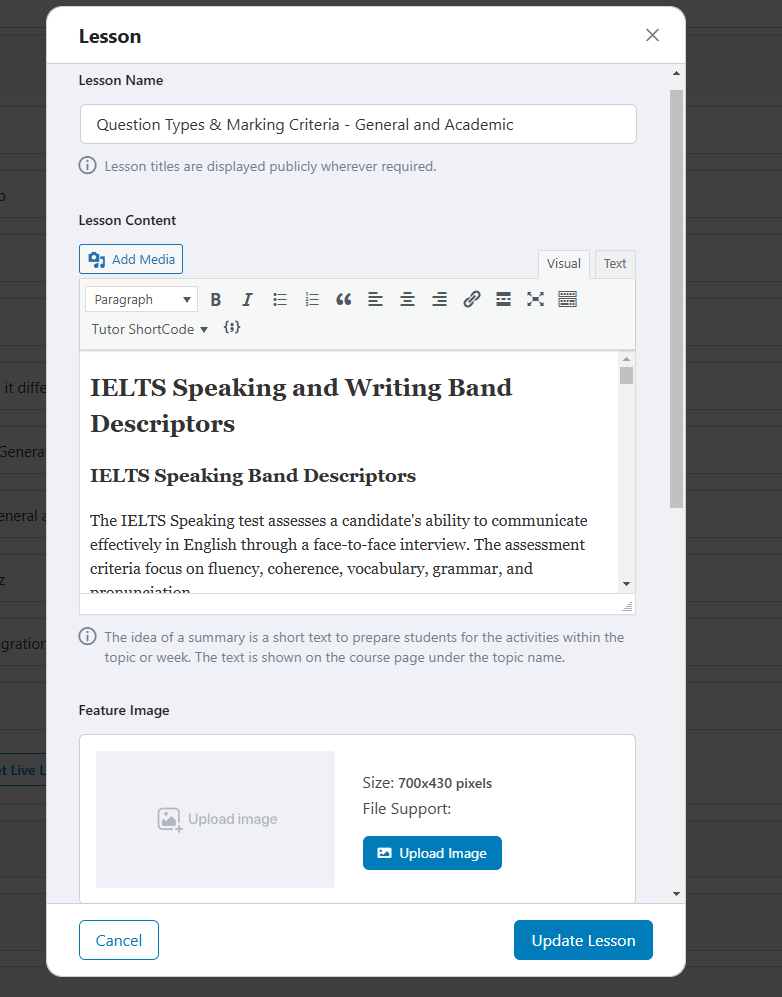
- To add a new Lesson, click on the Lesson button on the left side, and you will see a new pop-up window similar to this. Add in the Lesson Name, Lesson Content, and once completed, click on Update Lesson.
- To add a quiz, simply click the Quiz option next to Lesson and in a new pop-up window, you will be taken to create a new quiz. Provide some quiz info and click on Save & Next. Here you will have the option to add in as many of the following question types as you want:
- True/False
- Single Choice
- Multiple Choice
- Open Ended
- Short Answer
- Fill In the Blanks
- Matching
- Image Matching
- Image Answering
- Ordering
You can select any one of these options from the drop-down menu:
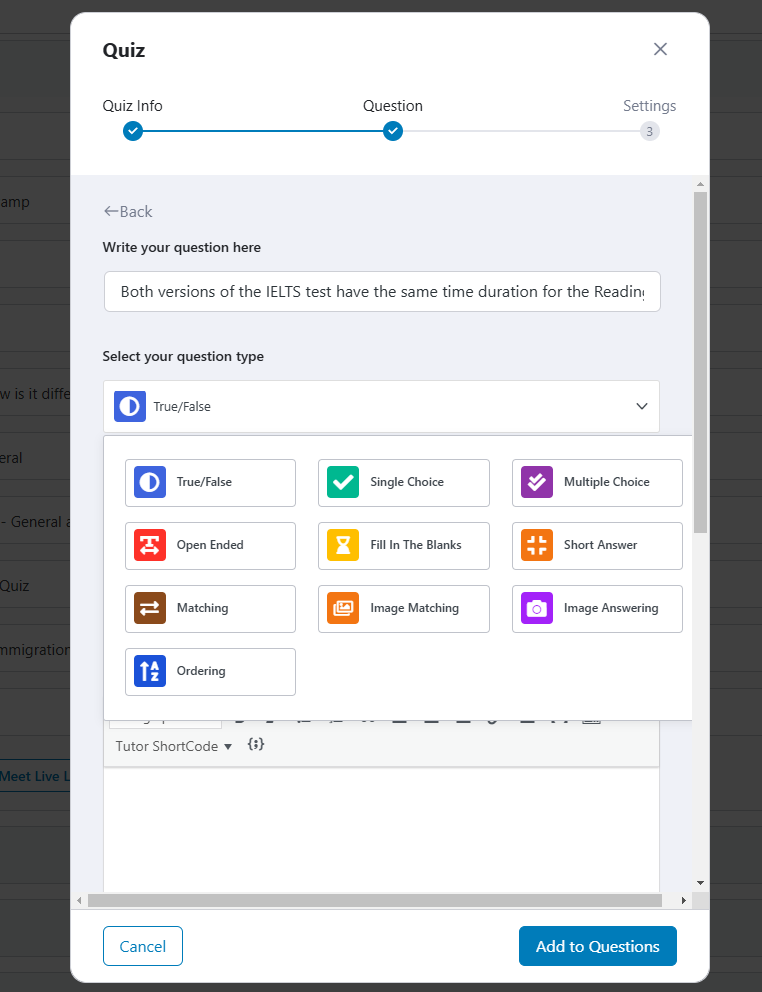
Once you click on Add to Questions, you can then make changes in Settings as you like and click Save & Next to publish your quizzes.
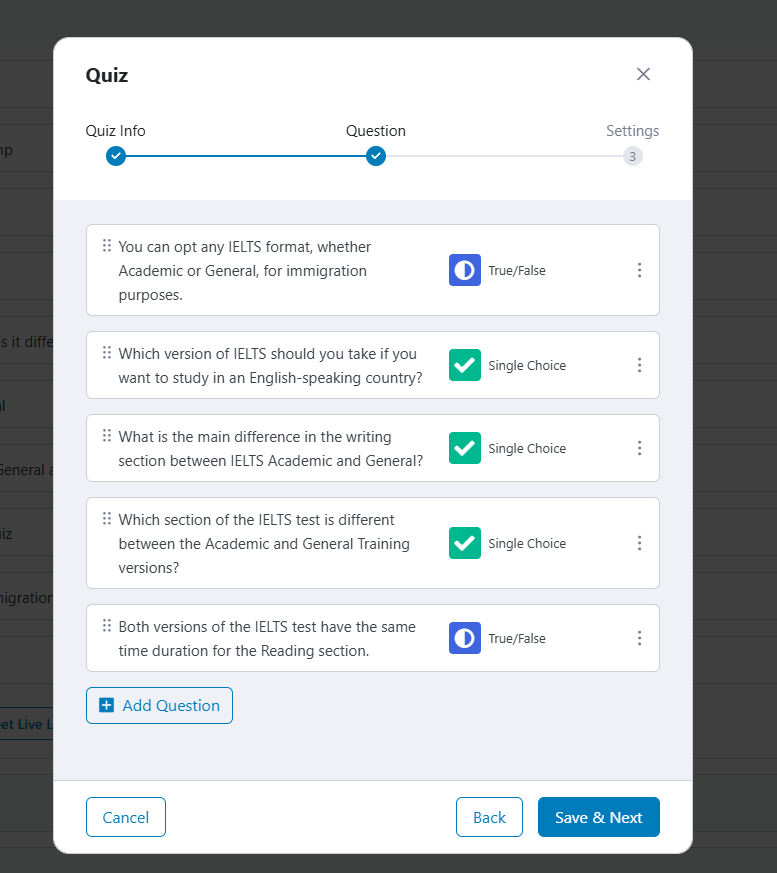
Pro Tip: If you’re handling multiple instructors or collaborators, Tutor LMS Pro’s multi-instructor feature will be highly beneficial.
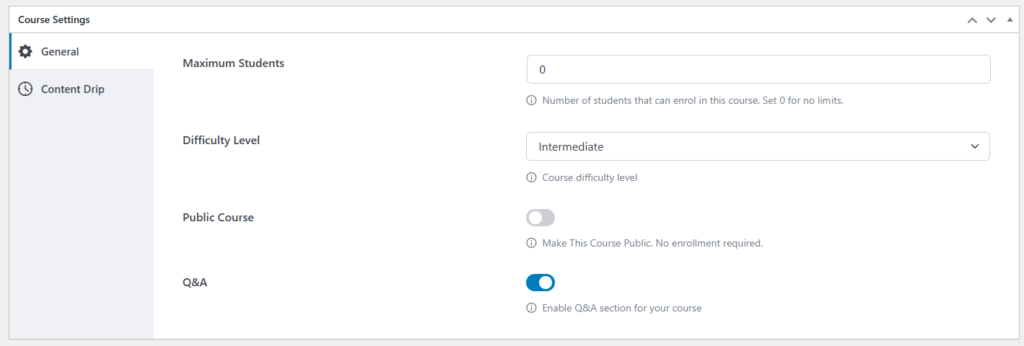
Under Course Settings, you can see the following options:
- Maximum Students: Set it to 0 if you do not want to put a limit on the number of students you want enrolled. Or specify a number, after which Tutor LMS will now allow additional students to enroll.
- Difficulty Level: You select the difficulty level of each course from All Levels, Beginner, Intermediate, or Expert.
- Public Course: When someone signs up on your website, you can either make this course public for them to enroll or keep it private with a manual enrollment option.
- Q&A: You can enable the questions and answers feature to allow your students to contact you or your instructors.
- Content Drip: This is an LMS Pro addon, which comes with a yearly $199 fee. It allows you to publish content based on a set of criteria, such as dates or prerequisites of lesson completion.
A fully-fledged course with all the bells and whistles will look like this. You can see how everything is neatly structured. The following screenshot is of a live website that teaches language content. It has lessons and quizzes that are clearly structured.
Step 5: Optimize Media and Content with Cloud Hosting
As an LMS creator, you’ll likely upload videos, documents, and quizzes, which can consume a lot of storage and bandwidth. Rapyd Cloud allows you to store large media files without compromising your site’s speed.
- Use your website storage: Upload videos directly onto your LMS website and make them private, accessible only to your paid students. Here, one of the lessons has an audio file directly embedded on the hosting server.
Step 6: Set Up Payment Gateways
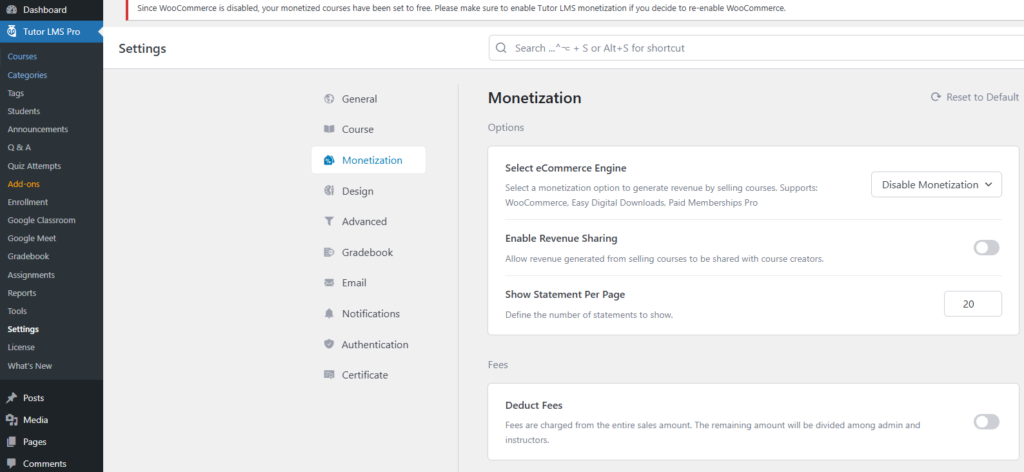
If you’re monetizing your courses, setting up a secure, efficient payment process is essential. Tutor LMS integrates with popular gateways like PayPal, Stripe, and WooCommerce.
- Configure payment settings: Go to Tutor LMS > Settings > Monetization, and choose your preferred gateway.
Many online education platforms rely on Tutor LMS and Rapyd Cloud to deliver a seamless learning experience. By embedding multimedia content on the website, you can also provide students with uninterrupted access to resources, even during high bandwidth consumption.
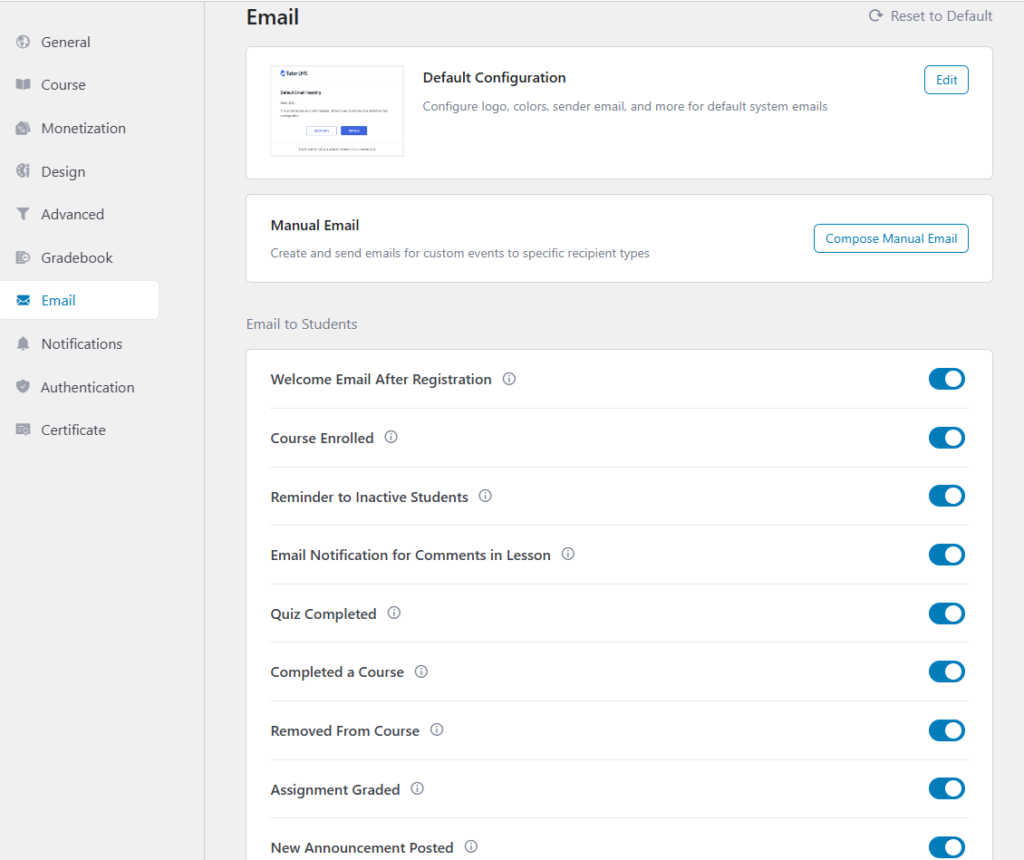
- You can also set up email configurations, but before doing that, make sure you let our team know to set up a webmail server so that your emails can go through. The email setting is one of the most powerful options for LMS, as every time a new student is enrolled, completes a quiz, and submits an assignment, the instructors and the students both get email notifications.
Step 7: Tutor LMS Import/Export Plugin
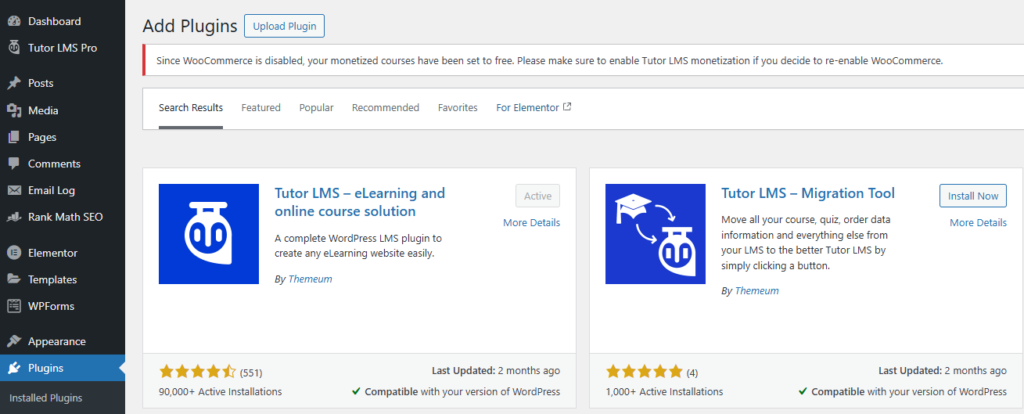
But what if you already have your course content created in another LMS? Would you manually update Tutor LMS with all the course materials? No. The best solution is to install the LMS Migration Plugin that allows you to easily migrate all course content from any other WP-based LMS to Tutor LMS.
Step 8: Test and Launch
With everything set up, it’s time to test your LMS website before the official launch.
- First, let’s look at how your students can log in and see their dashboards. On the left side, your students can view profile options, the courses they have enrolled in, reviews, quiz attempts, settings, and calendar. On the right side, they get detailed options.
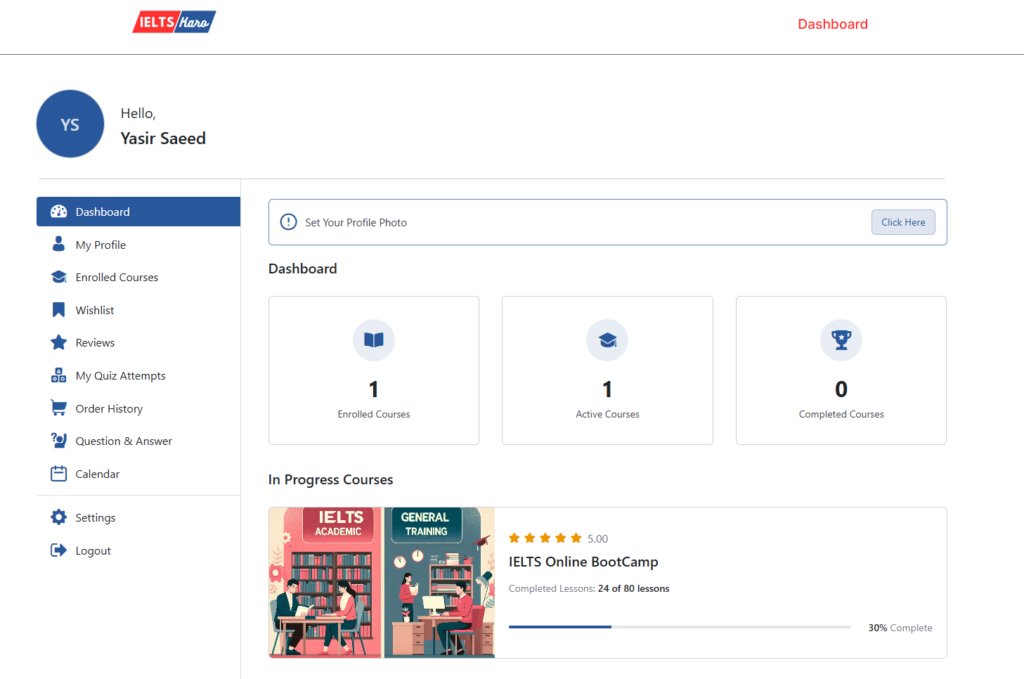
- Click on the Enrolled courses, and the students can see the courses that they have enrolled in. Once they click that course link, they will be taken to a new page as shown below:

Free vs. Pro LMS Comparison
To know more about the free vs. Pro versions, have a look at the following comparison below:
Important Tips:
- Regularly update plugins: Keep Tutor LMS and all other plugins updated for security and performance enhancements. With Rapyd Cloud, leave that to us. We’ll automatically update your theme and plugins.
- Monitor traffic and resource usage: Rapyd Cloud provides analytics to help you track and manage server resources. Should there be an anomaly, our team will handle it.
Conclusion
Building a high-quality LMS website with Tutor LMS demands dedication, but the results are truly rewarding. With Tutor LMS’s robust features combined with Rapyd Cloud’s optimized, high-performance infrastructure, you can focus on what truly matters—creating impactful courses and driving revenue. Let us handle the technical challenges, so you can bring your educational vision to life smoothly and confidently. Whether you’re an educator, entrepreneur, or institution, Rapyd Cloud is the ideal partner for launching a scalable, efficient LMS that captivates learners and fuels growth. Ready to take the leap and launch your own online courses?


