Ready to transform your knowledge into a thriving online business? LearnDash, the industry-leading LMS plugin, empowers you to create and sell stunning online courses with ease. In this hands-on LearnDash review, we’ll dive deep to help you determine if this plugin is the right fit for your needs.
Whether you’re an entrepreneur, educator, or course creator, LearnDash provides the tools you need to captivate your audience, deliver exceptional learning experiences, and generate significant revenue. Discover how to harness the power of LearnDash hosting and launch your own successful online learning platform today!
The reason why LearnDash is so popular with course creators is that it has robust features that convert your WordPress website into a cash-making machine.
In this blog, we will discuss the LearnDash LMS plugin in detail, its working, installation, and how it allows anyone to be a course creator.
1. What is LearnDash LMS?
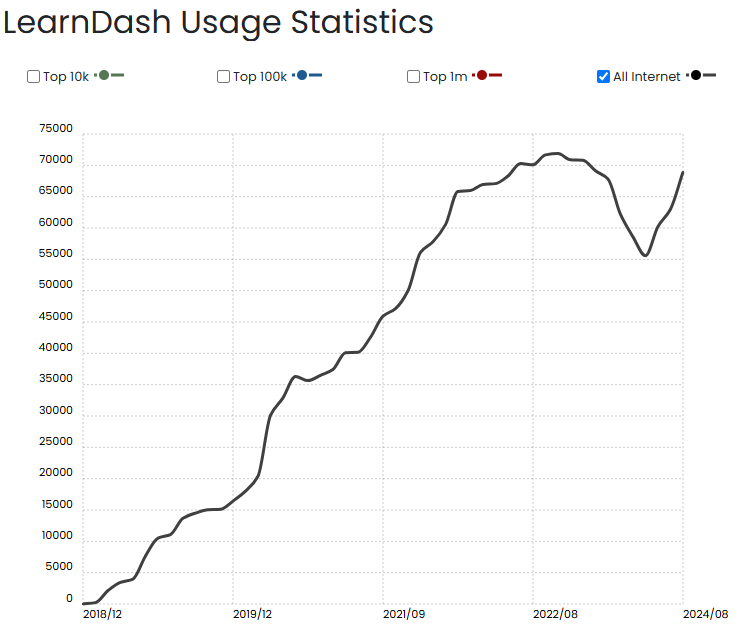
LearnDash is a powerful WordPress LMS plugin with features such as a quiz builder, assignment maker, lessons, drip content and more. According to Builtwith, there are currently 75,000+ active websites that have installed this LMS.
1.1. Overview and Statistics
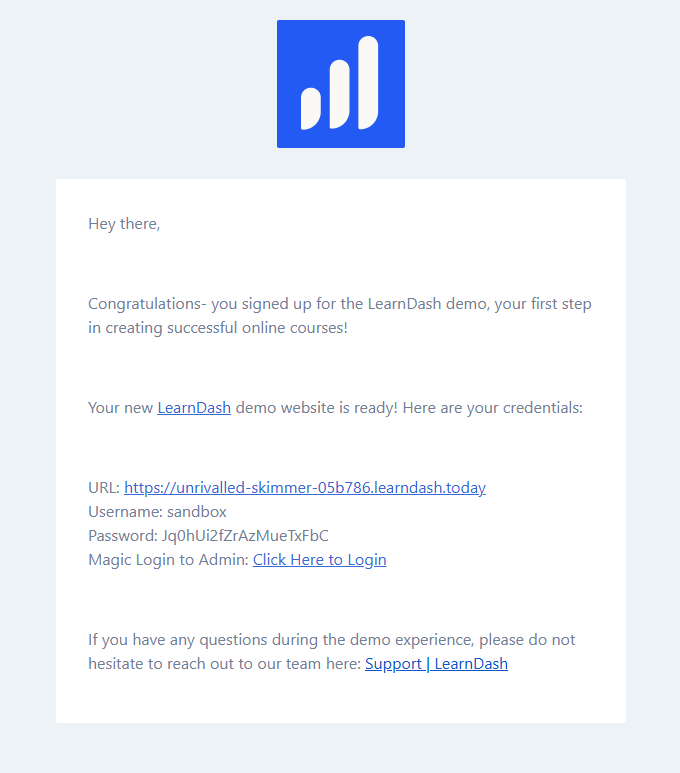
While there is no free version available, you can always try it out in a sandbox environment, which is the one we’ll use to demonstrate how it works. To take it out for a spin, head over to LearnDash website, enter in your email address, and receive the username/password in your inbox, which you can then use to sign in and test out the system.
LearnDash LMS Pricing
Once you are completely satisfied with it, you can go ahead and make a purchase at an annual price of just $199, which provides licenses for use on 1 site.
If you are a total newbie and want to skip the queue by purchasing a self-hosted solution, then their cloud hosting option is something you can consider which provides you with WordPress CMS, the Learndash LMS, and website hosting, starting at $29 a month.
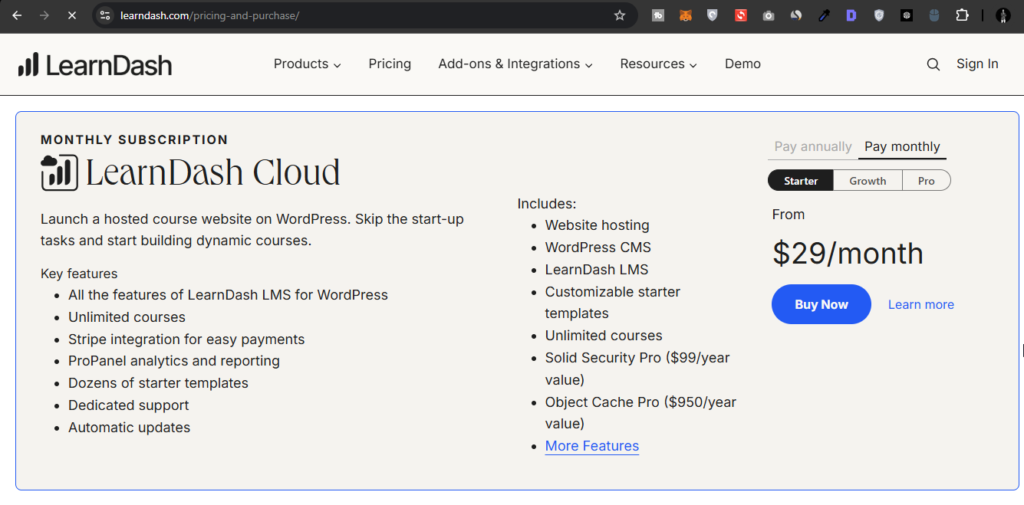
LearnDash Cloud is a new feature that differentiates it from other top LMS plugins like Tutor LMS and Lifter LMS.
This means, you get a managed WordPress hosting solution with LearnDash, at a monthly price of $29 instead of $199 upfront. Other LMS platforms do not provide such an option, which makes LearnDash to be a lucrative option.
Step-by-Step Guide to installing LearnDash LMS on WordPress
LearnDash LMS comes with a host of powerful course creation features such as drip content, quiz maker, front-end course maker, assignment builder and many more. Let’s understand the step-by-step LearnDash setup process.
The following tutorial highlights all steps in detail for you to set up, install and configure LearnDash LMS on your website. We will be demonstrating everything based on the sandbox environment as it contains all the features that you’d get otherwise with a paid license.
Step 1. Choose a Hosting Solution
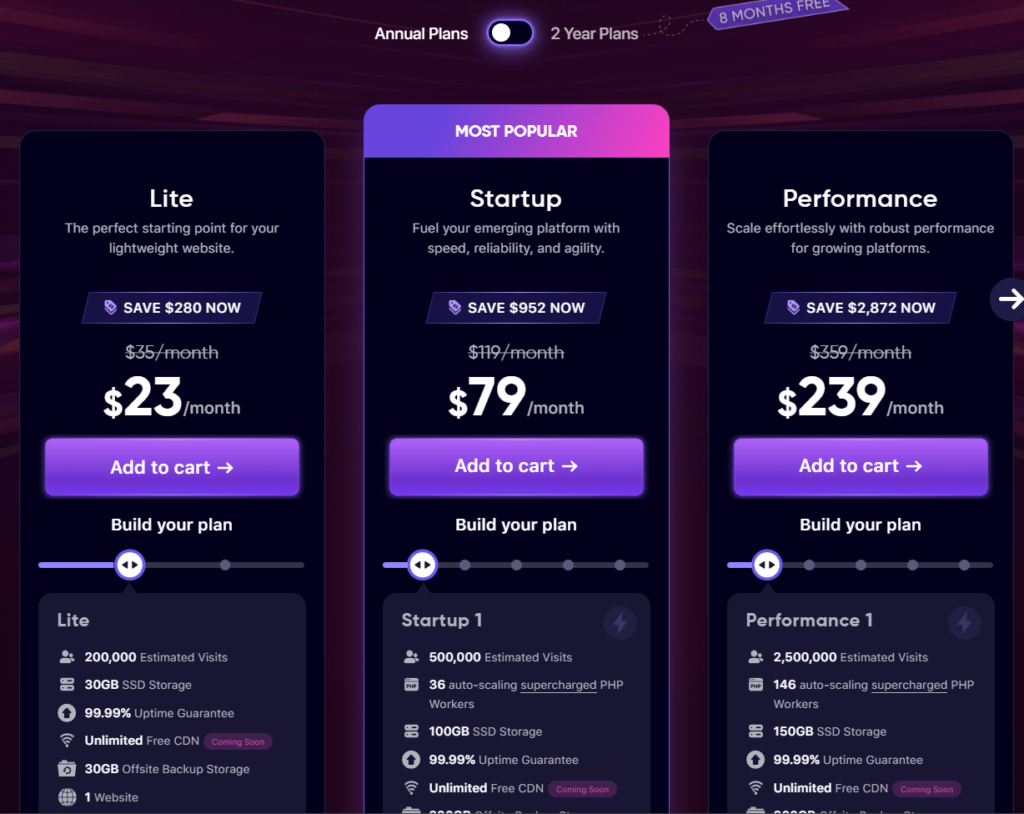
To launch your own website using LearnDash, you need to have reliable and powerful LMS hosting services. While shared hosting is great for beginners, you’d ideally want to set yourself up for success. This is why we strongly recommend to opt for Rapyd Cloud’s hosting, which provides DDoS protection, NVME storage, and turbo fast servers for hosting.
Step 2. Install and Configure the LearnDash LMS plugin
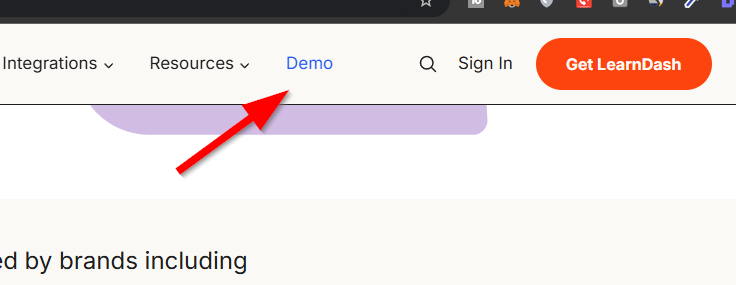
Head over to the LearnDash LMS website, and click Demo at the top right corner.
Now in a new popup window, enter your email address to receive the demo link.

Check your inbox and you should receive an email that provides you with a username, password and login access to your personal sandbox environment. Click Click Here to Login link to log in the WordPress Dashboard with your credentials.
Step 3. WP Dashboard for Course Creation
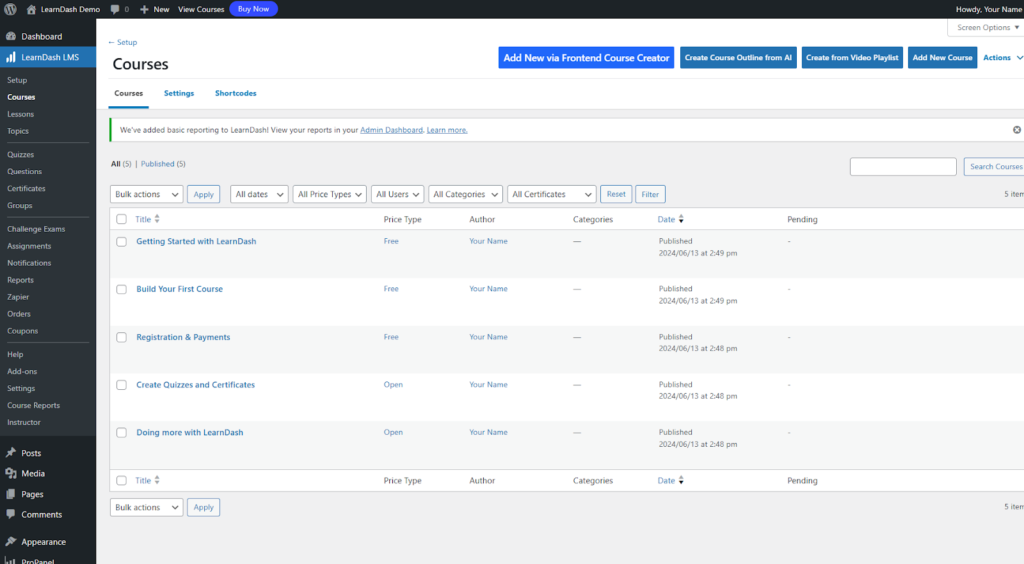
You will be immediately logged in to the WordPress admin area where you can see the plugin already installed. Click on Courses on your left, and one the right side, you will see a list of pre-built courses that you can explore.
Step 4. Create a Course, Add Topic, Lesson and Quizzes
The fun part begins here. You can start creating courses, adding topics and developing dynamic and highly engaging quizzes. To create a new course, click Courses>Add New via Frontend Course Creator.
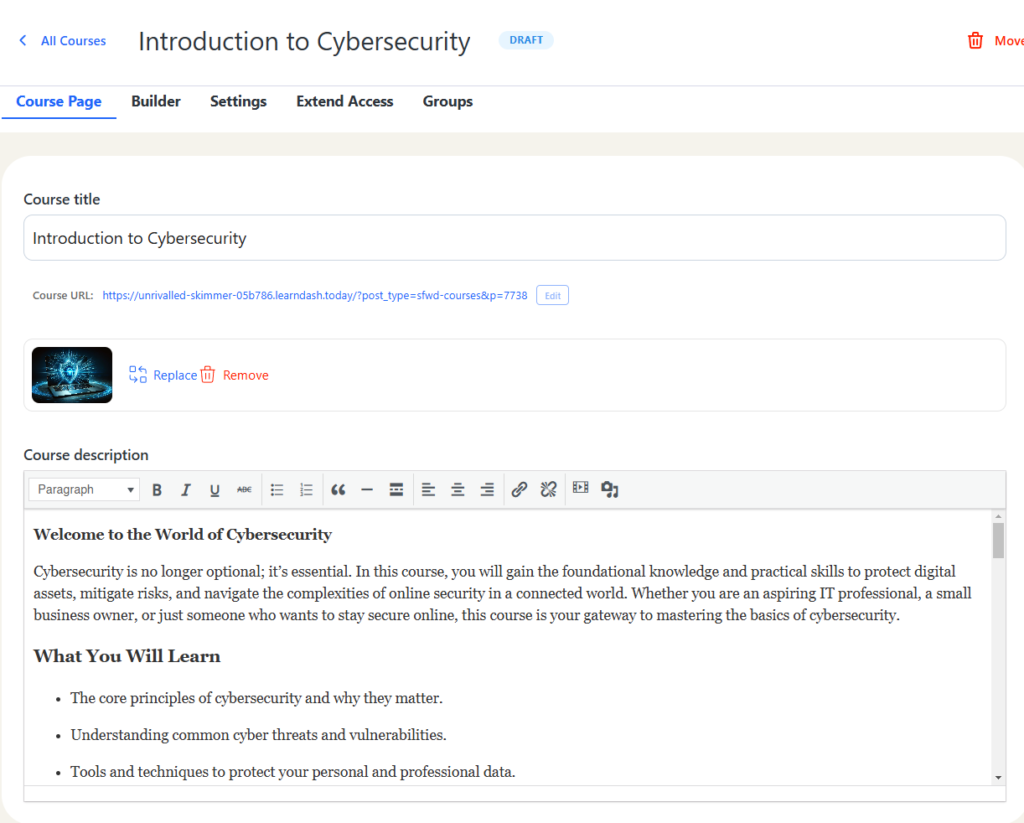
You will be taken to the frontend section, with multiple options:
- Course Page – This is where you enter the title, description and the featured image of the course.
- Builder – Add in lessons, topics and quizzes.
- Settings – Decide if you want to show content as drip or all at once, and many other settings that you can tweak for the course.
- Extend Access – Provide access to the course either for a set duration or have an expiry date.
- Groups – You can define groups with inclusions or exclusions from this specific course.
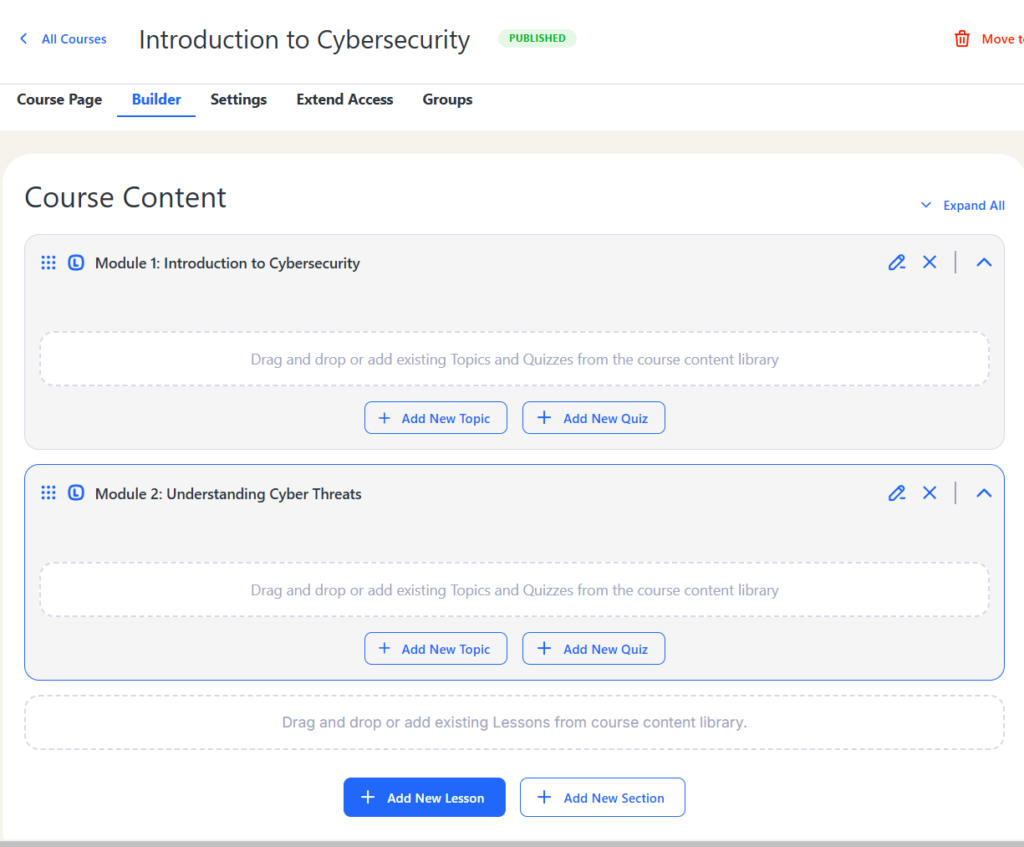
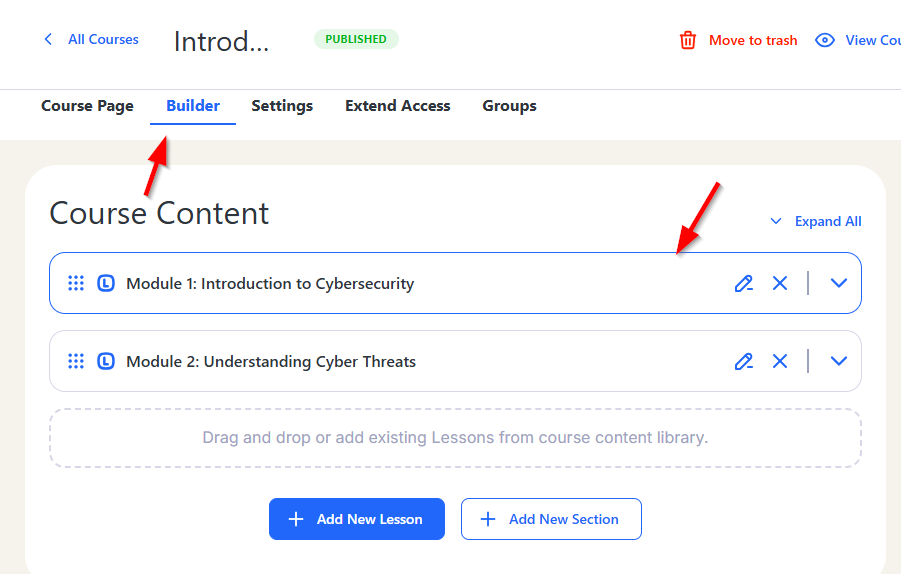
Once we have built some foundations of the course, you can see it populated in the image above. We have just created a new course on Cybersecurity by adding in the details to show you how it is done easily.
Step 5. Add in Lessons and Topics
To create new lessons click Builder and here you will see the following options:
- Add a new lesson – Lesson is the main heading or unit of the module.
- Add a new topic – Topic is added underneath each lesson.
- Add a new quiz – To enhance learning, add a quiz of various types.
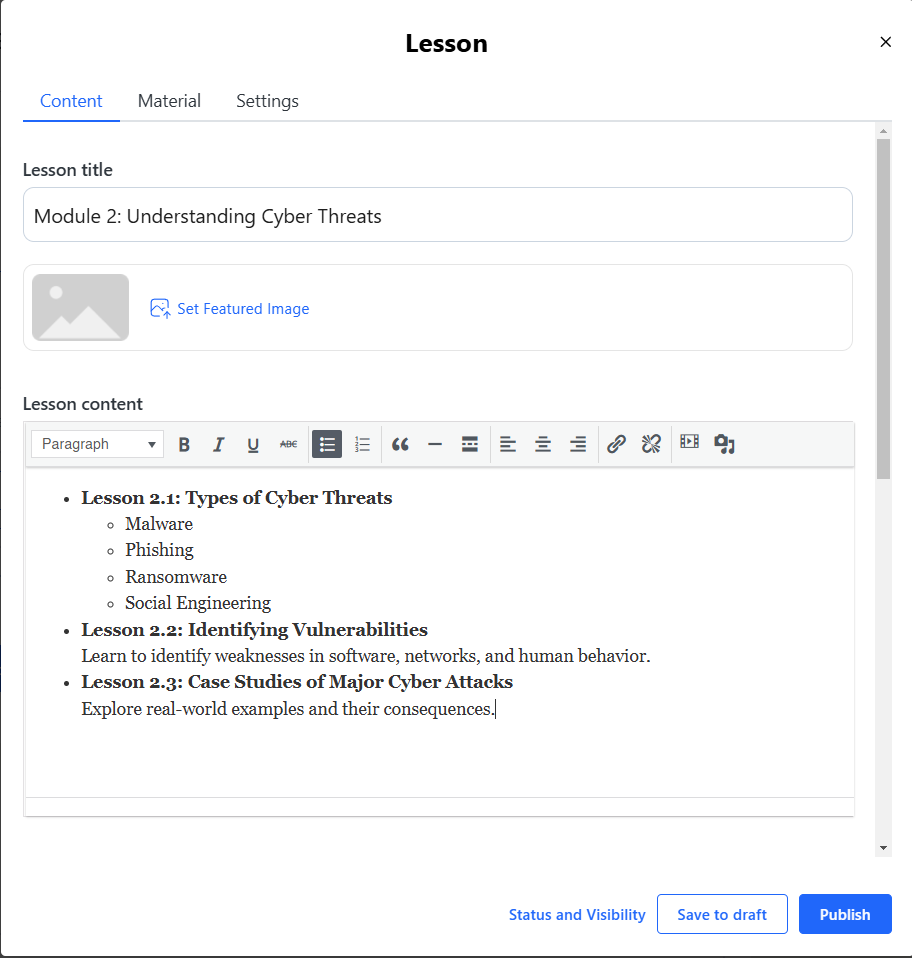
To add in a new lesson, click on Add New Lesson. In a new popup window, add in your lesson details. Here is the list of options that you get:
- Content – You add in course content here.
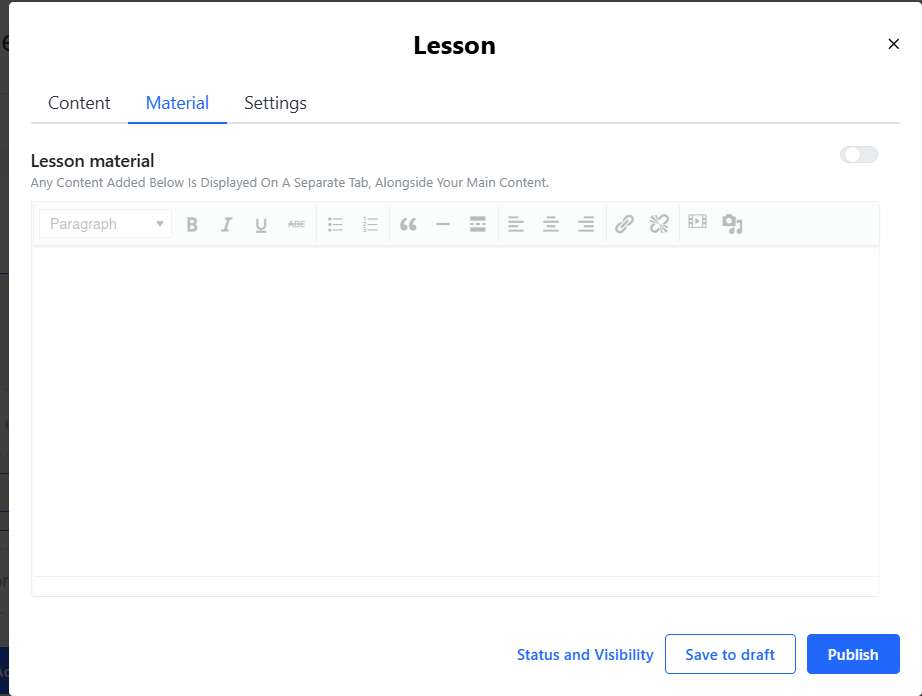
- Material – If you want to add additional content such as PDFs, you can attach here.
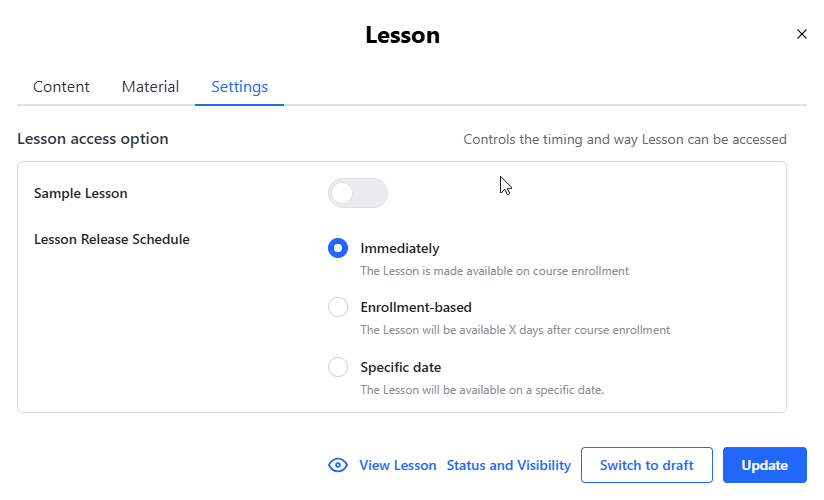
- Settings – Specify quiz appearance, time and other options for each test.
Head over to Material where you can add PDFs and other course content to make it more interactive and rich in media.
Now click Settings where you can adjust how you want people to view the contents of the lesson. You can set it as a free sample lesson or set a publishing schedule.
Once you are done making changes, click Publish and you can see the lesson.
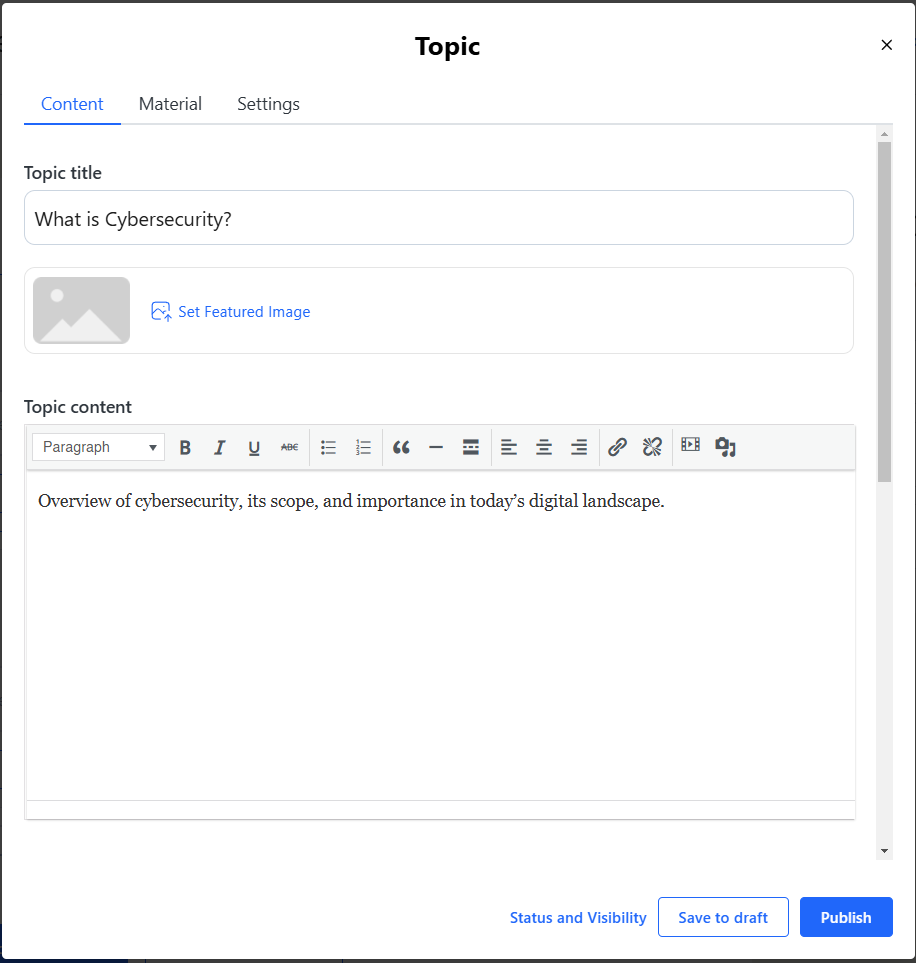
To add in topics, you need to click Add a Topic under each lesson and in a new popup window you can provide details for the topic. The options that you see here are no different than the ones seen in Lesson. Once you click Publish, you will be able to see the topic underneath the lesson.
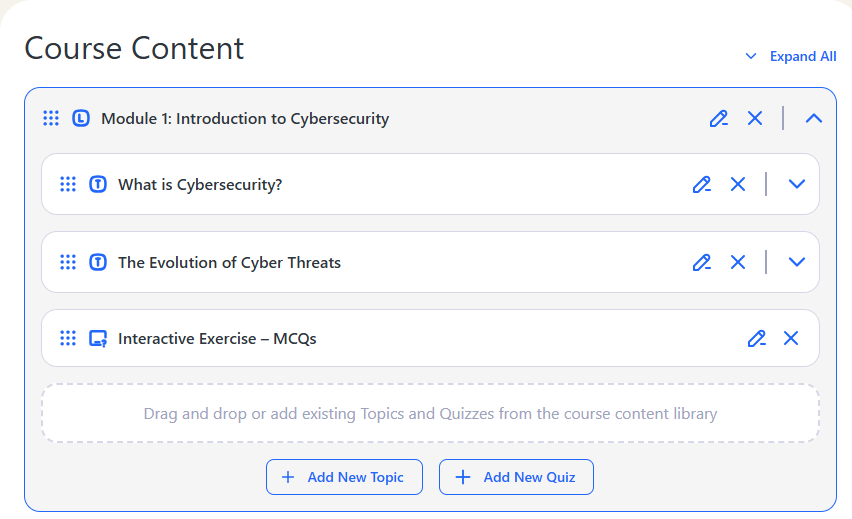
This is how the topics appear beneath lessons.
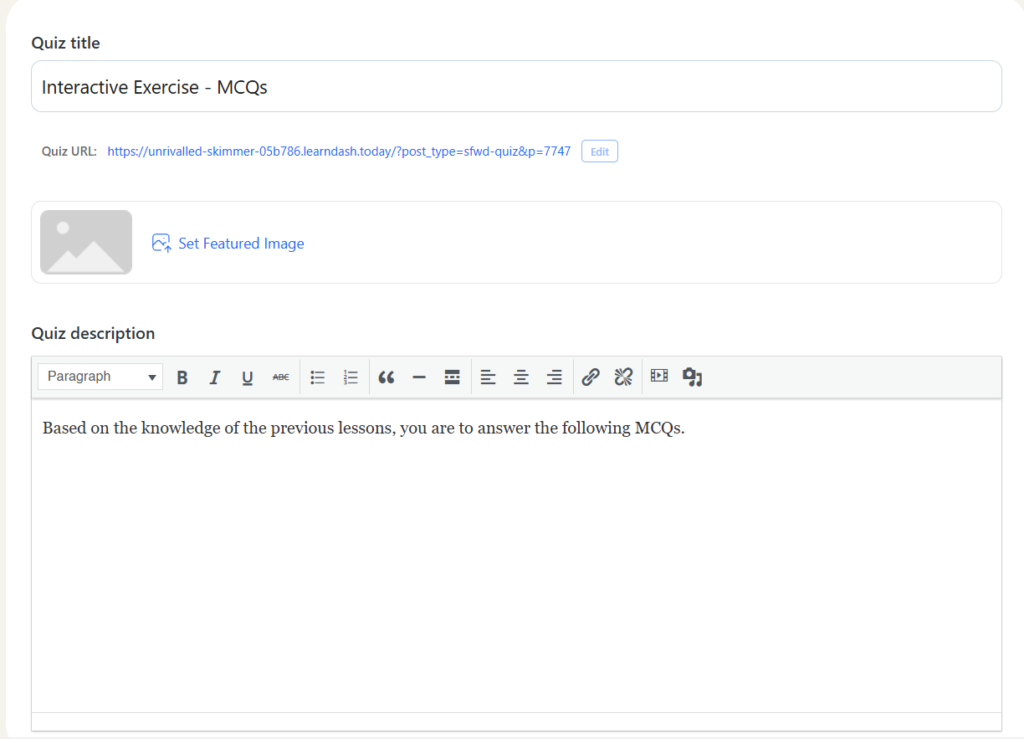
To add a quick, click on Add New Quiz and in a new popup window, you need to specify the Quiz Title, Quiz Description.
To add new questions, click Builder>Add new question.
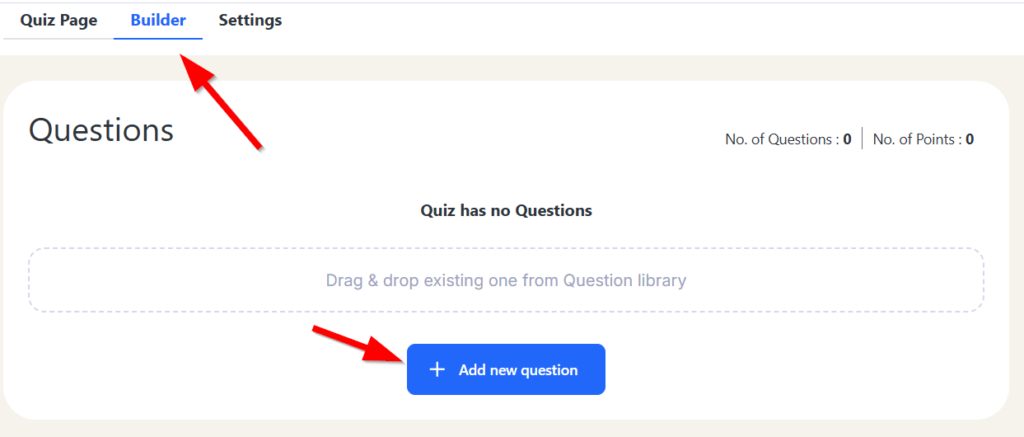
There are multiple options for quizzes. These are:
- Single Choice
- Multiple Choice
- Free Choice
- Matrix Sorting Choice
- Sorting Choice
- Fill in the Blanks
- Assessment
- Essay/Open Answer
Select any one from the drop down and give a title and description to the answer. Next, click the Answer tab and fill out the possible answers based on your question type. Don’t forget to check the Mark as correct answer option or else your question won’t be saved. Once you are done adding answers, click Publish.
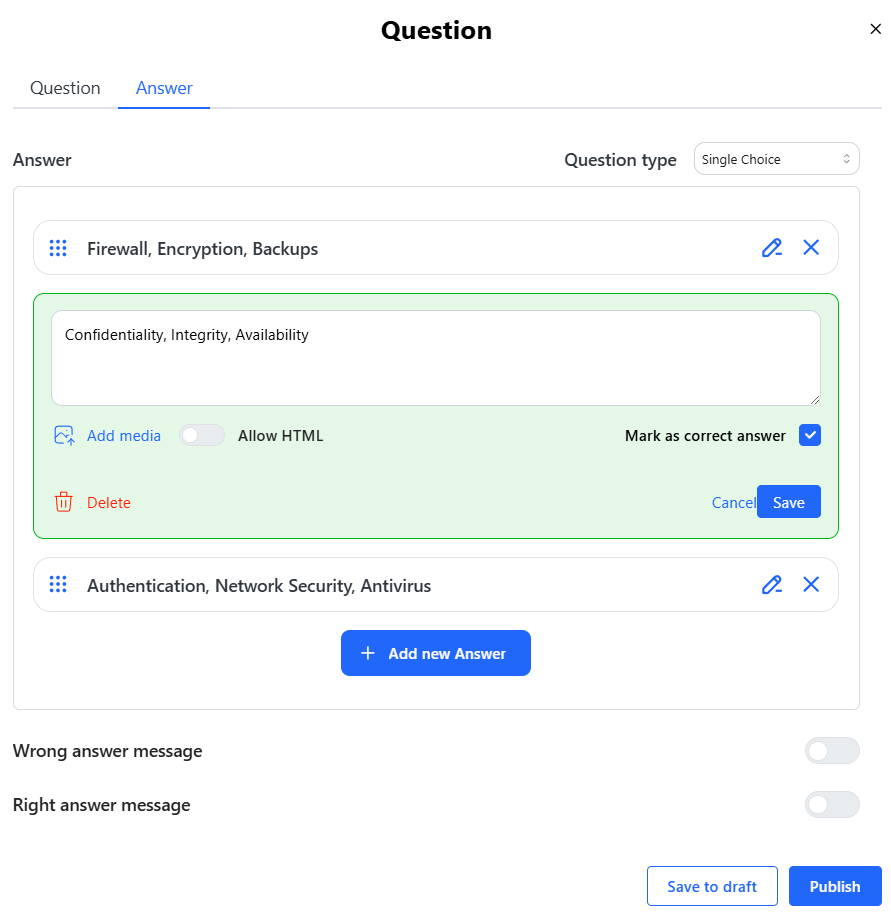
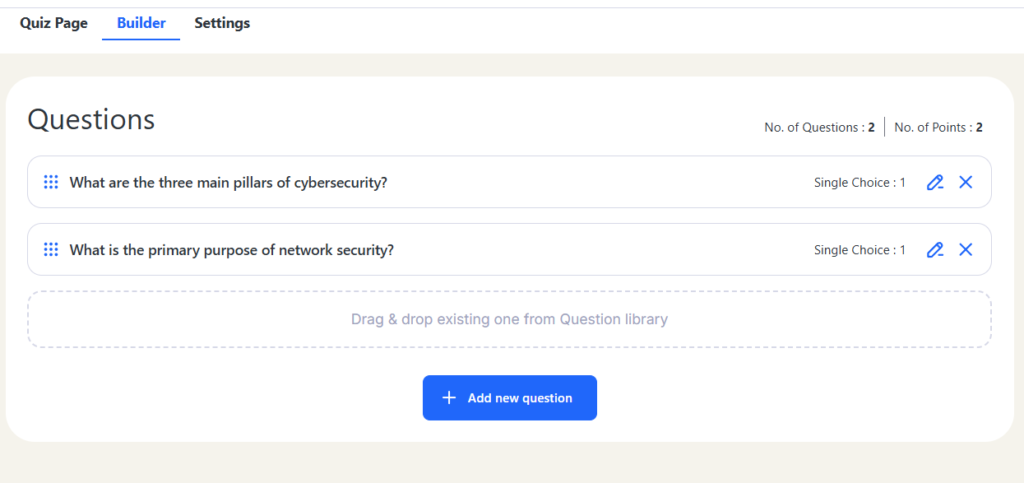
This is how the questions will appear once created in the Frontend.
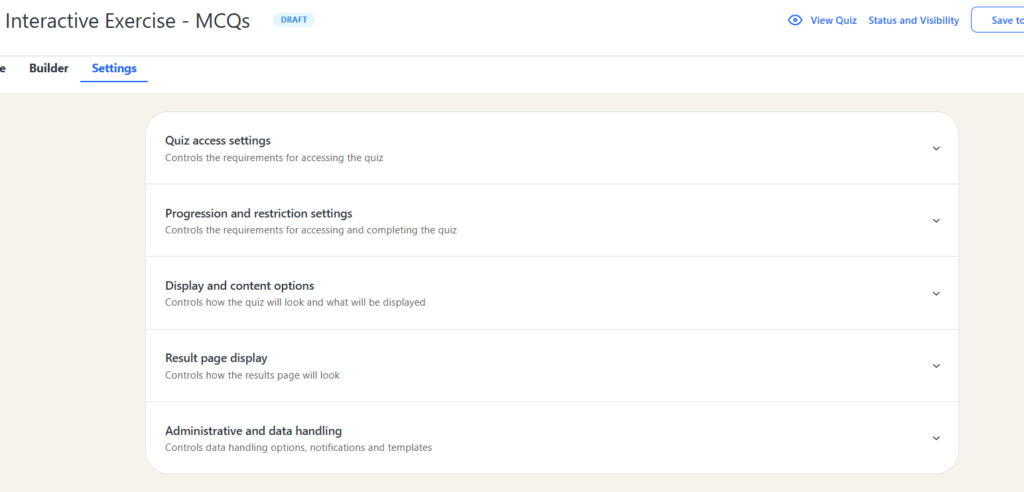
To make any changes to how the quiz appears, such as quiz time, access settings and progression, click the Settings option at the top next to Builder and feel free to play around with the options to suit your liking.
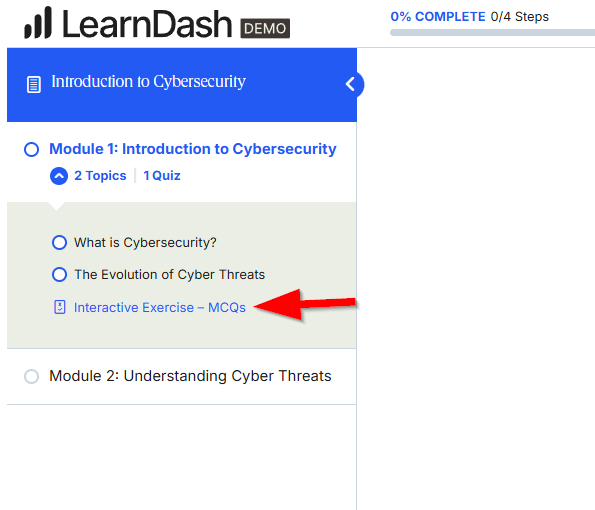
Once the page refreshes, go to the course page and you can see the lessons, topics and the quiz added as follows. The sections are on the left, and the contents for each section on the right.
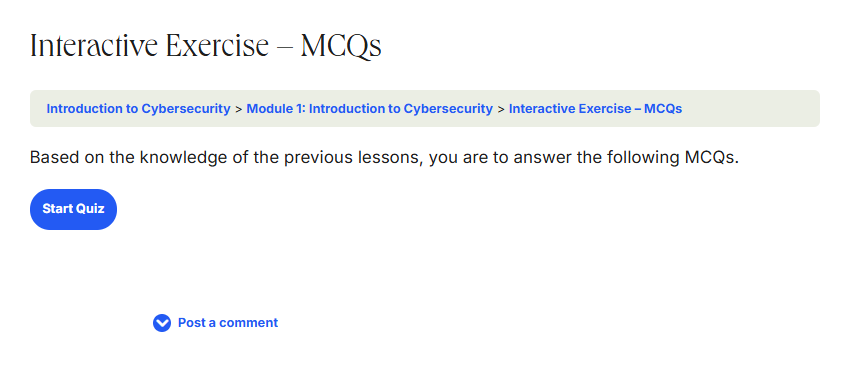
Click Start Quiz to start the quiz that you just created.
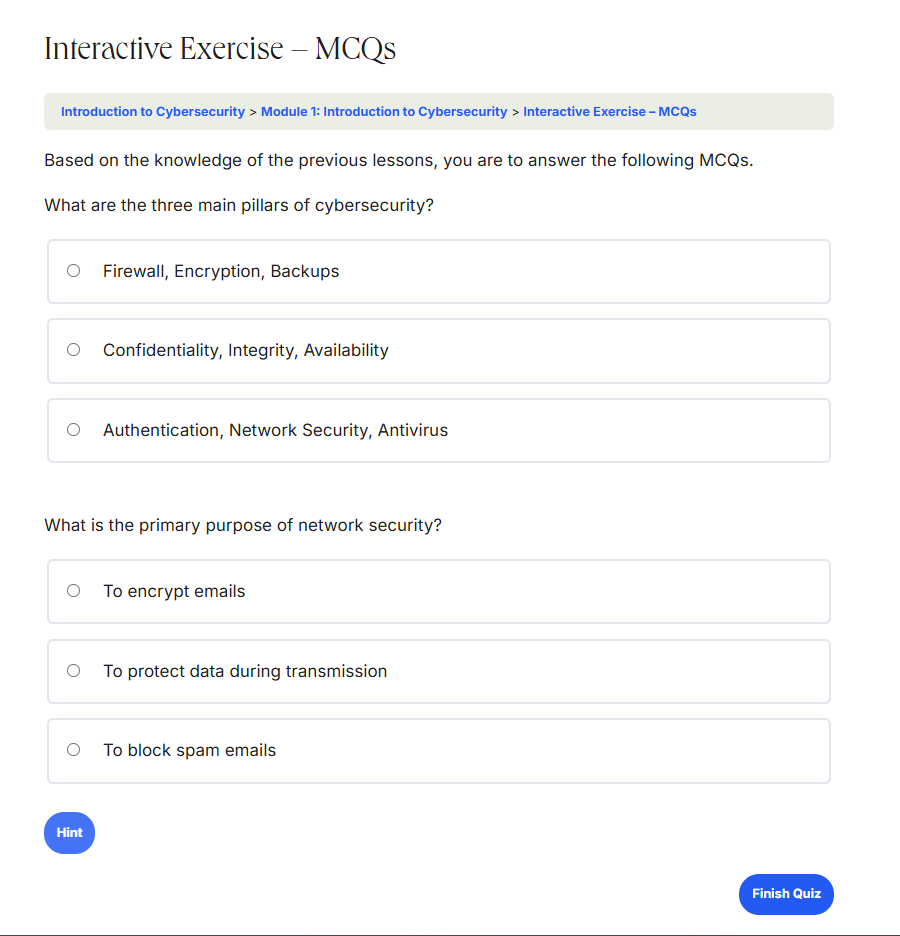
We chose the option of showing all questions on just one page. This is how the quiz is beautifully displayed to the user attempting it:
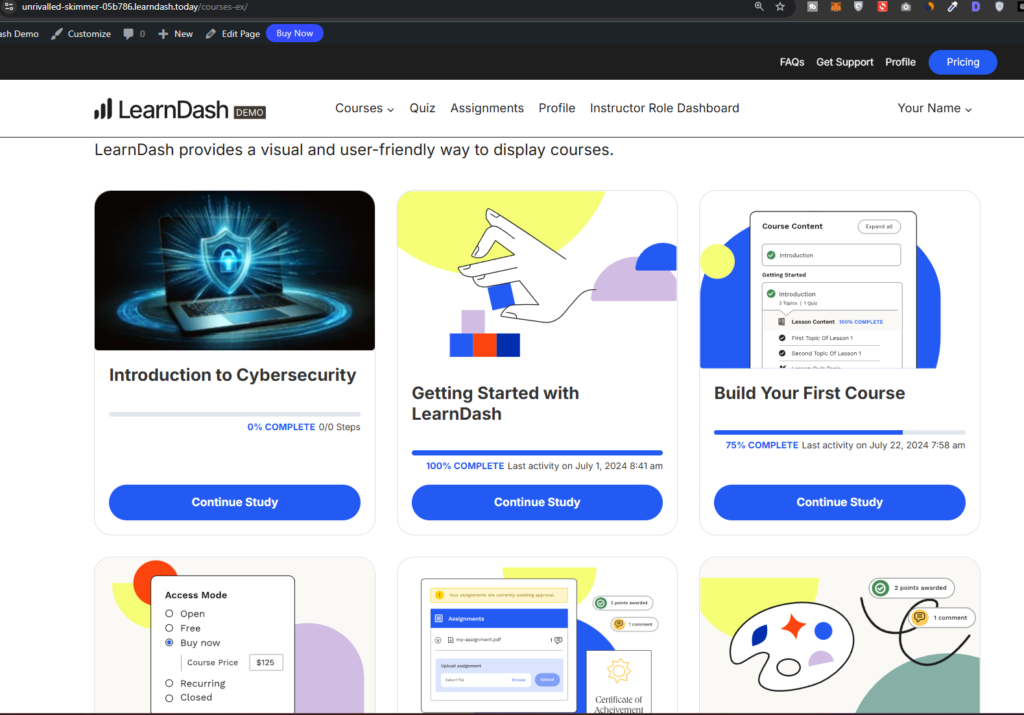
You can also see the main courses page of the website where all courses are beautifully displayed. This is the main page with the /courses link generated by default to make it easier for your audience to pay and enroll in a course of their choice.
Step 5. How to integrate Stripe/Paypal
The entire purpose of creating a course website is to monetize your knowledge by setting a price for each course. This is an exclusive option that is provided by LearnDash LMS. This step shows you how to integrate payment gateway methods, mostly Stripe and Paypal, so that your students can confidently make a purchase using SSL encryption on your website.
The method of setting up Stripe is the same for Paypal. To set up, head to the main page, and click Connect Stripe, under the payment options.
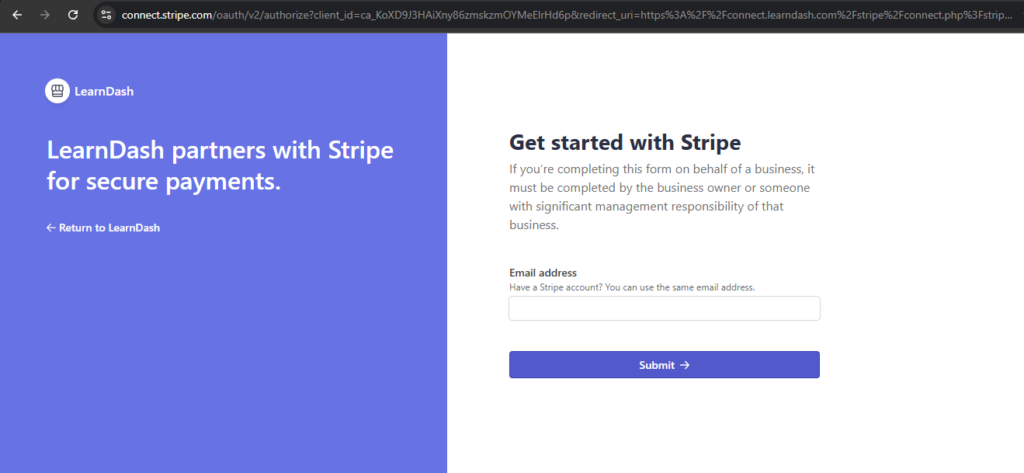
You will now be redirected to the Stripe page where you can enter your Stripe credentials to integrate your account with your website and LearnDash LMS portal.
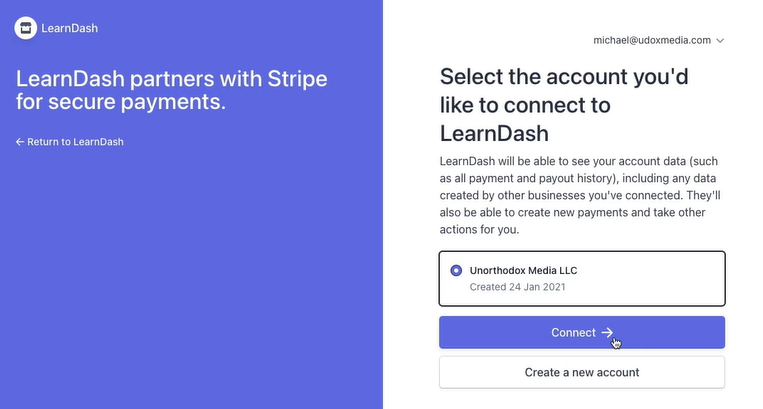
Once you enter your Stripe details, it will ask you to connect the account associated with your username.
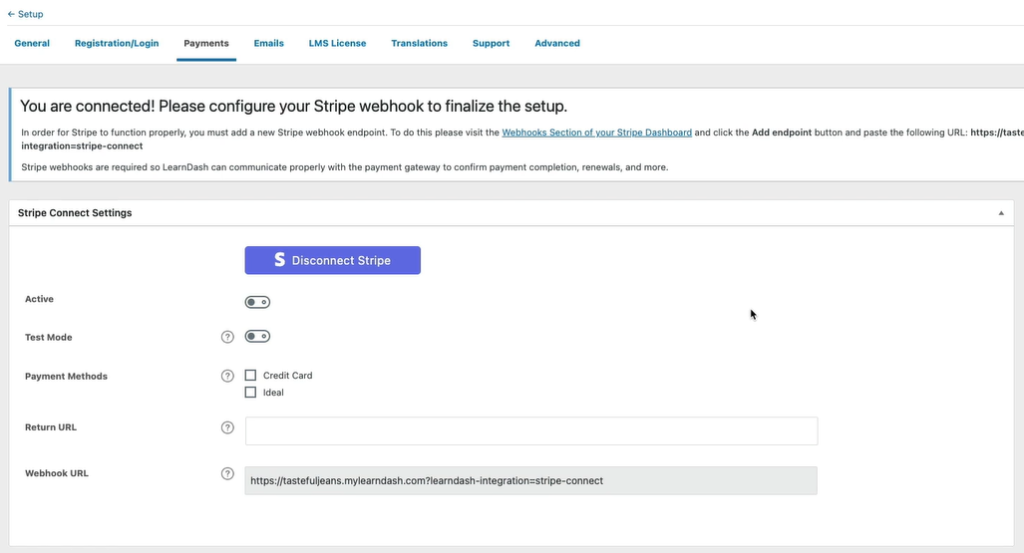
Once connected, you will be redirected back to LearnDash LMS portal and then see a message at the top You are connected! Please configure your Stripe webhook to finalize the setup.
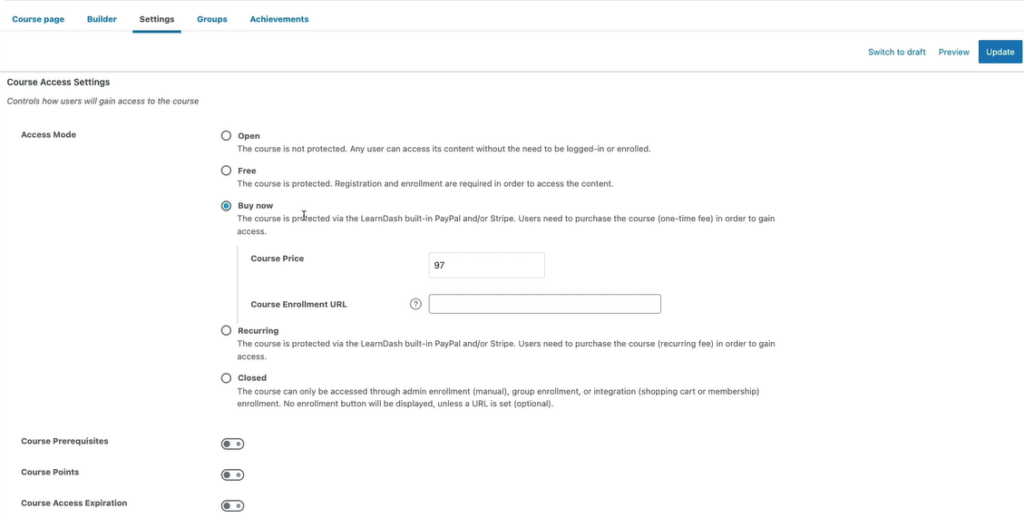
Once you set up an endpoint, you can now visit the Settings page of your course and set a price that you want to sell it for. Open means that the course is openly available to anyone without registration. Free means that even though the course is free, the user still needs to sign up and enroll with their email address to access the course. Buy now means you can set the Course Price to your liking. Next to Course Enrollment URL, specify the link address where you want people to redirect to once they make a successful purchase of your course. Recurring means that the fee will be deducted on a monthly basis from each user enrolled in the course. Once you are done with all the changes, click on Update.
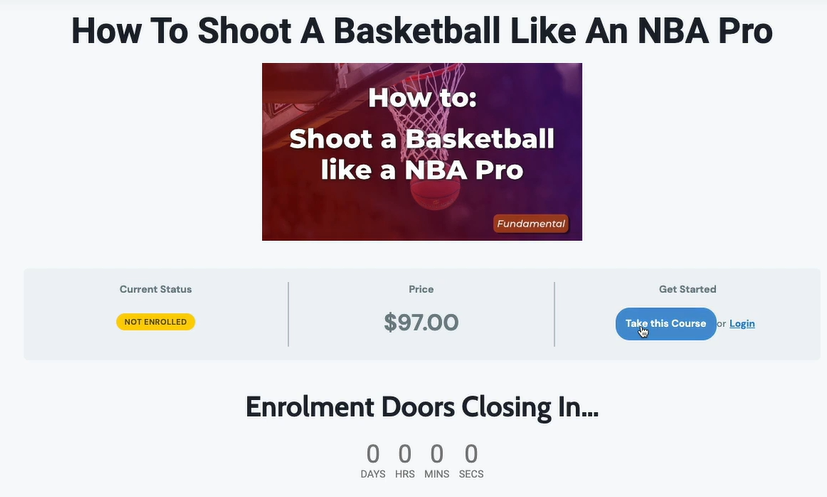
You can now see that the course has a set price of $97 which you specified earlier under the settings.
2. Who Should Use LearnDash?
If you have the knowledge and are willing to share it with others, there is someone out there ready to pay for it.
This statement may sound like a cliche, but if you think deeply, it efficiently sumps up the motivation you need to start your own digital product.
Whether you’re a teacher sharing your love and passion for Physics, Chemistry or any other academic subject, or an online entrepreneur who wants to just share premium knowledge with the world, LearnDash LMS is here to help you in achieving your dreams.
It enables you to set up your own course website and start selling your online courses by integrating with Stripe and PayPal in a matter of minutes.
3. Pros and Cons of LearnDash
Every LMS plugin has its own learning curve, and for LearnDash LMS, this is no different. You need to invest some time and energy before you can make the best use out of it.
Since the only way to install LearnDash LMS on your website is after purchasing its site license, we strongly recommend testing out and learning all of its features in the sandbox environment. This will dramatically reduce the time you need to build your own online courses without having to worry about making a significant investment.
Here are all the pros and cons highlighted:
- Pros
- Complete control over course contents, price, and audience metrics.
- Create unlimited courses any way you want.
- Buy a self-hosted solution or a one-time annual fee to set up the LMS.
- You retain your customers.
- You do not pay a cut to LearnDash LMS for any sales you generate.
- Cons
- Not easy to set up as it comes with a learning curve.
- You are responsible for branding and marketing
- Regardless of the sales or free content, you are also responsible for timely payments (monthly or annually as per your contract)
- Some question options are limited compared with Tutor LMS Pro.
4. Comparison with Tutor LMS Pro
LearnDash LMS and Tutor LMS both are comparable to each other. They offer robust features, enhanced security, stripe/paypal integration and have frontend course creation options. Tutor LMS also comes with a free version that you can use on your website but you have limited options of creating lessons, topics and quizzes.
In contrast, LearnDash LMS does not provide a free option, rather you can try out all features for free using their sandbox environment before making a purchase.
LearnDash provides monthly self-hosted plans and annual site-wide license, whereas Tutor LMS does not offer any self-posted plan. You can read our detailed Tutor LMS review here to know more about using this plugin.
4. Conclusion and Final Verdict
Learndash LMS offers outstanding features and the best in class for course creation, allowing you to build visually stunning courses, course pages, and a wholesome online learning environment.
Using LearnDash LMS and Rapyd Cloud hosting is a perfect match because the hosting solutions offered are in line with the demands of hosting your own course website. Go ahead and build an online learning empire with the likes of Coursera and Udemy, whereas we cover your hosting needs.
Frequently Asked Questions
What is LearnDash LMS?
LearnDash is a powerful WordPress plugin that transforms your website into an online learning platform. You can create courses, quizzes, and publish drip content. It is an excellent tool for marketers, educators and entrepreneurs looking to share their knowledge and build a community online.
How much does LearnDash cost?
A single-site license costs 199 a year, 355 for 5 sites, and 799 for 10 sites, respectively. If you want to avoid this upfront investment and get a ready-made solution with hosting, then the learndash cloud hosting plan is a better option for you. It starts at 29 a month, and goes upward based on the features you need.
Is LearnDash easy to use?
While LearnDash offers a wide range of features, it’s designed with user-friendliness in mind. But for anyone trying out for the first time, we strongly recommend taking a demo version and using all of its features before making a purchase. The detailed documentation makes it relatively easy to set up and manage your online courses.
Does LearnDash offer support?
Yes, LearnDash provides comprehensive support to its users. You can access their extensive documentation, knowledge base, and community forums for assistance. Additionally, they offer premium support plans for more in-depth help.
Can I track my students’ progress with LearnDash?
Yes, LearnDash includes powerful reporting and analytics tools that allow you to monitor student progress, track course completion rates, and identify areas where learners may need additional support.
Is LearnDash suitable for beginners?
A: While LearnDash offers a range of advanced features, it’s also accessible to entrepreneurs who have never created a course. The user-friendly interface and helpful resources make it a good choice for those new to online course creation.
Why should I choose Rapyd Cloud for my LearnDash LMS site?
Rapyd Cloud is specifically designed to handle the demands of resource-intensive platforms like LearnDash. It offers optimized performance, fast load times, ironclad security, scalability and expert Support.


