On average, it takes more than 90 minutes to watch a movie (not counting Marvel Universe), but less than one hour to build your own BuddyBoss mobile app!
Why does that matter, you say?
In these days of online socializing and learning, a BuddyBoss mobile app isn’t just “nice-to-have” anymore – it’s the key to boosting engagement, providing seamless access, and meaningfully connecting with your audience.
So, for all you BuddyBoss community managers, e-learning platform and membership site owners, and developers, we have a treat – a step-by-step guide to building your BuddyBoss mobile app in under 60 minutes with no code.
Ready? Start the clock!
How to Build a BuddyBoss App – Step by Step
Step 1: Connect Your BuddyBoss App to Your Website
The first order of business is to link your existing BuddyBoss website and the BuddyBoss App platform. To do this, you’ll need the BuddyBoss App plugin installed and activated on your WordPress website.
So, go to your WordPress Admin dashboard and select Plugins > Add New, then Upload Plugin.

Once installed, connect the app to your website.
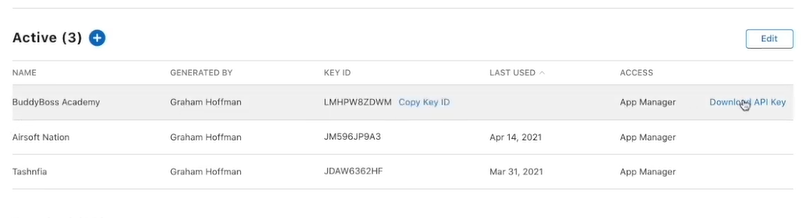
First, go to your BuddyBoss.com account, select Apps, then Manage to copy your App ID and App Key.

Copy these numbers and head back to your WP dashboard. Now go to BuddyBoss App > Connect and enter in the App ID and App Key.

Once your site is connected, you will see the following message:
This site is now connected as your primary site.

Step 2: Configure Your BuddyBoss App
For starters, we’ll handle the basics. Click Configure to specify the app’s name, description, and icon under ‘General Configuration’. After that’s done, press Save.

Step 3: iOS Configuration – Setting Up for Apple Devices
If you want your app to be available on the Apple App Store for iPhones and iPads (as you should), you’ll need to venture into the iOS settings within the BuddyBoss App platform.
Head over to your Apple Developer account, then App Store Connect > Users and Access > Keys. Click the plus icon to add in a new API, then Generate.

You can now see a new API key generated, which you’ll need to proceed. So, click Download API Key.
In a new pop-up window, press Download.

Now copy the Issuer ID.

Return to the WP Dashboard and BuddyBoss settings. Paste the Issuer ID, Key ID, and upload the Apple API Key.

That’s it – your Apple Developer account is now connected!

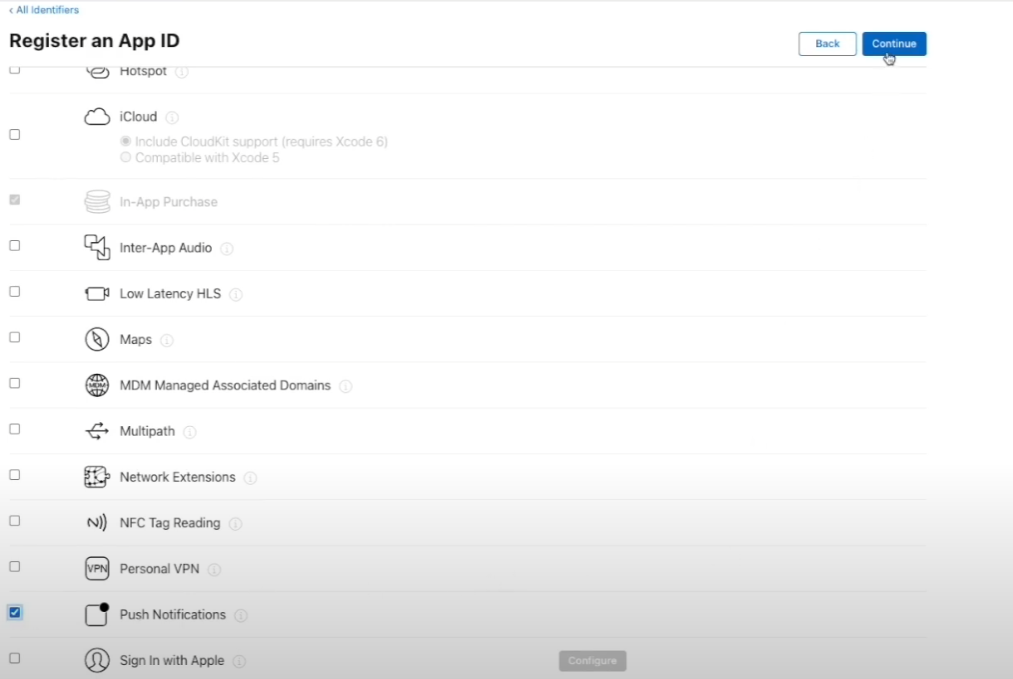
You’ll also want to add an Apple certificate. Open your Apple Developer account and select Certificates, IDs, and Profiles.

Pick Identifiers, then the plus icon to add in a new identifier.

Select App IDs and click Continue.

Add the App ID, select Push Notifications, and then click Continue.
Do the same for the release and test versions.

Go back to WP dashboard, select the test and release versions, and click Save Configurations.

Mac users will need to log in to their Apple Developer account and add a new app. Select the platform, primary language, Bundle ID, and the SKU version. Grant Full Access and press Create.

From the App Store Developer account, copy and paste the Apple App ID for the newly created BuddyBoss app, as well as the App Specific Shared Secret back into the WP main dashboard.

Step 4: Add Your iOS Device for Testing
How else will you ensure that your app functions flawlessly and provides a great user experience if not via testing on real devices? For iOS, you’ll need to add your iOS device to the BuddyBoss App platform for testing purposes.
Here’s what you do: click iOS Devices > Add New Device. Then, add in the name of the new device.

From there on, scan the QR code using the same device you want to add to the list.

Voila – the device is now added.

Step 5: Android Configuration – Setting up for Android Devices
Just like with iOS, you’ll need to configure the Android settings within the BuddyBoss App platform to have it available on the Google Play Store and, hopefully, thousands of Android devices.
Make your way to the Google Play Store Developer account and click on Create app.

Provide the app name, make sure to select that it’s a free app, then click on Create app after accepting the Terms and Conditions.

Now go to Settings > Developer account > API Access > Create new project and click on Link a Project.

Once you are inside the linked Google Cloud project, your next objective is to create a new service account. To do so, click Create Service Account.

Provide additional details such as Service account name, Service account, and Service account description. Click Create and then insert the necessary details of the remaining two steps if you want – both are optional.

You don’t need to grant additional access to this service account. Click Done.

You will now see the BuddyBoss service that you recently created. Next on the list is to create a key by clicking on the three dots under Actions and selecting Manage keys.

Download the key as a JSON file and click Create.

Head over to the WP Dashboard and upload the JSON file you just downloaded in the Android Settings.

Your work is almost done – you have successfully connected your Google Play Store Developer account with the website.

As you’ve probably noticed, the main difference between Android and iOS is that you only need to provide one App ID in the former, whereas the latter requires separate versions.
All that’s left to do is to create the Application ID and then click Save Changes.

All done!
Step 6: Configure Firebase for Android
For Android apps built with BuddyBoss App, Firebase (Google’s mobile and web app development platform) is often used for push notifications and other backend functionalities. Hence, configuring it is a step you don’t want to miss when setting up your Android.
To begin, we’ll create a Firebase project (in case you don’t have one already) in the Firebase Console.

Within your Firebase project, add a new Android app. You’ll need to provide the Package Name you configured in the BuddyBoss App platform.
First, get the server key by going to Settings, Cloud Messaging, and copy the server key.

Firebase will generate a google-services.json file, so make sure to download it. The BuddyBoss App platform will have a section for Firebase configuration where you’ll upload the google-services.json file.
Don’t let this overwhelm you – Firebase configuration is primarily for enabling push notifications on Android and potentially other backend services. Moreover, the BuddyBoss App platform streamlines this integration so you won’t break a sweat.
Step 7: App Settings
With the basic configurations and platform-specific settings in place, it’s time to fine-tune your app’s functionality and user experience through the App Settings within the BuddyBoss App platform.
Here’s what you do:
- Navigation Menu: Customize the app’s navigation menu by choosing which menu items to include (e.g., Activity Feed, Groups, Forums, Courses, Members) and arranging them in a way that makes sense for your users.
- User Roles and Permissions: Control who can access what within the app. You can often mirror the user roles and permissions you’ve set up on your BuddyBoss website, ensuring consistent access control.
- Feature Configurations: Depending on the BuddyBoss App platform’s features, you might have options to configure specific functionalities. This could include settings for push notifications, in-app purchases (if applicable), and integrations with other services.
- Appearance Settings: This is where you go beyond the basic branding colors and further refine the visual appearance of your app. This includes customizing fonts, button styles, and other UI elements to align with your brand aesthetics.
The point here is that you can absolutely tailor the mobile experience to perfectly match your community’s needs and overall platform strategy.
Step 8: Customize the App Branding – Make it Truly Your Own
As you may or may not know, branding is key to making your app feel like a natural extension of your online community. The BuddyBoss App platform provides robust customization options to make sure that your app truly reflects your brand identity. This includes:
- Logo Customization: Upload your brand logo to be prominently displayed within the app, often in the header or navigation areas.
- Color Scheme Refinement: Basic branding colors are fine, but you want to tweak the color palette used throughout the app and make everything pop. That said, try to ensure that your color choices enhance readability and go in line with your brand guidelines.
- Splash Screen Design: Create a visually engaging splash screen that reinforces your brand identity and leaves a positive first impression when users launch the app.
- Custom CSS (Optional, for Advanced Users): For those with coding knowledge, the BuddyBoss App platform offers the option to add custom CSS (Cascading Style Sheets) for even more granular control over the app’s visual appearance.
Don’t be fooled – branding customization is as much about functionality as it is about having a visually appealing and brand-consistent experience for your users.
Step 9: Expand Functionality by Adding App Pages as Necessary
While the BuddyBoss App platform automatically brings in your core BuddyBoss website features, you might want to take a minute and think about adding custom pages to your app for specific content or functionality, such as:
- Custom Pages: Build completely new pages within your app. This could be for welcome messages, promotional content, resource libraries, or any other information you most definitely want to make easily accessible within the app.
- Webview Pages (Linking to Website Sections): Embed specific sections of your BuddyBoss website within the app using webview pages. This is useful for seamlessly integrating content that’s primarily managed on your website but needs to be accessible within the app.
- External Links: Add links to external sites or resources that are relevant to your community.
In a nutshell, adding app pages allows you to offer more to your users beyond the core BuddyBoss features and provide a richer, more tailored experience they will appreciate.
Step 10: Build Your App – Compiling for iOS and Android
Since we did all the configurations and customizations tasks, the time has come to build your app. This is where the BuddyBoss App platform takes over the technical heavy lifting.
- Initiate Build Process: Within the BuddyBoss App platform dashboard, you’ll find a “Build” button. Click this to start the app building process.
- Platform Handles Compilation: The BuddyBoss App platform will automatically compile your app for both iOS and Android platforms. You don’t need to worry about complex coding or compilation steps.
- Build Time (Under an Hour!): The platform is designed for rapid app building. In most cases, the build process will be completed in well under an hour, often within minutes.
The “Build” step is remarkably simple thanks to the BuddyBoss App platform, allowing you to focus on your content and community rather than technical complexities.
Step 11: Install and Test Your App – Ensuring a Smooth User Experience
Once the build is complete, it’s crucial to install and thoroughly test your app on both iOS and Android devices before launching it to your wider community.
- Download Test Builds: From the BuddyBoss App platform, download the test builds for both iOS (.ipa file) and Android (.apk file).
- Install on Devices:
- iOS: Use a tool like TestFlight (often provided or guided by BuddyBoss App platform) to install the .ipa file on your registered iOS device.
- Android: Install the .apk file directly onto your Android device (you may need to enable “Install from Unknown Sources” in your device settings temporarily for testing purposes).
- Thorough Testing: Test every aspect of your app:
- Navigation: Ensure menus and links work correctly.
- Content Display: Verify that all your BuddyBoss content (posts, groups, courses, etc.) is displaying correctly within the app.
- Features: Test all features like posting, commenting, joining groups, accessing courses, push notifications (if configured), etc.
- User Experience: Evaluate the overall user experience – is it smooth, intuitive, and visually appealing?
- Identify and Report Issues: If you find any issues during testing, report them to the BuddyBoss App platform support team or address them through configuration adjustments within the platform.
Thorough testing is essential to catch any glitches and ensure your app provides a polished and professional experience for your users from day one.
Step 12: How to Manage Your BuddyBoss App from the Rapyd Cloud Dashboard
The Rapyd Cloud Dashboard serves as your central command center for managing your BuddyBoss mobile app after it’s launched.
- App Updates: Deploy updates to your app directly through the Rapyd Cloud Dashboard. This simplifies the process of releasing new features, bug fixes, and content updates without requiring users to manually update from app stores every time (depending on the type of update).
- Analytics: Access analytics and usage data for your app through the dashboard. This valuable information helps you understand how users are engaging with your app, identify popular features, and make data-driven decisions to improve the app over time.
- User Management (Potentially): Depending on the specific features of the BuddyBoss App platform and Rapyd Cloud Dashboard, you might have some level of user management capabilities directly within the dashboard.
- Push Notification Management: If you’ve configured push notifications, the dashboard is typically where you’ll manage and send out push notifications to your app users.
The Rapyd Cloud Dashboard provides ongoing management capabilities, ensuring your BuddyBoss app remains dynamic, engaging, and aligned with your community’s evolving needs.
Conclusion: Ready to Launch Your Dream Mobile App?
Building a mobile app for your BuddyBoss community doesn’t have to be a complex, time-consuming, or expensive endeavor. The BuddyBoss App platform has truly democratized app development, putting the power to create a professional, native mobile app directly into your hands – in under an hour!
By following these simple steps, you can transform your BuddyBoss website into a mobile powerhouse, reaching your members wherever they are, boosting engagement, and taking your community to the next level.
If you’re still unsure about BuddyBoss, check out our detailed BuddyBoss review and I’m sure you’ll be enticed to use this wonder platform.
So what are you waiting for? Stop dreaming about a mobile app and start building! The BuddyBoss App platform makes it faster and easier than you ever imagined. Launch your dream mobile app today and unlock the full potential of your online community.
And if you need a BuddyBoss hosting that is optimized for your mobile app, try Rapyd Cloud’s best wordpress hosting for high traffic today.
Frequently Asked Questions
Why use BuddyBoss?
BuddyBoss stands out as a powerful platform for building online communities and membership sites on WordPress. Its key benefits include comprehensive community features, flexibility and customization and powerful e-learning Capabilities.
How to set up BuddyBoss?
Setting up BuddyBoss involves a few key steps:
- Content and Community Building.
- WordPress Installation.
- BuddyBoss Theme and Platform Plugin Installation.
- Configuration.
How do you build your own app using BuddyBoss?
Building your own app using BuddyBoss is remarkably straightforward thanks to the BuddyBoss App platform. As detailed in this blog post, the process involves:
- Connecting your BuddyBoss website to the BuddyBoss App platform.
- Configuring basic app settings, iOS and Android settings.
- Customizing branding and adding optional app pages.
- Building the app with a click of a button.
- Testing and launching your app.
The BuddyBoss App platform is designed to be no-code, meaning you don’t need programming skills to create a professional mobile app.
Is BuddyBoss open source?
No, BuddyBoss is not fully open source. It is a commercial product with a proprietary license. However, it is built on top of WordPress, which is open source.
How much does it cost to build a custom app?
The cost of building a custom mobile app through traditional development can vary wildly depending on complexity, features, and the development agency you hire. It can easily range from $15,000 to $100,000 or even more. Factors influencing cost include complexity of features, platform, location of the agency or freelancers, etc.