Launching a site is a huge undertaking, especially when you’re juggling a gazillion other things: from customer service to growing your brand and anything in between.
To make matters worse, setting off to build a WordPress website often means wrestling with complicated hosting control panels. In a flash, initial excitement can give way to frustration.
That’s why Rapyd Cloud exists – to shorten the learning curve needed to build a WordPress website and simplify the entire web development process — from setup to launch.
That’s also why this article exists. By the time you finish it, you’ll know all there is to know on how to build a website with WordPress that is professional, secure, and ready to welcome visitors from every corner of the world.
Step-by-Step Guide to Build a WordPress Website
1. Registering Your Domain
It all starts with a domain name, which is basically your online address – aka. the name people put in their browsers to find you. But it just can’t be any name – no sir/mam. You have to put your thinking cap on and carefully pick it.
Key considerations when choosing a domain name:
- Simplicity: Shorter names are generally remembered better.
- Relevance: Ideally, your domain should reflect what you do and who you are.
- Extension: The .com one is most common, though you could certainly use a regional or niche extension if it fits your business.
Now that we got your creative juices flowing, here’s how you can register your domain in a few quick steps:
- Choose a Domain Name Registrar: This is the company that handles the reservation of domain names and assigns IP addresses to them. GoDaddy, Namecheap, and Cloudflare Registrar are good options.
- Search for Availability: Check with the registrar’s search tool if your desired domain is available. If so, consider variations or look for another extension.
- Purchase and Complete Registration: Provide your details, add domain privacy if you want to keep your personal info hidden in WHOIS databases, and make payment.
With a fresh domain secured, the next thing you need to build a WordPress website is hosting.
2. Signing Up for Rapyd Cloud
You’d think that with so many hosting providers available, picking one would be quite a task. Luckily for you, Rapyd Cloud is one of the easiest to use out there, and WordPress installation is a breeze.
Why Rapyd Cloud, you ask? Here are just a few reasons:
- Simple Onboarding: You can start a WordPress site without figuring out complex server settings.
- Powerful Server Infrastructure: High-performance LiteSpeed servers designed for top-notch efficiency so you can grow your website to its full potential.
- Intelligent Caching: Advanced caching with Redis and Object Cache Pro that speeds up your website.
- Free CDN: No-cost Rapyd CDN ensures high performance to all visitors, regardless of where they are.
- Security Features: Built-in support for SSL and automatic backups (with or without plans) that keep your site safe.
- Auto-scalable Plans: You don’t have to upgrade your plan just to deal with a sudden traffic growth; Rapyd Cloud auto-scaling eases the load for you.
- Rapid Support: 24/7 assistance with an average first response time of just under 46 seconds (personal best!).
Convinced Rapyd Cloud is the right choice? Then here’s how you kickstart the relationship with your new best friend:
- Login to the Rapyd Cloud account.
- Head over to the Rapyd Cloud website.
- Choose between the three offered plans (we have plenty of discounts!).
3. Creating a New WordPress Site
This is where things get serious, as you can now create a new WordPress-ready site with a few clicks.
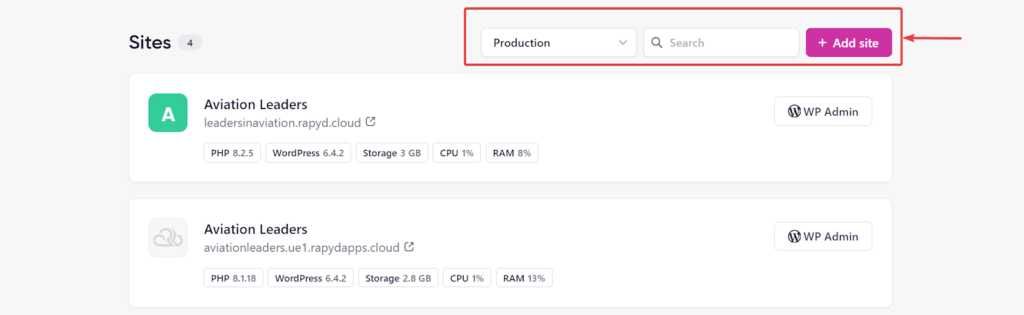
To do that, go to the Rapyd Cloud dashboard and click Sites.
- Click on Add Site.
- A modal will pop up, where you’ll be asked to select the plan you purchased and want to build your site on. Click Continue after choosing the plan.
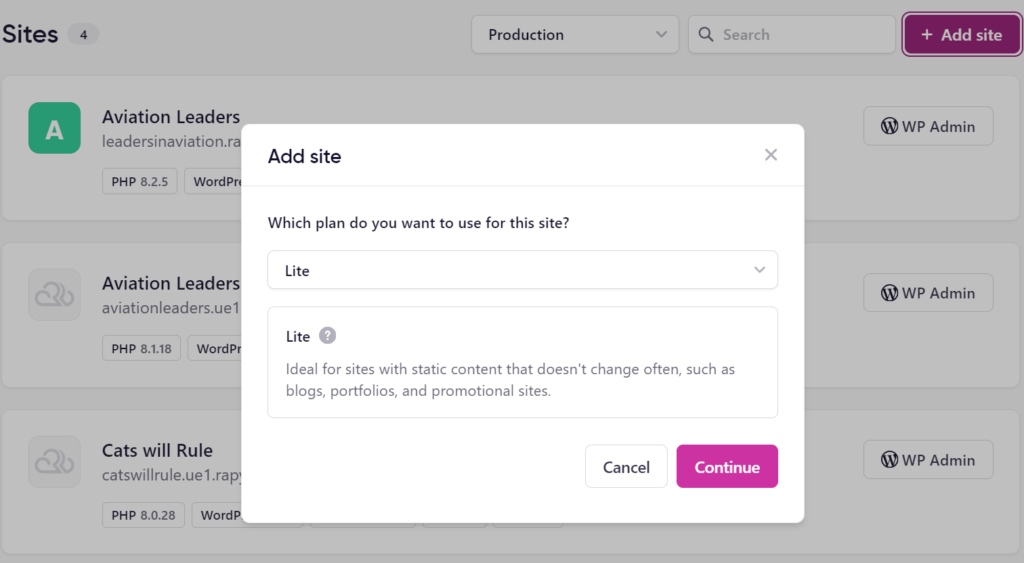
Quick note: In case all of your existing plans are linked to active sites or you don’t have a plan, an alternate pop-up will prompt you to buy a new plan.
- After that, you will be asked to provide specific information about your new site: site name and domain, location of your target audience, and the desired PHP version of your website. There’s also a checkbox you can tick if you need the mighty WooCommerce on your site.
The site domain name inserted here is only a placeholder for finding your website and won’t be connected to it. As for the PHP version, choosing 8+ is highly recommended.d.
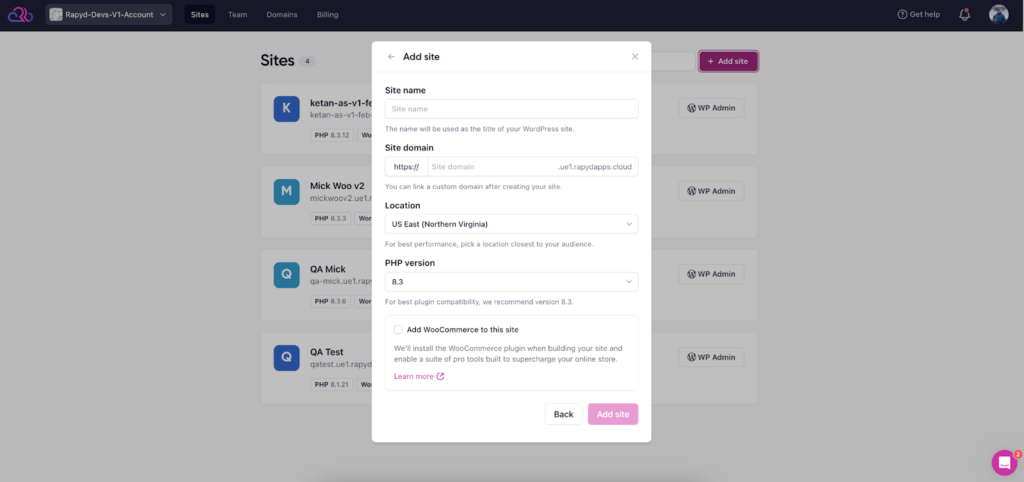
Once you’ve duly filled the necessary details, click on Add Site. You’ll have to wait a few minutes, as it usually takes a little bit of time to create the website at this stage.

4. Connecting Your Custom Domain to Rapyd Cloud
At this point, your site will be accessible through a default Rapyd Cloud subdomain or an IP address. For the ultimate professional look, though, you want to use the custom domain you registered already. Follow these steps:
- From the Rapyd Cloud dashboard, click on Domains.
A list of associated domains will appear. For your first domain setup, the page will be empty.
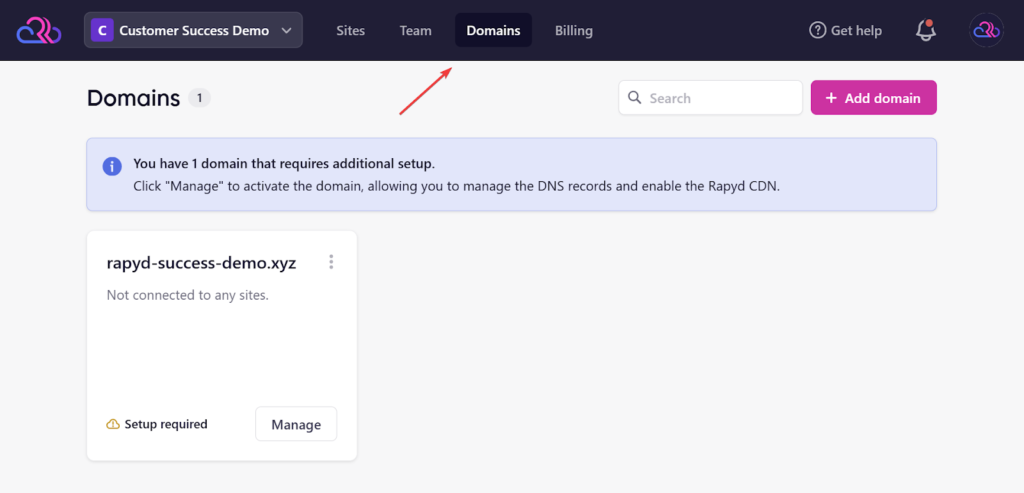
- 2. Click Add domain at the top right. In the popup, enter your domain name (example.com) and click on the Add domain button.
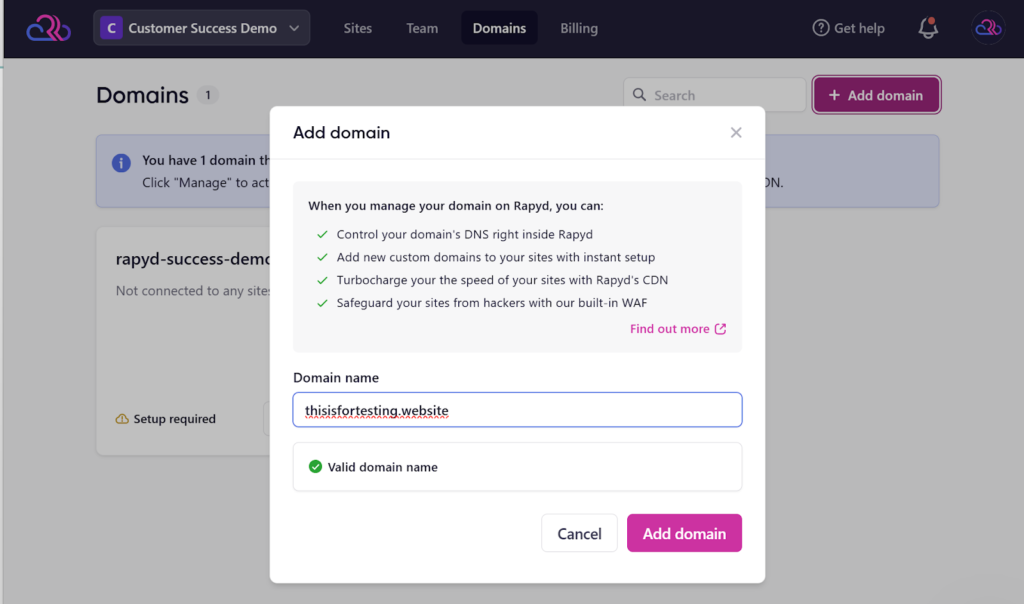
If all goes well (it should), you’ll be taken to the domain activation page with instructions for the next step.
You’ll see a management page for that domain when it gets added to the system.
3. For activation, update the nameservers through your domain registrar (e.g., GoDaddy, Namecheap, whichever you chose). You’ll have to go to your registrar account and find the domain’s DNS settings.
Replace the current servers with those provided by Rapyd Cloud and save your changes. Note that nameserver updates may take 10 minutes to several hours to propagate worldwide.
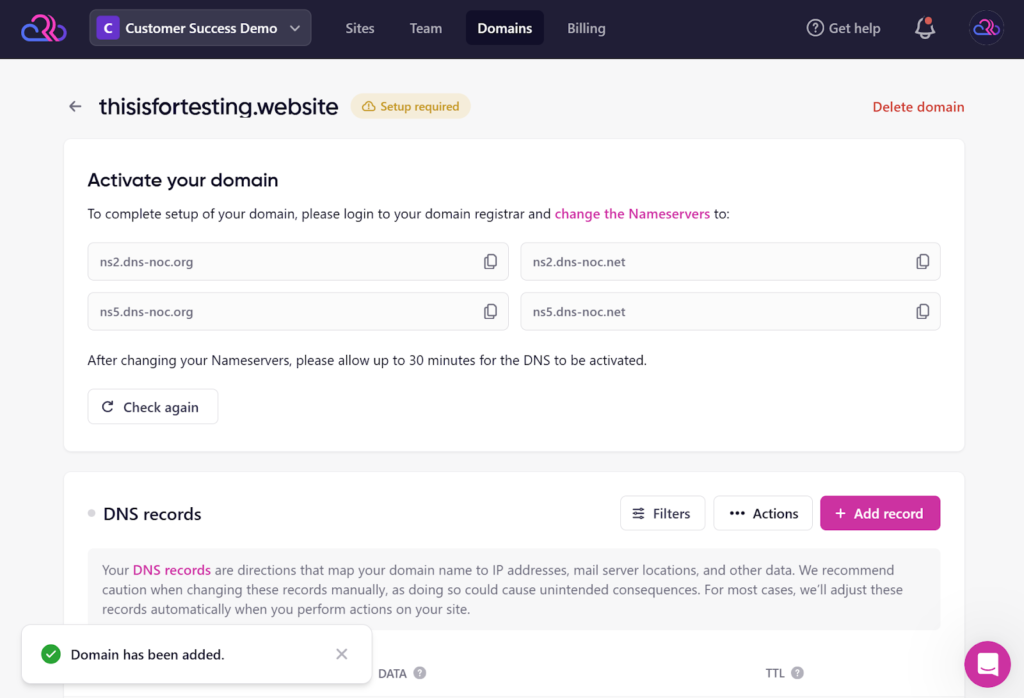
Do note that nameserver updates may take anywhere between 10 minutes to several hours to propagate worldwide. It is what it is.
4. When you’re done, return to the Rapyd Cloud dashboard and click Check again on the domain activation page.
If verification is successful, your domain will become Active.
Once active, you can manage all DNS records directly in Rapyd Cloud and use services like CDN and WAF (web application firewall).
5. Maintaining Site Security
Security is paramount, especially if you collect user data, offer e-commerce functionality, or simply want to appear online as a responsible business entity. The good news is that with Rapyd Cloud, you don’t have much to worry about in that regard, as we provide features like free SSL, WAF, and built-in malware protection on all sites. We’ve also partnered with Monarx and PatchStack to up the level of protection against malware and WordPress vulnerabilities.
Also Read: A Simple Look at SSL Certificate Errors and How to Fix Them
All of these security measures are then coupled with our first line of defense, Rapyd CDN, which also protects you from DDoS and cyber attacks.
However, if you decide to turn off any of our security features (which we urge you not to do), at least be a good sport and install a prominent security plugin like Wordfence or Security to keep your website somewhat protected.
6. Designing Your WordPress Website
WordPress has a functional but not so flashy default theme. If you have a few bucks to spare, try a paid theme, but if the budget is tight, you can also go for cool freemium themes like Astra, Blocksy, or Neve.
For this purpose, we’ll show you how to design a site using the popular Astra theme.
- Log in to the Rapyd Cloud dashboard and click on the WP Admin button to access the WordPress admin backend.
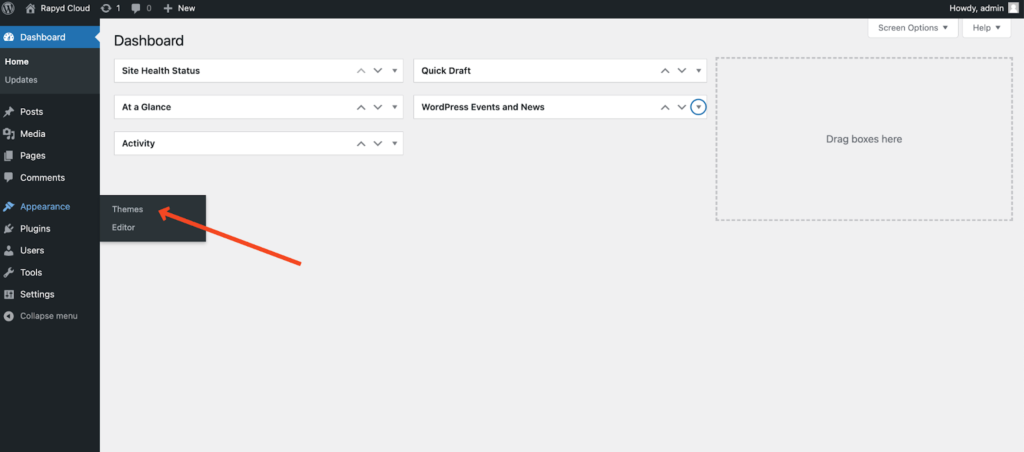
From the menu, click on Appearance > Themes.
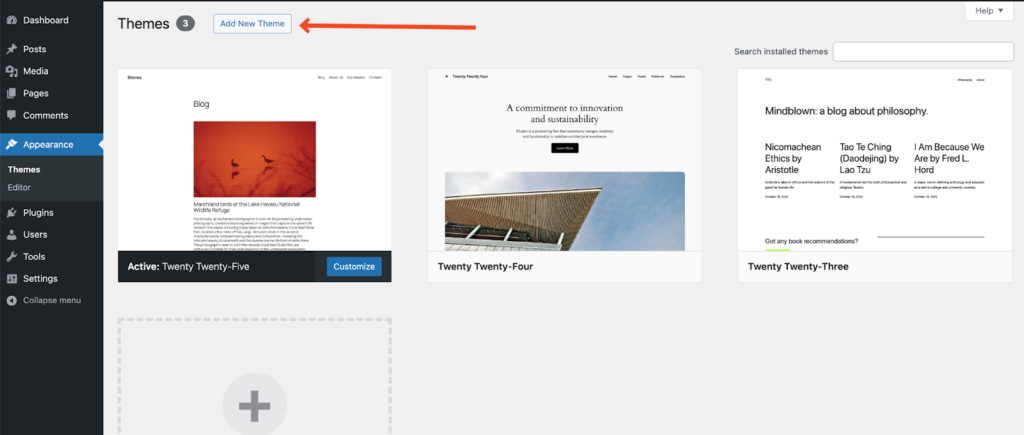
2. You have a few options here as you can use default WordPress themes, a third-party theme from the WordPress.org repository, or maybe upload a premium theme. For now, we will use the Astra theme from the WordPress.org repository.
For starters, click on Add New Theme.
3. Now search for the theme you want to install (Astra). Click on Install, then Activate.

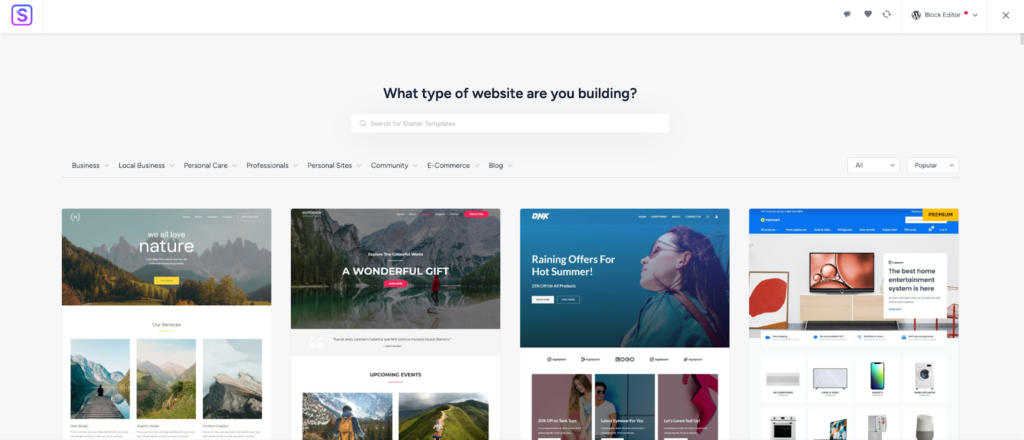
4. You can either design your entire website with a block editor from scratch or simply use one of the starter templates to get started. We’ll go for the latter option, so be sure to click on the Let’s Get Started with Starter Templates button.

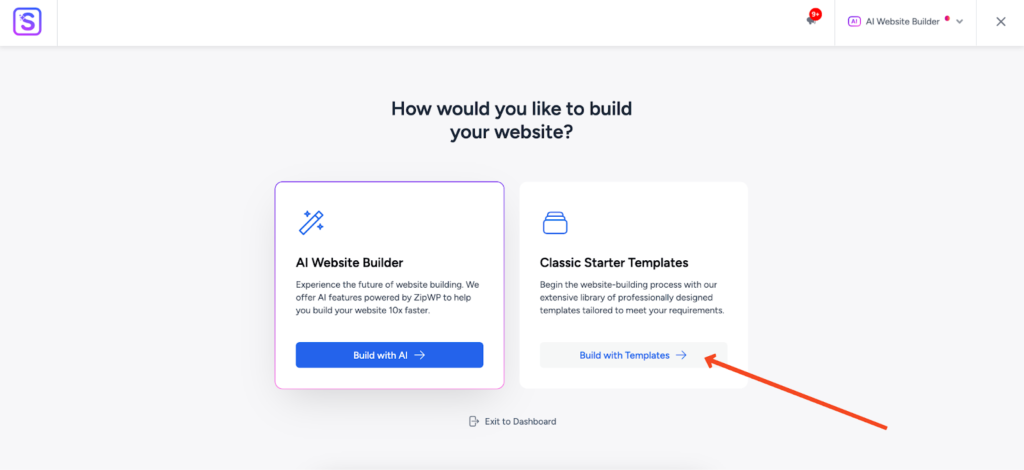
5. After activating the starter templates extension, you will have to choose between using the AI Web Builder or the Classic Starter Templates. Not that we’re old school, but we’ll go with Classics in this case.
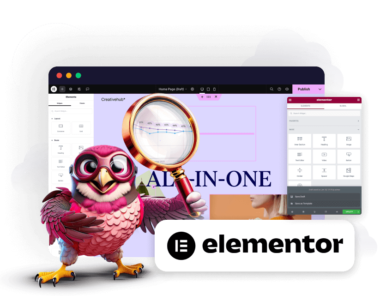
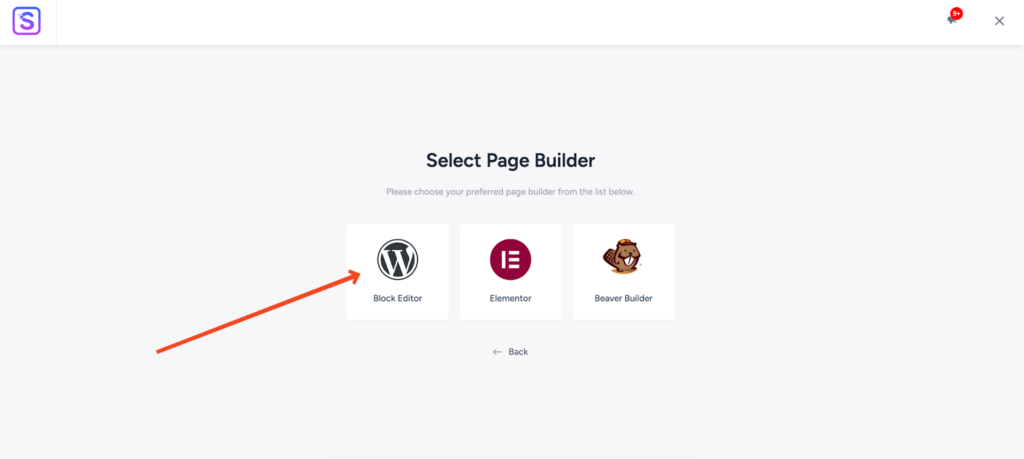
6. Next, you’ll have to decide if you want a page builder like Elementor or Beaver, or to build a Block Editor-based website. We chose the Block Editor here (maybe we are a bit old school).
7. The following screen will show a complete list of starter templates. Take a few moments and pick the one you like the most, then click Continue.
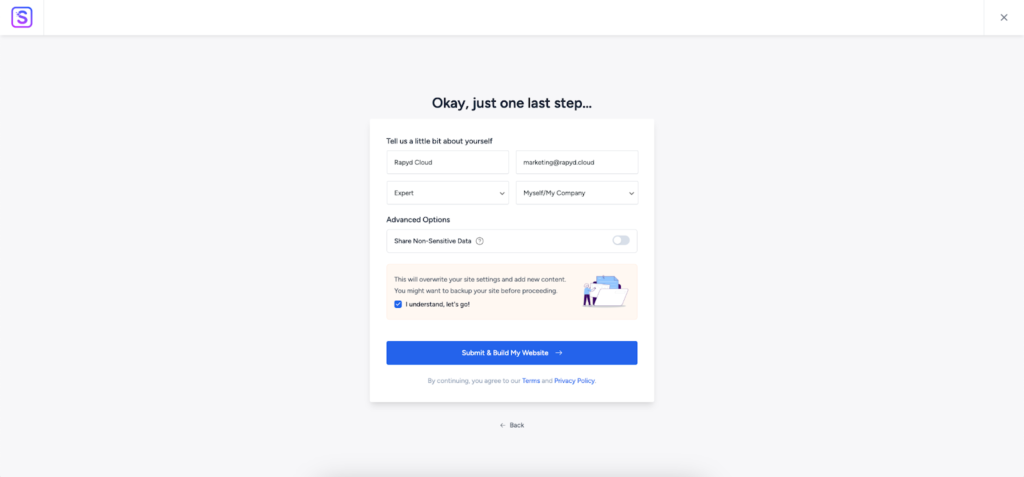
8. Fill in the relevant details and click on Submit & Build My Website. Again, you’ll have to exercise some patience as it will take some time to build your website. Once built, you can click on View Your Website to check how it looks.
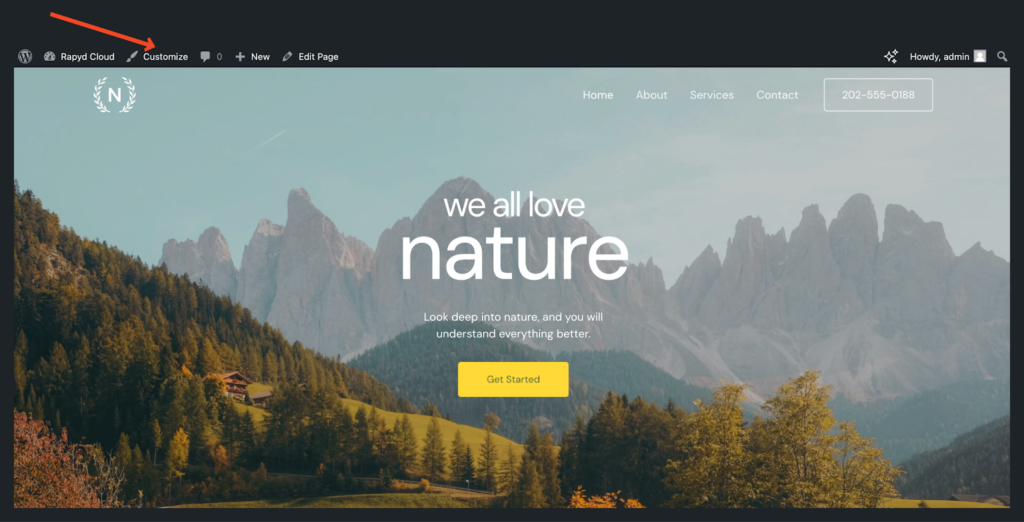
That’s it – your website is ready!
But wait, there’s more. You can click on Customize from the toolbar and further tweak each aspect of your website until everything is just right.
7. Finalizing and Launching
Nearly there!
All that is left is to do your homework before you go live so that everything is primed for prime time.
By that, we mean making sure all content is proofread and responsive, running a speed test, and checking SEO settings before you publish, share, and index your site to search engines and the world.
8. Shape Your Online Presence With Ease
Hopefully, we did a good job in showing that building a WordPress website on Rapyd Cloud is an incredibly straightforward process – even for complete novices who are about to be first-time website owners. From the registration of domain names and DNS records configuration to installing WordPress, every step is simplified so you can focus on what matters most: your website.
Now, the time has come to launch your website.
We wish your new site to be more than a digital address – may it be your foundation and voice to connect with a global audience.
Godspeed!
Frequently Asked Questions
How long does it take for my website to go live?
DNS changes can take up to 48 hours to spread over the internet. But usually, it is done within 10 minutes or so.
Do I need to buy an SSL certificate separately?
No, the free SSL certificate offered by Rapyd Cloud will be automatically activated.
What DNS records do I need to update for my domain?
Usually, you change a record to point to the Rapyd Cloud with our nameservers, which will be shown on the instructions after you add your domain.
Can I migrate an existing WordPress website to Rapyd Cloud?
Absolutely. Rapyd Cloud offers free migrations.
What if my site doesn’t load properly after updating DNS?
- Check Propagation: Check if the DNS records have changed globally using tools like WhatsMyDNS.net.
- Verify Records: Type the IP address or CNAME correctly.
- Wait a Bit: Change can take a while, though, so wait for a bit.
Also Read: TLS vs SSL: What’s the Difference?
Conclusion
Hope you understand till now that building a WordPress website on Rapyd Cloud’s managed WordPress cloud hosting is an incredibly simple process – even for complete novices in online publishing. From the registration of domain names and DNS records configuration to installing WordPress, every step is simplified so you can focus on what matters most: your website! How you shape your online presence.
If you’ve read this guide, and now it’s time to launch your website.
We wish your new site be more than a digital address. May this be your foundation, your voice, and a way to connect with a global audience.