The WordPress .htaccess file is one of the most powerful tools in a WordPress site owner’s toolkit. This file holds the key to optimizing website performance, securing your site, and controlling redirects. It is a hidden file with many mighty powers.
Whether you’re a seasoned developer or a beginner, understanding how to use the .htaccess file effectively can drastically improve the security and speed of your WordPress website.
In this blog post, you will learn everything you need to know about the WordPress .htaccess file and its functions.
What is a WordPress .htaccess File?
The .htaccess file (short for hypertext access) is a configuration file used by Apache web servers. In the context of WordPress, it plays a crucial role in controlling how your server responds to various requests.
At its core, .htaccess lets you:
- Control redirection rules
- Customize error messages
- Improve performance through caching and compression
- Secure your website by restricting access to certain files and folders
In a WordPress installation, this file is automatically generated when you configure permalinks. Even though it’s hidden, this lightweight file can significantly influence your site’s behavior.
If your site is hosted on an Apache server (which most WordPress hosts use), you’re already using .htaccess even if you haven’t touched it manually.
Why WordPress .htaccess File Matter?
WordPress relies on the .htaccess file mainly to control how the server handles requests and ensure that your website functions smoothly. This file is very useful for handling permalinks, redirecting traffic, increasing security, and optimizing speed. The following points briefly describe the functions of the WordPress .htaccess file:
- Permalinks: It configures URL rewriting to manage clean URLs, ensuring posts and pages are accessible via friendly links.
- Security: It helps block access to sensitive files like wp-config.php and xmlrpc.php, preventing unauthorized access.
- Performance: .htaccess can enable Gzip compression, browser caching, and other optimizations to improve load times and reduce server strain.
- Redirections: You can set up 301 redirects and prevent broken links when content is moved or deleted.
- Error Handling: It allows customization of error pages, such as 404, to improve user experience.
- Hotlinking Protection: Prevents others from using your images and files, saving bandwidth.
- Multisite: For WordPress Multisite, .htaccess handles network-wide URL rewrites.
How to Access the WordPress htaccess File?
Due to its operational importance, the .htaccess file is a hidden file inside the root directory of a WordPress installation, the same place where you can see the wp-config.php file. You will need an FTP/STF client or a file manager to unhide the .htaccess file. To access it:
- Using FTP Client: Connect to your website using an FTP client like FileZilla and navigate to the root directory.
- Enabling Hidden Files: If you do not see the .htaccess file, enable the option to view hidden files in your FTP client or File Manager.
How to Create a WordPress .htaccess File?
Sometimes, your WordPress site might not have a .htaccess file—especially on a fresh install or if it was deleted unintentionally. Luckily, creating one is easy.
Option 1: Let WordPress Generate It
- Go to Settings > Permalinks in your WordPress dashboard.
- Click Save Changes (even without making changes).
- WordPress will attempt to generate a default .htaccess file in the root directory.
💡 Note: Make sure your server allows WordPress to write to the root directory. If it doesn’t, you’ll need to do it manually.
Option 2: Create It Manually
- Open a plain text editor (like Notepad or VS Code).
- Paste the following default WordPress rules:
apacheCopyEdit# BEGIN WordPress
<IfModule mod_rewrite.c>
RewriteEngine On
RewriteBase /
RewriteRule ^index\.php$ - [L]
RewriteCond %{REQUEST_FILENAME} !-f
RewriteCond %{REQUEST_FILENAME} !-d
RewriteRule . /index.php [L]
</IfModule>
# END WordPress
Upload it to the root directory of your WordPress site using an FTP client or File Manager.
Save the file as .htaccess (make sure there’s no file extension like .txt).
How to Edit the .htaccess File in WordPress?
After making the .htaccess file visible, there are two ways through which you can edit the file:
- Download a copy for manual editing
- Use a WordPress .htaccess plugin (or SEO plugin)
Edit the WordPress .htaccess File Manually
For this method, you will need an FTP/SFTP client. Here’s how you can download and edit the file:
- After connecting your FTP client (FileZilla) with the server, navigate to the public_html folder
- In the top menu of the FTPZilla window, click on Server.
- Select Force showing hidden files, which will make .htaccess visible.
- Search for the file and download it.
- Save a backup copy before making changes.
- Open the file using a text editor like Notepad++.
- Make the necessary changes and save the file.
- Upload the modified file back to the server.
Use a WordPress Plugin to Edit the .htaccess File
The beauty of WordPress is that you can find a plugin for basically anything. There are two ways through which you can modify the .htaccess file:
- Using dedicated WordPress .htaccess plugins
- Using SEO plugins
Editing Using a WordPress .htaccess Plugin
If you are looking for a dedicated .htaccess editing plugin, you can use WP Htaccess File Editor by WebFactory.
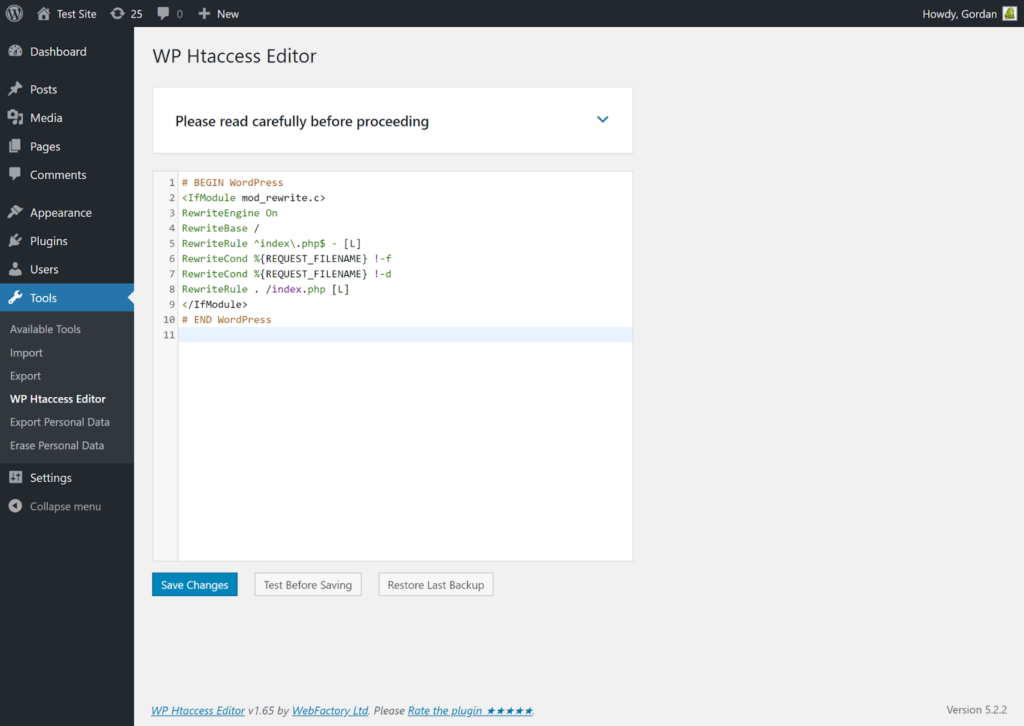
The WP Htaccess Editor plugin makes it easy to manage and edit your .htaccess file from inside the WordPress admin panel. It checks for syntax errors before saving changes to make sure the file is error-free.
Moreover, it creates backups of the file automatically whenever you make updates and stores it with timestamps for quick recovery.
If anything goes wrong and your site has problems, you can easily restore the backup through the plugin or FTP, reducing downtime and hassle.
Editing Using an SEO Plugin
The .htaccess file plays an important role in SEO operations. Therefore, the two most-used SEO plugins, Yoast SEO and All in One SEO, provide the ability to edit the .htaccess file.
Here’s how you can do it:
- Yoast SEO: From the left side of the WordPress dashboard, navigate to Yoast SEO > Tools > File Editor to edit .htaccess.
- All In One SEO: From the left side of the WordPress dashboard, go to All in One SEO > Tools > .htaccess Editor.
Using .htaccess File for Optimizing and Safeguarding Your WordPress Website
While there are many uses of the .htaccess file, we are covering how you can use it for:
- Security: Safeguard your WordPress site from unauthorized access and unlawful actions
- Optimization: Boost the performance of your website
- Control: Manage URL redirects efficiently
Securing a WordPress Site with .htaccess
The .htaccess file is an amazing tool for establishing access controls. Through this file, you can restrict access to sensitive files, block malicious IP addresses, and protect the wp-admin directory.
Restrict Access to WP-Admin
Using the .htaccess file to protect the wp-admin sounds like a simple task, and it works like a charm. Considering you will be making a small, yet significant change to the file, you should first save a copy. To restrict access to the wp-admin directory using the .htaccess file, you can add the following code:
<Files wp-login.php>

  order deny,allow

  deny from all

  allow from xxx.xxx.xxx.xxx

</Files>

<Directory /wp-admin>

  order deny,allow

  deny from all

  allow from xxx.xxx.xxx.xxx

</Directory>
Replace the xxx.xxx.xxx.xxx with an IP you want to allowlist. You can add multiple “allow from” lines for multiple IPs. This simple configuration can lock the backend, i.e. wp-login.php file and wp-admin directory, to anyone who comes from outside the authorized pool of IPs.
Block Access to WP-Content
The wp-content directory is an essential part of a WordPress website. It is the place where all the important files and PHP scripts are saved, including uploads, plugins, and theme files, etc. Sadly, hackers love to target this directory. The good news is that you can protect this important folder using the .htaccess file. Just add the following code to the file:
# Block access to specific wp-content subdirectories
<Directory "wp-content">
Order allow,deny
Deny from all
<Files ~ ".(jpg|jpeg|png|gif|css|js)$">
Order allow,deny
Allow from all
</Files>
</Directory>
However, a word of caution! By locking the wp-content directory, any type of writing activity is blocked. This means you might not be able to successfully install any plugins, updates, or other functionalities. Therefore, if you want to install anything, you should just remove the code and you are ready for action.
Prevent Directory Listing
Directory listing occurs when someone accesses a directory URL (e.g., yourwebsite.com/wp-content/uploads/) and finds a list of all the files contained within that directory. This can reveal sensitive data, like plugin files, backups, or other assets you don’t necessarily want publicly accessible.
By blocking directory listing, you keep your files from being found easily by hackers or people who shouldn’t be finding them.
It is a simple fix. Just add this code to your .htaccess file:
Options -IndexesPrevent Hotlinking
Hotlinking is a practice where third-party websites use your media URLs (mostly images) on their websites. Since the file is hosted on your server, you will end up paying for the bandwidth instead of the third-party website owner.
To prevent hotlinking, just add this:
# Disable direct access to image files from other domains

RewriteEngine on

RewriteCond %{HTTP_REFERER} !^$

RewriteCond %{HTTP_REFERER} !^http(s)?://(www\.)?yourwebsite.com [NC]

RewriteRule \.(jpg|jpeg|png|gif|webp)$ - [NC,F]
Replace “yourwebsite.com” with your own domain name. This code blocks the hotlinking of popular image files, including JPG, GIF, PNG, and WebP.
Optimize WordPress Performance Through .htaccess
You can improve the performance of your website by using the .htaccess file smartly. The .htaccess file allows you to apply performance-related optimizations such as caching, compression, and resource control, which reduce server load and improve user experience.
Enabling Gzip Compression
Gzip compression can reduce the size of your website’s files (such as HTML, CSS, JavaScript) by up to 70% before sending them to the user’s browser. Due to small file sizes, the website loading time improves, resulting in a boost in user experience. Faster loading speeds also give your SEO a competitive edge: search engines like Google prioritize websites that perform well, boosting your rankings and visibility in search results.
Here’s the code you need to enable Gzip compression:
# Enable Gzip compression

<IfModule mod_deflate.c>

    # Compress text files

    AddOutputFilterByType DEFLATE text/plain text/html text/css application/javascript application/json application/xml application/xml+rss text/javascript


    # Compress font files

    AddOutputFilterByType DEFLATE application/font-woff application/font-woff2 font/ttf font/otf

    # Exclude browsers that don't support compression

    BrowserMatch ^Mozilla/4 gzip-only-text/html

    BrowserMatch ^Mozilla/4.0[678] no-gzip

    Header append Vary: Accept-Encoding

</IfModule>
Enabling Browser Caching
Browser caching lets web browsers save certain files–like images, CSS, Javascript–locally on a user’s device for a defined period of time. When a user revisits, the browser serves the locally-stored copies, instead of downloading them again from the web server. This cuts loading times, minimizes bandwidth usage, and enhances the overall user experience.
Just add the following code to .htaccess file:
# Enable browser caching for images, CSS, JavaScript, and fonts
<IfModule mod_expires.c>
    ExpiresActive On

    # Default expiration time (1 year for most static files)
    ExpiresDefault "access plus 1 year"

    # Expiration times for specific file types
    ExpiresByType image/jpg "access plus 1 year"
    ExpiresByType image/jpeg "access plus 1 year"
    ExpiresByType image/gif "access plus 1 year"
    ExpiresByType image/png "access plus 1 year"
    ExpiresByType text/css "access plus 1 month"
    ExpiresByType application/javascript "access plus 1 month"
    ExpiresByType application/font-woff2 "access plus 1 month"
    ExpiresByType application/font-woff "access plus 1 month"
    ExpiresByType application/vnd.ms-fontobject "access plus 1 month"
    ExpiresByType font/ttf "access plus 1 month"
    ExpiresByType font/otf "access plus 1 month"
</IfModule>

# Set cache-control headers for static resources
<IfModule mod_headers.c>
    <FilesMatch "\.(jpg|jpeg|png|gif|css|js|pdf|swf)$">
        Header set Cache-Control "max-age=2592000, public"
    </FilesMatch>
</IfModule>
Minifying CSS and JavaScript (JS)
If you are not using a minifying plugin like Autoptimize, you can always use this code to minify CSS and JS in the .htaccess file:
<IfModule mod_deflate.c>

# Compress HTML, CSS, JavaScript, Text, XML and fonts

AddOutputFilterByType DEFLATE application/javascript

AddOutputFilterByType DEFLATE application/rss+xml

AddOutputFilterByType DEFLATE application/vnd.ms-fontobject

AddOutputFilterByType DEFLATE application/x-font

AddOutputFilterByType DEFLATE application/x-font-opentype

AddOutputFilterByType DEFLATE application/x-font-otf

AddOutputFilterByType DEFLATE application/x-font-truetype

AddOutputFilterByType DEFLATE application/x-font-ttf

AddOutputFilterByType DEFLATE application/x-javascript

AddOutputFilterByType DEFLATE application/xhtml+xml

AddOutputFilterByType DEFLATE application/xml

AddOutputFilterByType DEFLATE font/opentype

AddOutputFilterByType DEFLATE font/otf

AddOutputFilterByType DEFLATE font/ttf

AddOutputFilterByType DEFLATE image/svg+xml

AddOutputFilterByType DEFLATE image/x-icon

AddOutputFilterByType DEFLATE text/css

AddOutputFilterByType DEFLATE text/html

AddOutputFilterByType DEFLATE text/javascript

AddOutputFilterByType DEFLATE text/plain

AddOutputFilterByType DEFLATE text/xml

</IfModule>
Use .htaccess to Control Redirects in WordPress
The .htaccess file provides an excellent yet hassle-free way of creating URL redirects for any reason. You can use this file to temporarily or permanently redirect URLs, standardize your direct traffic to sa ingle www or non-www format, enforce HTTPS (or vice versa), manage 404 errors, and reroute traffic using REGEX queries.
Basic Redirects for URL Changes
Nobody wants to see error messages like “the requested url was not found on this server.” That’s why whenever you change the URL of a page, make sure to redirect it to the new link.
To create simple redirects from one URL to another, use the Redirect directive.
For example:
Redirect 301 /old-page https://www.yoursite.com/new-page
Note: 301 is the “code” for permanent redirection. If you want to redirect something temporarily, you can use 307.
Non-www to www Redirect (or Vice versa)
Using one format (www or non-www) helps prevent duplicate content, consolidates link equity, ensures consistent branding, and improves SEO. If you want to force the use of either the www or non-www version of your domain, you can use one of the following rules.
For www to non-www redirects, use this code:
RewriteEngine On

RewriteCond %{HTTP_HOST} ^www\.(.+)$ [NC]

RewriteRule ^ https://%1%{REQUEST_URI} [L,R=301]

For non-www to www redirects, use this code:

RewriteEngine On

RewriteCond %{HTTP_HOST} ^yourdomain\.com$ [NC]

RewriteRule ^ https://www.yourdomain.com%{REQUEST_URI} [L,R=301]
Force HTTPS Redirect
After using free SSL from Rapyd Cloud (or a third-party SSL certificate), you must include the following code in the .htaccess file for proper HTTPS redirection:
RewriteEngine On

RewriteCond %{HTTPS} off

RewriteRule ^ https://%{HTTP_HOST}%{REQUEST_URI} [L,R=301]
Handling 404 Errors
Error 404 basically indicates a non-existing URL. To properly handle 404 errors, you should create a dedicated 404 page and redirect traffic there. To redirect 404 errors, you can use this code:
ErrorDocument 404 /404-pageRedirect Specific Pages (Using Regex)
You can also use regular expressions to handle redirects with more complex patterns. For example, if you want to redirect any URL that starts with /product/ to a new base URL:
RewriteEngine On

RewriteRule ^product/(.*)$ https://www.yoursite.com/new-product/$1 [L,R=301]
How to Protect Your .htaccess File
Protecting your .htaccess file is absolutely critical because it serves as a powerful configuration gateway to your web server. This small but mighty file can control server behavior, URL redirects, password protection, and security policies for your entire website.
If left unsecured, malicious actors could gain access to it, potentially exposing sensitive server paths and authentication credentials or modifying server rules to create backdoors. A compromised .htaccess file could lead to a complete website takeover, data breaches, or defacement without leaving obvious traces of intrusion.
Put the following code in the .htaccess file to deny access:
# Deny access to hidden files - files that start with a dot (.)

<FilesMatch "^\.">

Order allow,deny

Deny from all

</FilesMatch>
Fixing Common .htaccess Related Issues
Because the .htaccess file controls such critical behavior, even a small error can cause major issues. Here’s a deeper look at the most frequent problems and how to resolve them.
1. 500 Internal Server Error
- This typically happens due to incorrect syntax, such as a missing character or miswritten directive in the .htaccess file.
- Fix: Restore the default WordPress .htaccess content or upload a working backup. If the issue persists, temporarily disable plugins to rule out conflicts.
2. Permalinks Not Working
- If your links return 404 errors, it’s often because the .htaccess file is missing or doesn’t contain the proper rewrite rules.
- Fix: Go to Settings > Permalinks in your WordPress dashboard and click Save Changes. This will regenerate a fresh .htaccess file.
3. Redirect Loops
- Conflicting or duplicate redirect rules—especially involving www, non-www, or HTTPS—can lead to endless loops.
- Fix: Review your .htaccess file and remove redundant redirects. Also, check your plugin settings (like SSL or SEO plugins) for overlapping rules.
4. 403 Forbidden Error
- Overly strict access restrictions or incorrect file permissions can prevent users from accessing certain pages.
- Fix: Review IP restriction rules in .htaccess and ensure your IP is allowed. Also, verify that file permissions are correctly set (typically 644 for files, 755 for directories).
5. Unable to Access Admin Dashboard
- If access is blocked to /wp-admin or wp-login.php, it’s likely due to IP filtering or misconfigured security rules in .htaccess.
Quick Tip: Always create a backup of your .htaccess file before making changes. One wrong character can take your whole site down—backups make recovery painless.
The Ultimate Optimization Powerhouse
Offering a wide range of benefits from performance optimization to enhanced security, the .htaccess is a powerful tool for any WordPress webmaster. Proper understanding and usage of this file can save you from installing too many plugins. However, due to its configurable nature, the file should be hardened with added security and multiple off-site copies.
Frequently Asked Questions
How to access WordPress .htaccess file?
There are two ways through which you can access the .htaccess file in WordPress:
Use a dedicated WordPress .htaccess (or in some cases, SEO) plugin.
Use an FTP/STP client (like FileZilla)
How to redirect http to https in WordPress using .htaccess?
Use the following code in the .htaccess file:
RewriteEngine On

RewriteCond %{HTTPS} off

RewriteRule ^ https://%{HTTP_HOST}%{REQUEST_URI} [L,R=301]
How to add a 301 redirect in WordPress .htaccess?
Edit your .htaccess file with this code:
Redirect 301 /old-page https://www.yoursite.com/new-pageIs WordPress .htaccess necessary?
The .htaccess file significantly enhances the capabilities of a WordPress site. It is essential for enabling pretty permalinks, which improve URL readability, and can also bolster security and performance through various configurations. While a basic WordPress installation can run without it, utilizing .htaccess is highly beneficial for optimizing site management and user experience.
How to redirect HTTP to HTTPS in WordPress without a plugin?
Yes. You can do it without using a plugin. You will have to edit the .htaccess file with the following code:
RewriteEngine On

RewriteCond %{HTTPS} off

RewriteRule ^ https://%{HTTP_HOST}%{REQUEST_URI} [L,R=301]